Hybrid Appliances
Register an on-premise appliance, download the signed agent for it from Aegis, and enrol it with a single-use token.
A hybrid appliance (a small server inside
your own network that runs the Aegis agent) lets connectors reach systems that
are not reachable from the internet. The appliance connects out to Aegis;
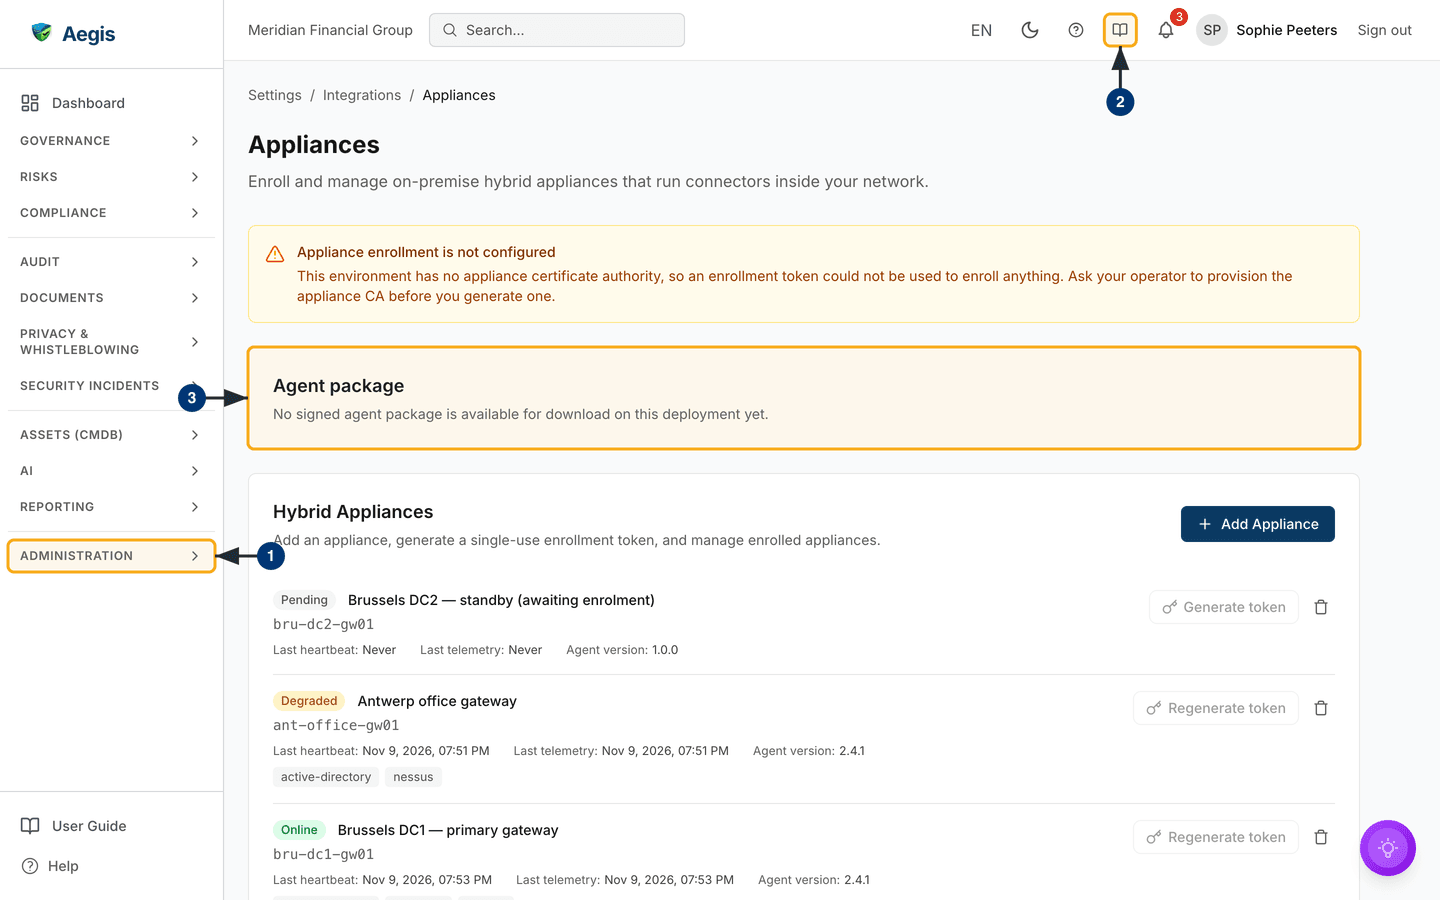
nothing in your network has to accept calls from outside. This screen,
Settings → Integrations → Appliances at
/settings/appliances, is where you register appliances, fetch the
agent package and hand each appliance the settings it needs to enrol. Each
appliance also has its own page, where you follow its health, send it jobs and
adjust its agent settings.
Who uses it
-
Only an Admin can open the
screen and the appliance pages behind it; any other role is sent to
/unauthorized. -
Adding an appliance and generating an enrolment token need the Hybrid
Appliance licence. Without it an amber banner reads "Hybrid Appliances is
not included in your plan" and those two buttons are greyed out, but you can
still see, revoke and remove the appliances you already have. The
Hybrid Appliancescard on the Integrations tab of Settings stays visible with a licence badge, so an unlicensed organisation can still reach its fleet. - Enrolment also needs an appliance certificate authority (the service that issues each appliance its certificate) on your Aegis deployment. Your operator provisions it; it is not something you set up on this screen.
-
The appliance list is served by the Assets (CMDB) module. If that module is
not switched on for your organisation, the list cannot load and shows
"Failed to load appliances" with a
Retrybutton.
What's on this screen
Under the breadcrumb Settings / Integrations / Appliances sit the
title Appliances and a one-line description. Below them, up to two
amber banners can appear. The licence banner described above shows when the
Hybrid Appliance licence is missing. The banner "Appliance enrollment is not
configured" shows when the deployment has no appliance certificate authority: it
explains that a token could not be used to enrol anything and asks you to have
your operator provision the appliance CA first. The captured screen shows this
second banner, which is why its token buttons are greyed out.
Two cards then fill the page. Agent package offers the signed agent
for the first installation on your appliance server.
Hybrid Appliances carries Add Appliance at its right
and lists every registered appliance, one per row:
-
A status chip:
Pendinguntil it has enrolled, thenEnrolling,Online,Offline,Degraded,UpdatingorError. The captured screen shows a pending, a degraded and an online appliance. - The display name, which is a link to the appliance's own page, and below it the technical name.
-
Last heartbeat,Last telemetryandAgent version. An appliance that has never reported showsNever. - Grey chips for the capabilities the agent reports, such as the connectors it can run, when there are any.
- A certificate chip when attention is needed: amber "Certificate expires in … days" as the expiry approaches, red "Certificate expired" once it has passed.
Each row ends with Generate token (on an enrolled appliance,
Regenerate token) and a bin icon. With nothing registered, the list
reads "No appliances yet". The list shows up to 100 appliances on one page, with
no paging controls.
-
Open
Administrationin the sidebar and selectSettings. On theIntegrationstab, select theHybrid Appliancescard. The Appliances screen opens. - To read this chapter while you work, select the book icon in the top bar. The User Guide opens at the page for the screen you are on.
-
Read the
Agent packagecard. When a signed release is available, it names the agent version and lists each package file with its.sha256and.sigfiles beside it. The download comes from your own Aegis tenant, which checks the package's checksum and signature before serving it. Where no release has been published for your deployment yet, as on the captured screen, the card reads "No signed agent package is available for download on this deployment yet."
Registering an appliance
-
Select
Add Appliance. A dialog asks for aName— lowercase letters, digits and hyphens, 3 to 63 characters, starting and ending with a letter or digit, for exampledc1-appliance-01— and an optionalDisplay name. A name that breaks the rule is refused under the field before anything is sent. -
Select
Create. The dialog closes, "Appliance created" confirms it, and the appliance joins the list asPending. -
Select
Generate tokenon the appliance's row to open the enrolment dialog, described below. When the licence or the appliance certificate authority is missing, the button stays greyed out, and hovering over it says which of the two is lacking.
Installing the agent
Download the package together with its .sha256 and
.sig files. Before installing, run sha256sum -c on the
.sha256 file and verify the .sig signature with the
Euraika public key, as the customer guide that comes with the agent explains.
You need this download only for the first installation: once enrolled, the
appliance fetches later updates itself over its secured connection, and only
versions published for your tenant are offered to it.
Enrolling an appliance
Generate token opens Enrollment token — followed by
the appliance's name. No figure is shown here because the token on screen is a
live secret.
-
Copy the token straight away with
Copy token. The amber note says why: it is shown only once and cannot be retrieved again. The line below it gives the expiry — a token is valid for 24 hours and can be used once. -
Check the two addresses the agent needs.
Runtime endpointis the appliance host the agent talks to after enrolment, using its certificate.Enrolment endpointis the main Aegis address, used once for the token enrolment, because the agent has no certificate yet. The dialog also shows theAppliance IDandTenant ID. -
Select
Copy settingsto copy theAgent settingsblock — the two endpoints, the token, both ids and the state directory — and paste it into the agent's environment file on the appliance server. Restart the agent, then selectClose.
Once the agent has enrolled, its chip in the list changes from
Pending, and the heartbeat, telemetry and agent version start to
fill in.
Anyone holding an unused token can enrol a machine as this appliance until it expires. Paste it only into the agent's settings file, never into a ticket or chat. If it may have leaked, generate a new token.
The appliance's own page
Select an appliance's name in the list to open its page. The header repeats the
status chip, last heartbeat, last telemetry and agent version, and
Back to appliances returns to the list. Six tabs sit below; each
one can be linked to directly. No figure of this page was captured for this
edition of the guide.
-
Overview— the identifier, registration date, update channel, whether automatic updates are on, and the reported capabilities. ItsCertificatecard shows the state (Valid,Expiring soon,ExpiredorRevoked), when the certificate was issued, when it expires and the days remaining. An appliance that has not enrolled readsNot enrolled, with a link back to generate a token. -
Telemetry— CPU, memory, disk, uptime, connection state and pending or running jobs, with a chart of resource use over the last hour, 24 hours or 7 days, andExport CSV. Until the agent reports, it reads "No telemetry yet". -
Jobs— the work sent to the appliance, filterable by status, withExport CSV.Dispatch jobopens a dialog for the job type, an optional JSON payload, a priority and a timeout. It needs the licence and an enrolled appliance with a valid certificate; otherwise it is greyed out, its tooltip says why, and on a licensed but unenrolled appliance a note links back to generate an enrolment token. -
Alerts— health alerts filterable by status and severity.Acknowledgeappears on an active alert andResolveon any alert not yet resolved; neither needs the licence. -
Updates— the current and last installed agent versions and any published updates. This tab is read-only: approving, scheduling and installing updates are not yet available here. Where no update has been published, it reads "No update source configured". -
Settings— the agent's configuration in sections for updates, telemetry, alerts, connectivity and logging. Only automatic updates, the update channel, the telemetry and heartbeat intervals and the log level can be changed today; the other fields are greyed out, and a note explains that they are stored but no agent release reads them yet.Save changesneeds the licence.
Revoking or removing an appliance
The bin icon at the end of a row acts according to the appliance's state. On a
Pending appliance it is Delete: the registration was
never used and is removed. On an enrolled appliance it is Revoke:
its certificate is invalidated and it is disconnected, but the entry stays so
you can enrol it again with a new token. Both ask for confirmation first and
work without the licence, so a fleet can always be wound down.
Tips and limits
- The agent renews its certificate by itself in the last 30 days before it expires. An appliance whose certificate has expired can no longer authenticate: revoke it and enrol it again with a new token.
- Generating a new token for an appliance replaces any unused earlier one.
- Do not generate a token while the "Appliance enrollment is not configured" banner shows; the button is greyed out for that reason, because such a token could never be used.
- This screen has no AI assistance; every appliance is registered and enrolled by a person.
Where this connects
- Settings — the other administration screens.
- Connectors — the integrations, some of which an appliance can run inside your network.
- Assets (CMDB) — the module the appliance list belongs to.
- Audit log — where enrolments, revocations, package downloads and installed updates are recorded.