The Workflow Editor
Every saved workflow opens onto its own full-screen canvas — this chapter walks that editor in detail: the toolbar, the node library, the two faces of the right panel, and how to read a run.
The Workflows chapter covers the list at
/automation/workflows, creating a workflow, the statuses and the
import/export round trip. This one goes deeper into the screen you spend the
time on: the editor at /automation/workflows/<id>, where the
logic is actually drawn. It is a three-panel screen — node library on the left,
canvas in the middle, a context panel on the right — under a toolbar that
carries the workflow's name, status and actions.
Who uses it
-
Viewer and
Contributor can open the
editor and read everything, including the run history, in a view-only mode.
A blue
View onlypill sits beside the status, and a notice under the toolbar reads "You can view this workflow but not change it. Ask a manager or administrator to edit it." The name and status are plain text, the node library is not offered, and theSave,Export,TestandRunbuttons are not shown. The server refuses their saves, tests and runs as well. - Manager and Admin edit, save, test, export, activate and run. The Workflows module and the Workflow Automation licence feature gate the whole area, as described in Workflows.
What's on this screen
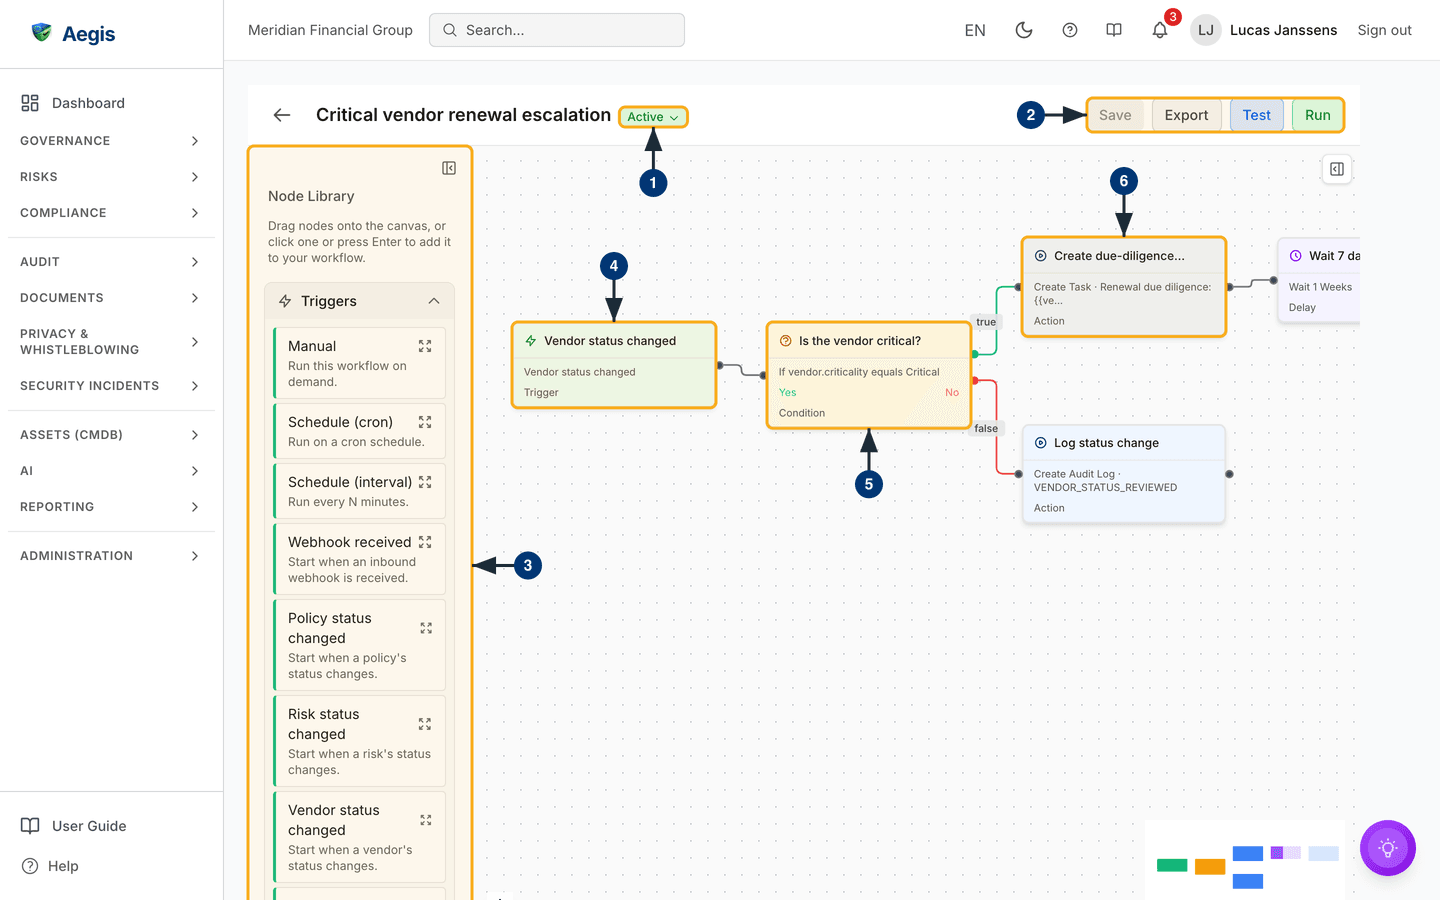
The captured screen shows a Manager's view of an active demo workflow that reacts to a vendor status change: it asks whether the vendor is critical, creates a due-diligence task and then waits on the "yes" side, and writes an audit-log entry on the "no" side.
-
The toolbar starts with a back arrow to the list, then the workflow's name —
select the name itself to rename it in place — and the status chip
(
Draft,Active,PausedorArchived). The chip is a dropdown: changing status happens here, not on a separate button row. It offers only the moves the current status allows —Activate,Pause,Set to DraftandArchive. An active workflow whose drawing no longer passes validation shows an amberNeeds attentionchip instead of a greenActiveone. -
The action buttons sit at the right:
Save,Export,TestandRun. Beside them the editor reports on itself — aSaving...orUnsaved changesindicator, and a red count such as2 errorsthat opens theValidation Errorslist.Saveis greyed out while there is nothing unsaved, as on the captured screen.Teststays disabled while there are validation errors, andRunstays disabled until the workflow isActiveand valid — hover over either to see why. -
The left panel is the
Node Library— "Drag nodes onto the canvas, or click one or press Enter to add it to your workflow." — in three collapsible groups:Triggers,ActionsandLogic. Each entry shows its name and a one-line description, such asManual— "Run this workflow on demand." -
The centre is the canvas. Each node is a card summarising its own
configuration — or warning it is not configured yet — with its kind
(
Trigger,Condition,Action,Delay) at the foot. Every drawing starts from one trigger card; drag from the handle on one node to the next to connect them. -
A condition card spells out its test in words, such as "If … equals …", with
a green
Yesand a redNohandle. The connections leaving it are labelledtrueandfalseon the canvas, so each branch can be followed by eye. -
Action and delay cards follow the branches. An action card names its type
and its key setting — for example
Create Taskwith the task's title, orCreate Audit Logwith the logged action — and a delay card shows how long it waits. A minimap in the bottom-right corner and zoom controls in the bottom-left help with large drawings.
The details panel
The right panel follows your selection. With nothing selected it shows
Workflow Details: the description, the node and connection counts,
the Run timeout (minutes) field, and when the workflow was last
updated. Both side panels can be hidden (Hide node library,
Hide details panel) and shown again; below 1,536 pixels of screen
width the details panel lies over the canvas and starts hidden. That is why the
captured screen shows only the small Show details panel
button at the top right of the canvas. Selecting a node opens the panel again
even if you hid it.
Below the details, Recent Runs lists the run history with a
Refresh control — No runs yet on a fresh workflow.
Select a node on the canvas and the whole panel becomes
Node Configuration instead.
Configure the trigger
A workflow has exactly one trigger — the node the run starts from. Drag one in
from
Triggers and select it: the right panel becomes
Node Configuration, with the node's Label, its type,
and the fields that type needs.
-
Manual— "Run this workflow on demand." A person selectsRun, or the run API is called. -
Schedule (cron)takes a cron expression and a timezone;Schedule (interval)runs every N minutes. -
Webhook receivedstarts when an inbound webhook arrives — the URL is generated once the workflow is saved. The saved trigger then shows theWebhook URLwith a copy button, and an optional event type that limits the workflow to deliveries carrying that event. Deliveries are posted as JSON and signed with HMAC-SHA256: until you selectGenerate signing secretthe endpoint rejects every delivery. The secret is shown only once, so copy it then;Rotate signing secretreplaces it immediately, and deliveries signed with the old one stop working. -
The entity triggers —
Policy status changed,Risk status changed,Vendor status changed,Control status changed,Procedure status changed,DSR status changedandDPA status changed— react to a status change on the named record type, optionally only for one status; left blank, any status change starts a run.Evidence expiring soontakes aDays before expirythreshold.Incident createdandIncident severity changedstart a run for a new incident or a changed severity, optionally only from aSeverity at leastlevel upwards — see Workflows for how the threshold is applied.Incident flagged significantstarts a run once, when an incident is marked as a NIS2 significant incident; theNIS2 Incident Notificationtemplate is built on it. -
The remaining event triggers need no settings:
Framework enabledandFramework disabled(a compliance framework is switched on or off),DSR created(a data subject request is submitted — optionally only for one request type, such as erasure),Consent withdrawn,Breach confirmed(an incident is confirmed as a data breach) andEmployee offboarded(an HR sync detects a departing employee). To narrow one of these further, follow it with aConditionnode.
Schedules are started by a background job, Webhook received by
a call to the workflow's webhook address, and the entity and incident
triggers by the change happening in Aegis — but only for a workflow whose
status is Active. A draft or paused workflow ignores its
trigger.
Add actions and logic
-
Drag an action in and configure it from its
Action Typedropdown:Send Email(recipients — several may be separated by commas or semicolons — subject, body),Send Webhook(URL, method, headers),Send Teams Message,Send Notification(an in-app notification), a status-setter for a policy, risk, vendor, control, procedure, data subject request or incident,Create Task(an action item with title, description, due date and owner),Create ticket(a follow-up ticket for the incident in Jira or ServiceNow, through the connector),Create DSR(open a data subject request for a person),Assign Owner,Create Audit Log,Enqueue JoborApproval Gate(pause for human approval). -
Use
ConditionfromLogicto branch on a field–operator–value test. A condition node has two outgoing handles — yes and no — and both must lead somewhere before the workflow validates. Chain condition nodes for compound logic. -
Use
Delayto wait — a fixed duration in minutes, hours, days or weeks, or until a date and time. The "until" date is fixed: values from the triggering record, such as a due date, cannot be used there. Text fields elsewhere accept placeholders in double braces, such as{{nis2NotificationDue}}in a task's due date; a value the run does not supply stays in the text as typed. - Watch the red error count as you build. It names what is missing — an unconfigured node, a dangling branch — and the workflow cannot be activated until the list is empty.
To remove a node, hover over its card and select the bin icon, or use the delete
control in
Node Configuration; both ask you to confirm in a
Delete Node dialog, because the deletion is saved within seconds. A
connection shows its own Delete connection button when you hover
over or select it. A selected node or connection can also be removed with the
Backspace or Delete key.
Test, run and read the history
-
Testchecks the configuration without running anything: it confirms the workflow has one trigger, that every connection leads somewhere, that every node can be reached from the trigger with no loops, and that each node's required settings are filled in and valid. No step is carried out, so it sends no email, changes no record and does not evaluate conditions against real data. It reports passed or failed with any errors and warnings, each offering a jump to the node concerned. To see what the workflow actually does, useRun. -
Runstarts a real run of anActiveworkflow. The run's detail opens straight away, and the run lands at the top ofRecent Runswith its status and when it was queued. -
Open a run to see the detail: when it was queued, started and completed, the
trigger type, any error message, and a node-by-node breakdown with each
node's status, input and output — the first place to look when a workflow
did not do what you expected. A step marked
SKIPPEDwas not run because a step it depends on failed; independent branches still run.Re-run Workflowrepeats the workflow from here.
Test, Run and Export each save any
pending change first, so they always work on the drawing you can see; if that
save fails, they stop and say so.
Failed runs say why in red on the run card itself — for example a run that could
not even be queued. That message is the difference between "the logic is wrong"
and "the logic never got to start", so read it before editing the drawing. A run
that stays active longer than the workflow's
Run timeout (minutes) is stopped and marked TIMED_OUT,
with the reason in its detail; time spent waiting in a Delay or for
an approval does not count towards the limit. The timeout accepts a whole number
of minutes from 1 to 44,640 (31 days).
Workflows shows a run with a skipped step.
Tips and limits
-
Canvas edits save themselves about two seconds after you stop, with
Saving...shown meanwhile;Savewrites immediately. Either way, wait for the indicator to clear before closing the tab — a pending change is lost. -
An
Activeworkflow only saves changes while its drawing is valid. If an edit breaks validation, a red banner says so and the change stays unsaved; fix the errors, or pause the workflow to keep editing. -
Exportproduces the workflow as JSON — useful as a backup before a big edit, or to copy a workflow between environments withImporton the list page. Webhook addresses and credential headers are masked in the export, so fill them in again before an import is accepted. The export dialog shows the JSON withCopy to ClipboardandDownload, and warns when the workflow could not be imported again as it stands. -
A run acts with the workflow's own authority, not the presser's. Use
Pausefor a workflow you may want back: a paused workflow can be activated again or set back to draft.Archiveis final — an archived workflow cannot be reactivated.
Where this connects
- Workflows — the list, creating a workflow, statuses, import and export.
- Auto-Incident Rules — the other automation surface, turning connector events into incidents.
- Connectors — where Teams, webhook, email, Jira and ServiceNow delivery are configured.
- Audit Log — where workflow changes and runs leave their trail.