CMDB and machine inventory
A compliance-focused register of the machines your organisation operates, with each asset tied to the risks, incidents and change history that depend on it.
CMDB stands for configuration management database — a record of the technology assets you run. It does not replace a full IT operations tool; it gives the compliance team a curated view of the machines that matter for security and audit work, so you can answer questions such as “which machines carry an open risk?”. You build the register by hand, or pull computer accounts in from Active Directory (a Microsoft directory of users and machines) where your operator has configured a connection.
Who uses it
What you can do here follows your role, and the header buttons change with it.
-
Viewer — browse the inventory
and read every tab. No adding, editing or deleting; but a Viewer holds the
export right, so the
Exportbutton is the one header button a Viewer sees, and ticking rows offers anExportaction too. The sidebar'sCMDBentry is shown to every role, so a Viewer opens the list from the menu like everyone else. -
Contributor — everything a
Viewer can do, plus add a machine, edit it and change its status. No delete
and no directory import — which is why the Contributor view below carries
two header buttons,
ExportandAdd Machine, not three. -
Manager and
Admin — the same rights, plus
the
Import from ADbutton for the Active Directory import, andDeletein the bulk-actions toolbar.
What's on this screen
Opening /cmdb sends you straight to the machine list at
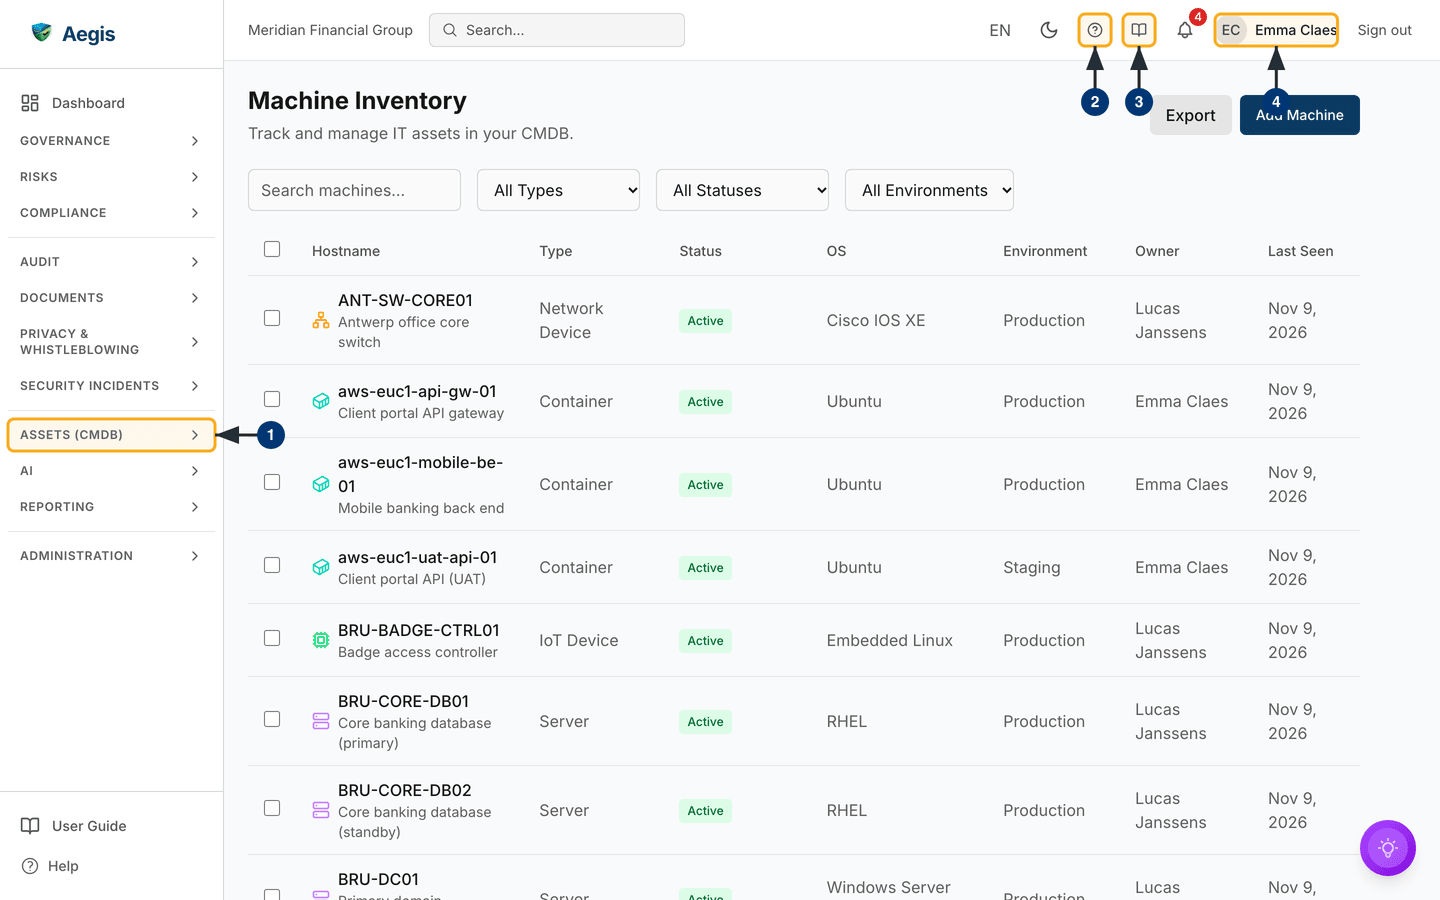
/cmdb/machines, headed Machine Inventory with the
subtitle “Track and manage IT assets in your CMDB.” The header's right carries
the action buttons — in the Contributor view below, the grey
Export and the dark blue Add Machine. For a Manager or
an Admin, a grey Import from AD button sits between them.
Under the header sits the filter bar: a Search machines… box, then
the All Types, All Statuses and
All Environments dropdowns. There is no separate search button: the
list filters itself a moment after you stop typing, and each dropdown applies as
soon as you change it. Search matches the hostname, the full network name (FQDN)
and the display name. The status dropdown offers Active,
Inactive, Maintenance, Decommissioned and
Unknown. The environment dropdown is built from the environments
already recorded on your machines, so it is absent while none carry one.
The table opens with a select checkbox, then Hostname,
Type, Status, OS,
Environment, Owner and Last Seen. Each
hostname cell carries a type icon and, underneath, the display name; a coloured
badge marks the status. Below the table, a line such as “Showing 1 to 20 of …
machines” sits opposite Previous, the page count and
Next — the list pages twenty rows at a time. Selecting a row opens
a detail panel from the right; ticking checkboxes reveals a bulk-actions toolbar
above the table. A round assistant button floats at the bottom right of the
page.
The captured screen shows a mixed estate: a network switch, container hosts, an
IoT badge controller and database servers, all Active, mostly in
Production with one in Staging, each with an owner and a
Last Seen date. A tenant with no machines shows “No machines
registered. Add your first machine to get started.” instead of the table; a
filter that hides everything gives “No machines match your search criteria.” If
the list cannot load, a banner reads “Could not load the machines. Please try
again.” with a retry control.
Open the machine inventory
-
In the left sidebar, open the
ASSETS (CMDB)group — belowSECURITY INCIDENTS— and selectCMDB. TheMachine Inventorylist opens. The group also holds Software, Information Assets, CMDB Services, External Services and SBOM. It starts collapsed, and stays open or closed as you left it. - The circled “?” in the top bar opens the help panel, which slides in with topics for the screen you are on and a search box. The global search box, the language selector and the light/dark toggle sit to its left.
- The open-book icon beside it opens this User Guide at the chapter for the current screen.
-
Your initials and name sit at the far right; selecting them opens your
profile page, and
Sign outsits beside them. If the header carries noAdd Machinebutton, you are signed in as a Viewer and this screen is read-only for you.
Add a machine by hand
Use this for a single asset — a new server, or a machine your directory does not cover.
-
Select
Add Machine. A dialog headedAdd New Machineopens over the list. -
Enter the
Hostname. It is the only field that blocks the dialog; leave it empty and the form reports “Hostname is required”.Typeis also marked required, but arrives pre-set toWorkstation. Each hostname can appear only once in the register; Aegis does not save a second machine with a hostname already in use. -
Add the optional
FQDN(the full network name) and a friendlyDisplay Name, which appears under the hostname in the list. -
Choose the
Type— Workstation, Laptop, Server, Virtual Machine, Container, Network Device, Mobile, IoT Device, Medical Device or Other. It sets the icon beside the hostname. ChoosingMedical Deviceadds aMedical device detailsgroup:MDR class(Class I,IIa,IIborIII, orNot classified),Manufacturer,End of supportandNetwork segment. The detail panel shows them again and marks a deviceOut of supportonce its end-of-support date has passed. The NEN 7510 hub counts these devices and opens this list already filtered toMedical Device. -
Pick the
Operating Systemfrom the list (Windows, Windows Server, Ubuntu, RHEL and macOS builds), or choose “Custom (enter manually)”, which reveals a text box. Add anOS Versionif you know it. -
Set the
Environment— Production, Development, Test, Staging, QA or Custom — then fill inLocation,Department, anyIP AddressesandMAC Addresses(one per line or comma-separated), comma-separatedTagsand free-textNotes. -
Select
Add Machineat the foot of the dialog. It closes and the machine appears in the list with the statusActive. The form has no owner field: you become the machine's owner.
Import machines from Active Directory
Where your operator has set up a directory connection that syncs computer
objects, a Manager or an Admin can pull those machines in. The
Import from AD button is shown only to those roles. This reads the
accounts that connection has already synced into Aegis; it is not a spreadsheet
upload.
-
Select
Import from AD. A dialog headedImport from Active Directoryopens on the connection step. -
Choose one of the connections listed — only those switched on and set to
sync computers appear, each showing its directory base (or Entra tenant) and
the date it last synced. Where there are none, the dialog reads “No AD
connections available” and offers a
Configure AD Syncbutton, which opens the Active Directory connector. -
Select
Preview Import. Aegis reportsTotal Found,New MachinesandWill Update, then lists the first ten objects, each taggedNeworUpdate. Two kinds of object are taggedWill be skippedinstead and counted under that heading rather than as importable: a computer that matches a machine deleted from the CMDB (“This machine was deleted from the CMDB; the import does not re-create it”), and a computer whose hostname already belongs to a machine linked to a different directory computer. Nothing is written yet —Backreturns you to the connection list. -
Select the import button, which names the count — for example
Import 24 Machines. A progress step runs and the dialog stays open until it finishes. -
The dialog then shows “Import Complete!” with counts for
Created,UpdatedandSkipped. Where a machine you added by hand had the same hostname as a directory computer, a line says how many existing machines were linked to their AD computers by hostname — they are updated, not duplicated. A warnings line counts any object that was not imported and lists the first three with the reason. SelectDone; the list refreshes and each imported machine carries a “Synced from Active Directory” banner on its overview.
The import matches on the directory object, so re-running it updates the
machines it created before rather than duplicating them. It writes hostname,
FQDN, display name, type, status (Active for an enabled computer
account, Inactive for a disabled one), operating system and
version, department and Last Seen, overwriting your edits to those
fields each run. Environment, location, notes, tags, owner and addresses are
left alone — record local knowledge there.
Directory connections are set up in
Connectors, which is also where the
View source link on an imported machine takes you, and where
the dialog's own Configure AD Sync button takes you — so add or
amend a connection there and switch on computer syncing.
Read a machine's full record
Selecting a row opens a panel from the right. Its header carries the hostname, with the machine type and its first IP address beneath, and a status badge to their right. Five tabs run across the top.
-
Select any row. The panel opens on
Overview: notes, owner, environment, location, department, the created and last-updated dates, and any tags. Type and status are read from the panel header rather than repeated here. An imported machine carries a “Synced from Active Directory” banner above the notes, with its last-sync date. -
Open
Technical. It holds four blocks:Network(IP address, MAC address, FQDN),Hardware(manufacturer, model, serial number, asset tag),Operating SystemandSystem(CPU cores, RAM, storage, last seen). -
Open
Risksfor the risks linked to this machine — each card shows the title, a short description, the status, the inherent risk score and the date raised. Selecting one opens the full record in the Risk register. With nothing linked it reads “No risks linked to this machine”. -
Open
Incidentsfor the same against Incidents, each card showing title, status, severity and detection date; incident descriptions are deliberately left out here. Then openHistoryfor the change log — what changed, when and who changed it, or “No audit history available”.
If the linked risks or incidents cannot be fetched, the tab says so — for example “The linked risks could not be loaded.” — with a retry control, rather than showing an empty list.
Nothing in Aegis currently writes manufacturer, model, serial number, asset
tag, CPU cores, RAM or storage — no form field and no import fills them.
Those two blocks are scaffolding and show a dash for every machine. The
network details, the operating system and
Last Seen are real.
Edit a machine, or retire it
-
Open a machine and select the pencil control (
Edit machine) in the panel header, beside the status badge. TheOverviewtab becomes a form withNotes,Type,Status,EnvironmentandLocation; for a medical device, theMedical device detailsgroup is editable too. The pencil is hidden from roles that cannot update machines. While you edit, the other tabs are greyed out — hovering one reads “Finish editing to switch tabs”. -
Update the
Notes, or correct theTypeif the machine was synced as the wrong one.EnvironmentandLocationare free-text boxes here rather than dropdowns, so keep your wording consistent — the environment filter is built from whatever has been typed. -
To retire the asset, set
StatustoDecommissioned. The other choices areActive,InactiveandMaintenance. Nothing is deleted; the record stays and stays searchable. -
Select
Save Changes. The panel returns to read-only, the row's badge updates in the list behind it, and the change is written to theHistorytab.Canceldiscards the edit. If the save fails, a “Failed to update machine” message appears and the form stays open so you can try again.
Owner, department and hostname are shown but are not editable here. To change
status across several machines at once, tick their checkboxes and use
Change Status in the bulk-actions toolbar — that dialog adds
Unknown to the four statuses above. The same toolbar offers
Export, a direct CSV download of the selected rows confirmed by a
message such as “Exported 3 machines to CSV”, and Delete, behind a
confirmation, to Managers and Admins. If a bulk action fails, a banner says so
above the table and your selection stays, so you can retry from the toolbar.
The delete confirmation names the count and says what happens — for two machines
it reads “Delete 2 machines? They are removed from the CMDB inventory, exports
and dashboards.” A deleted machine is marked as deleted rather than erased: it
disappears from every list, detail view, export, count and AI context, while its
links to risks and incidents and its audit trail stay with the record. There is
no restore control on any screen, so prefer
Decommissioned for a machine you have only retired. A deleted
machine also keeps its Active Directory link, so a later import does not
re-create it (see above).
Export the inventory
- Set your filters first — the export applies the search text and the type, status and environment filters currently on the list, as the dialog notes.
-
Select
Exportin the header. A dialog headedExport Machine Assetsopens on the format choice:CSV,JSON,XMLorExcel. -
Under
Fields to Export, tick the columns you want; a counter reads how many fields are selected.Select All,Select DefaultandClearset them in one action. Choosing none blocks the export. -
Tick
Include linked risks and incidentsto add count columns, then select the export button, which names the format. The file downloads.
Tips and limits
- Aegis does not scan your network to discover machines. The register is built by hand or fed from Active Directory; network discovery is not in this release.
- Risks and incidents are linked to a machine from those modules, not here. Both tabs are read-only views of links made elsewhere.
-
Last Seenis the last logon Aegis read from the directory. Machines added by hand show a dash until an import fills it in. -
There is no framework-scope field on a machine. You can record scope in
Tags(for examplepci-scope), but the list's search box does not match tags — tick theTagsfield in an export to work with them, or track scope in Audits.
Where this connects
A maintained inventory underpins your audit readiness and gives Anomalies context for what normal looks like. Software on these machines is covered in Software and SBOM; the data they hold in Information Assets; the services they support in CMDB Services and External Services. The suppliers behind them stay in Vendors, a separate register. Directory connections live in Connectors and the Active Directory connector, every change here also appears in the Audit log, and the rights behind each button are listed in What each role can do.