Webhooks
Send Aegis events to your own systems over HTTPS, and let external services start a sync by calling Aegis.
A webhook (an HTTPS call one system makes to
another when something happens) lets Aegis tell your own tooling about events
without anyone polling for them. Aegis has two outbound routes and one inbound
route. Settings → Webhooks sends subscribed events to as many
endpoints as you register. The Webhook connector at
/connectors/webhook, which this chapter walks through, sends to a
single address you configure. Inbound, external services call Aegis to start a
connector's sync.
At a glance
| Direction | Out of Aegis (event notifications) and into Aegis (sync triggers). |
|---|---|
| What it sends |
Settings → Webhooks: one POST per event you subscribe
to (for example incident.created,
risk.updated, evidence.uploaded). The
Webhook connector: metric alerts
(alert.triggered) to one address, plus the
connection.test call its
Test Webhook button sends.
|
| Payload |
Settings → Webhooks sends event,
timestamp, deliveryId and
data, signed in X-Aegis-Signature (the
same value is also sent as X-Aegis-Signature-256); the
fields per event are listed in Webhooks.
The connector sends event, timestamp,
source (always the same value, naming Aegis) and
data. It is signed the same way: the body in
X-Aegis-Signature, and the timestamp plus the body in
X-Aegis-Signature-V2, with the time in
X-Aegis-Timestamp.
|
| Credentials and permissions |
Your endpoint's HTTPS address and a signing secret. Your receiver
checks the HMAC-SHA256 signature in
X-Aegis-Signature-V2 and refuses a call whose
X-Aegis-Timestamp is more than a few minutes old, as
shown in Webhooks. Custom headers, such
as an Authorization header for your gateway, can be
added to the connector.
|
| Owner of imported records | Not applicable: nothing is imported. An inbound sync trigger runs the connector's own sync, with that connector's owner rules. |
| When it runs |
At the moment the event happens; a failed
Settings → Webhooks delivery is retried up to three
more times.
|
| Set it up |
Event subscriptions in Settings → Webhooks; the
connector at /connectors/webhook; the inbound addresses
on the Webhooks tab of Sync Settings, by
people allowed to configure connectors, on a plan that includes the
connector.
|
Who uses it
The connector page is for
Manager and
Admin. A
Contributor or
Viewer who opens
/connectors/webhook is redirected with an access-denied notice;
there is no read-only view. Reading, saving, testing and deleting the
configuration are each checked separately on the server, and all of them also
need the Webhook connector module to be enabled for your organisation.
What's on this screen
The page opens from the Webhook tile in the
Connectors
catalogue. The captured screen shows a connector that has not been saved yet,
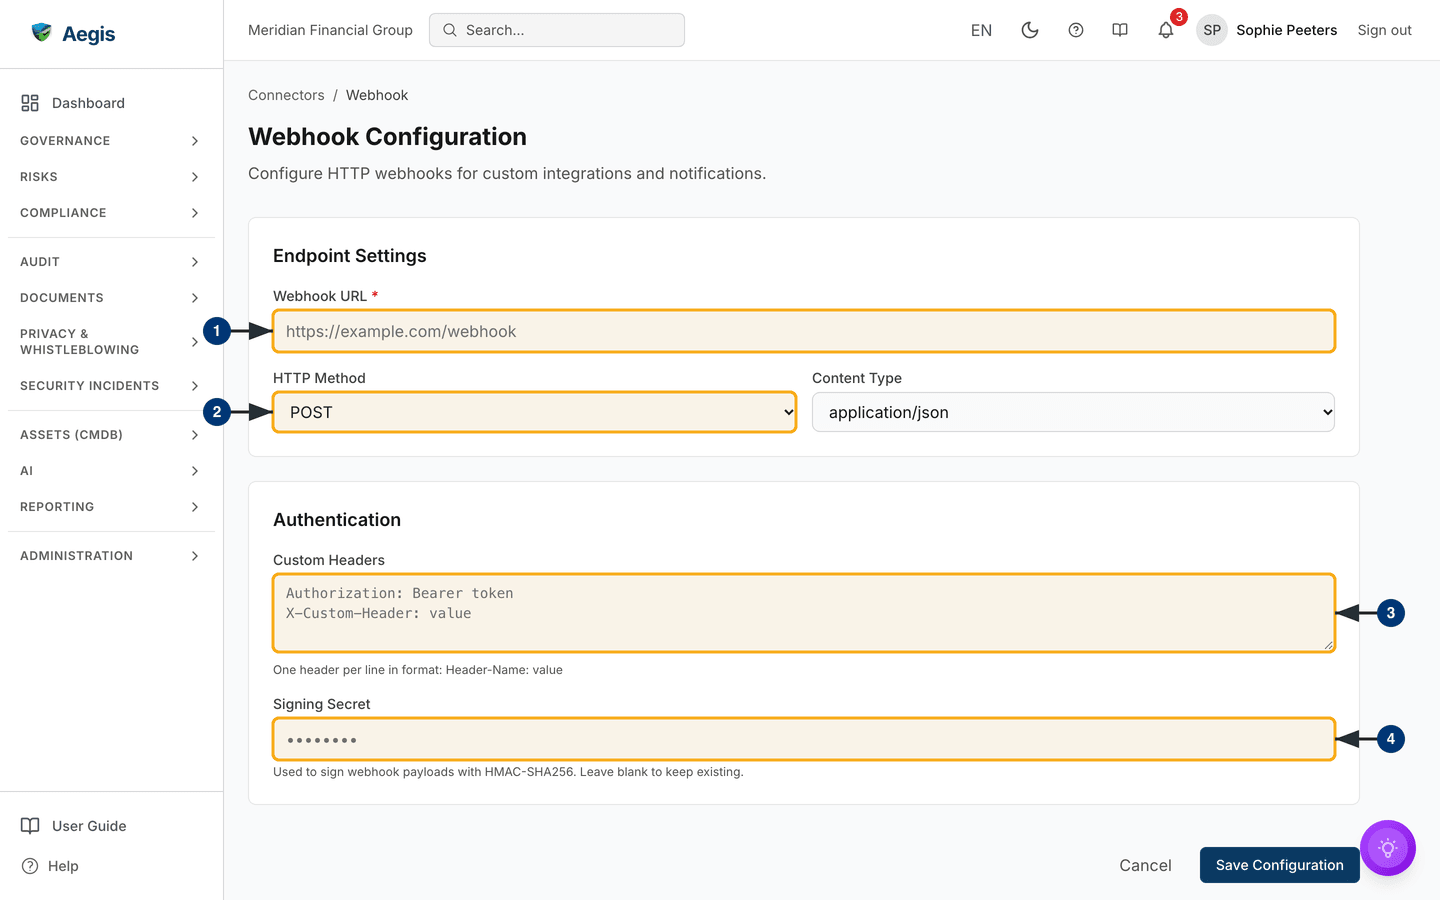
which is what every organisation sees the first time. From top to bottom:
-
Breadcrumb and header.
Connectors / Webhook(the first part links back to the catalogue), the titleWebhook Configurationand the line “Configure HTTP webhooks for custom integrations and notifications.” -
Status banner. Not on the captured screen: it appears only once a
configuration has been saved, and reads
Status: Disconnected,Status: ConnectedorStatus: Error. When the last test failed, the recorded reason and its time show beneath it. -
Endpoint Settings. The requiredWebhook URL(empty on the captured screen, showing the placeholderhttps://example.com/webhook), thenHTTP Method(POSTorPUT) andContent Type(application/jsonorapplication/x-www-form-urlencoded) side by side. -
Authentication.Custom Headers, a multi-line box with the hint “One header per line in format: Header-Name: value”, andSigning Secret, a password field with the hint “Required. Signs webhook payloads with HMAC-SHA256 so the receiver can verify them.” The dots in that field on the captured screen are its placeholder, not a saved secret. -
Actions.
Cancel(back to the catalogue) andSave Configurationat the foot of the form. After the first save,Test Webhookjoins them andDelete Configurationappears on the left. -
Webhook Payload. A help card below the form, outside the captured area, with an example body.
Setting up the connector
-
Enter the receiving address in
Webhook URL. It must be a completehttporhttpsaddress; an empty or malformed one stops the save withWebhook URL is requiredorInvalid URL format. After saving, the address is shown with its secret parts — a token in the query, a path secret such as Slack's, a user name and password — replaced by••••••••. -
Choose the
HTTP Methodand, in the box beside it, theContent Typeof the body. Both lists offer only the values above; the server refuses anything else. -
Add any
Custom Headers, one per line asHeader-Name: value. Saved headers are hidden: replace the whole value to change them, or clear it to remove them. A note saying so appears under the box once headers are stored. -
Set a
Signing Secretso your receiver can check the signature. It is required: saving without one shows “Signing secret is required”. A saved secret shows as dots; leave them as they are to keep it. Then selectSave Configurationat the foot of the form. A green “Configuration saved successfully.” message appears above the form, and the status banner readsStatus: Disconnecteduntil a test succeeds.
Leave the masked address unchanged and Aegis keeps the full address it
stored. Type a complete new address to replace it. An address that still
contains
•••••••• but was otherwise edited is refused, so it is never
stored broken.
When you change the address, Aegis will not carry saved headers or the signing secret over to it. Re-enter them (or clear them) in the same save; otherwise the save is refused with a request to do so. This stops a stored credential from being sent to an address it was never meant for.
Testing the connection
Test Webhook appears only after a configuration is saved, so it is
not on the captured screen.
-
Select
Test Webhook. The button readsTesting...while Aegis sends aconnection.testevent to your address; save and test are both locked until it finishes. -
Read the result above the form. A green “Webhook test successful” sets the
status to
Connected. A red message sets it toError, and the reason is recorded under the status banner.
Failure messages are deliberately short:
Webhook endpoint returned an error response when your endpoint
answered with an error code, Webhook URL blocked when the address
resolves to a network Aegis will not call, and
Failed to send webhook for anything else, such as a timeout. Your
endpoint's response body is never shown or stored. Every test, whatever its
outcome, is written to the audit log.
Deleting the configuration
Delete Configuration also appears only after a configuration is
saved, so it is not on the captured screen.
-
Select
Delete Configuration, bottom left. A dialog asks “Are you sure you want to delete this connector configuration?” - Confirm. The address, headers and secret are removed, the deletion is recorded in the audit log, and you return to the connectors catalogue.
Tips and limits
-
Addresses that resolve to private, loopback or cloud-metadata networks are
refused, also after a redirect. At save time the refusal reads
Webhook URL is not allowed. -
Every save sets the status back to
Disconnected. RunTest Webhookagain after any change. -
Use
X-Aegis-Delivery(the same across retries) to ignore aSettings → Webhooksdelivery you already processed. -
The connector's
Signing Secretis also the secret for the Generic inbound endpoint (/api/connectors/webhooks/generic). Until it is set, that endpoint refuses every call. -
An inbound endpoint refuses every call with
503until you set a webhook secret in that connector's settings. After that, a call without a valid signature gets401: an HMAC-SHA256 of the raw body inX-Hub-Signature-256(GitHub),X-CS-Signature(CrowdStrike),X-Webhook-Signature/X-Signature(Azure, Generic; Azure also acceptsX-Aegis-Signature, Generic alsoX-Hub-Signature-256) orX-Webhook-Signature(Microsoft Purview), and the secret asclientStatein every SharePoint notification. All inbound endpoints also need the Webhook connector module to be enabled. - The Microsoft Purview endpoint is the exception to “nothing is imported”: it accepts data loss prevention alerts and stores them through the same mapping as the scheduled sync. It also needs the data loss monitoring module and a Professional or Enterprise licence; see Data loss.
Example
A new incident, as sent by Settings → Webhooks:
| Field | Example value |
|---|---|
event |
incident.created |
timestamp |
2026-10-12T09:15:02.311Z |
deliveryId |
6f1c2a7e-3b9d-4c55-9e1a-2d8f0b7c4e61 |
data |
id cmg8x1v2k0001qz8l4h3d9f2a,
title “Phishing mail reported by finance”,
status OPEN, severity
HIGH
|
Where this connects
Every event, header and the signature check in code are in
Webhooks; workflow actions that call an address are
in Workflows. The catalogue and
Sync Settings are in Connectors; the
inbound senders have their own chapters, such as
GitHub,
CrowdStrike,
Azure and
SharePoint. Who may configure
connectors is set out in Roles.