Getting Started
A live checklist that tracks how far your organisation has set up Aegis, with a link beside every task still to be done.
Once the first-time setup wizard has run, Getting Started is your
launch pad for the first weeks: a progress ring, a short checklist of the things
a new tenant should do, and — where your
framework (the set of rules you are working
towards, such as ISO 27001 or NIS2) has one — a certification roadmap
underneath. It is a guide, not a gate. Nothing here blocks the rest of Aegis,
and there is no "mark as done" button: each item ticks itself off when the
underlying record exists.
The checklist moved into the Action Center,
where it is the Getting Started tab. Opening
/getting-started — from a bookmark or a dashboard banner —
redirects you to /action-center?tab=getting-started and shows
the same content. Because Getting Started is the Action Center's only tab
today, Aegis hides the tab strip altogether and shows the checklist on its
own; the strip appears once a second tab is added, and from then on
/action-center on its own reopens the tab you used last.
Who uses it
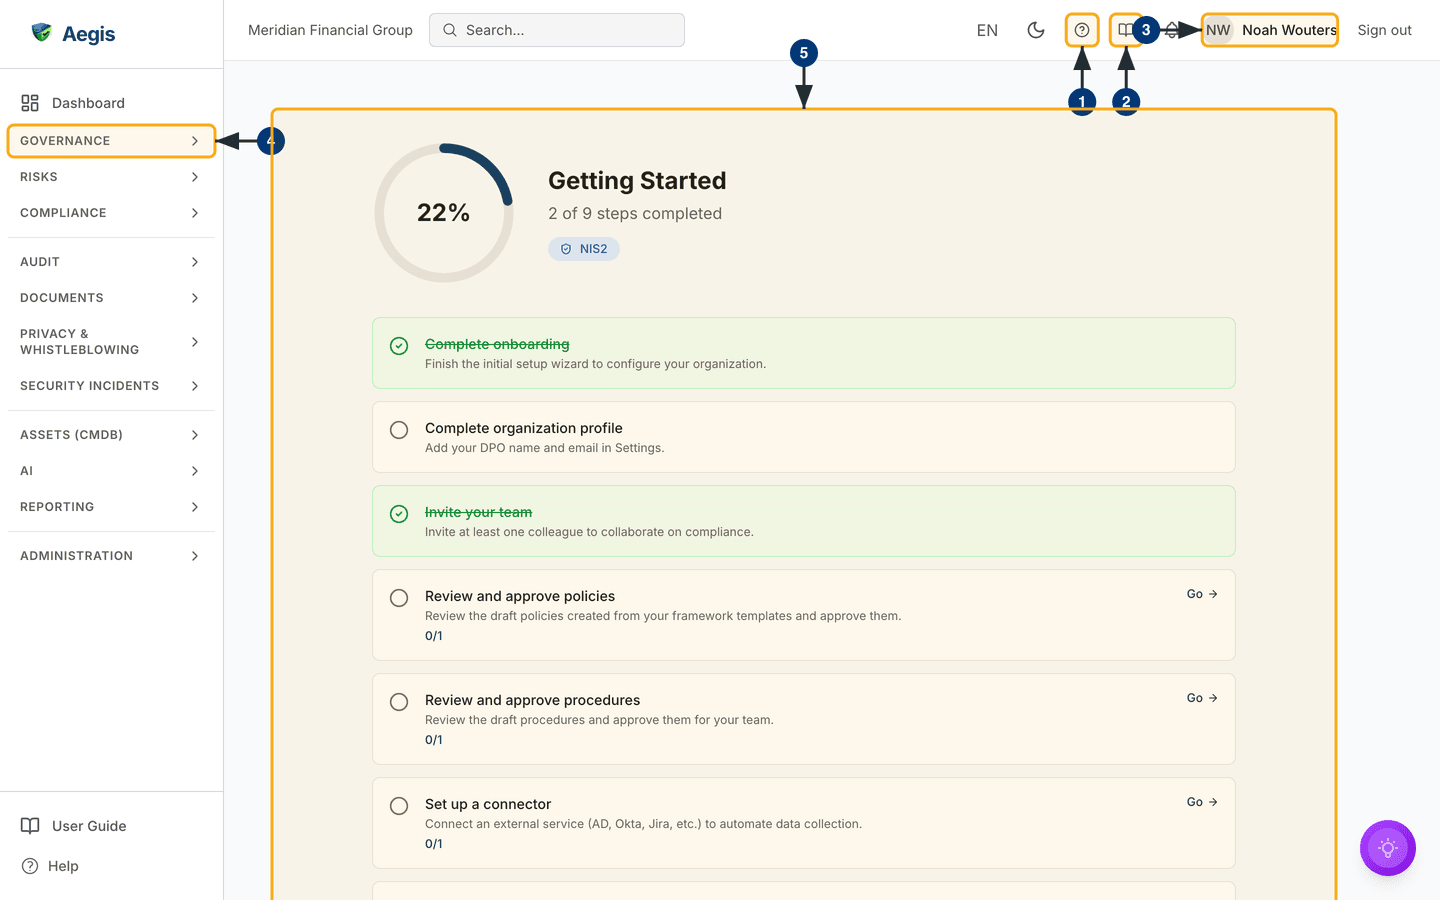
Any signed-in user can open the page; there is no minimum role. That means a Viewer can watch the organisation's progress and follow the links to read each area — the screenshot below was captured as a Viewer. What differs by role is who can finish the tasks:
- Admin — every task on the list, including the one only an Admin can finish: inviting your team.
- Manager — completing the organisation profile, approving the draft policies and procedures, setting up a connector, starting a compliance assessment, and creating the incident workflow a NIS2 or NEN 7510 tenant is asked for.
- Contributor — uploading evidence, and drafting the policies and procedures a Manager then approves.
-
Viewer — no checklist task. The
Golinks that are shown still open, but you can only read what is there.
Two Go links are hidden from roles that cannot open their target:
Complete organization profile shows its link only to Admins and
Managers, and Invite your team only to Admins. The task itself
stays on everyone's list, so the step count is the same for every role. The
other Go links do not check your role first: where your role cannot
act, the screen usually opens with the create and approve buttons hidden — and
where it does not, the action is refused when you try it. Hand that task to a
colleague with the right role.
Roles overview sets out who can do what.
What's on this screen
The page opens in the normal app shell. Along the top bar, from left to right,
are your organisation's name, the Search... box, the language
picker (EN), the light/dark theme toggle, the help "?" button, the
User Guide book icon, the notification bell, your avatar and name, and
Sign out. The left sidebar starts with Dashboard,
followed by the collapsible groups — GOVERNANCE,
RISKS, COMPLIANCE, AUDIT,
DOCUMENTS, PRIVACY & WHISTLEBLOWING,
SECURITY INCIDENTS, ASSETS (CMDB), AI,
REPORTING and ADMINISTRATION in the captured screen —
with User Guide and Help links at its foot. The round
purple button in the bottom-right corner opens the AI assistant chat.
The working area holds a single centred column with no tab strip above it. At
the top is the
progress header: a circular ring with your completion
percentage in the middle (the captured screen shows 22%), the
heading Getting Started, and a step count (2 of 9 steps completed
on the captured screen). Under that count sits a small pill-shaped badge, marked
with a shield icon, naming your primary framework — NIS2 in the
captured tenant, which is why its list has nine tasks rather than eight. If no
primary framework has been chosen, the badge is absent.
Below the header is the checklist, one card per task. A
completed card is tinted green, carries a green tick, and strikes its title
through — the captured screen shows Complete onboarding and
Invite your team that way. An outstanding card keeps a plain
background and an open circle, and usually a Go link on the right.
Cards that count records rather than answering yes or no also show a counter: in
the capture, Review and approve policies,
Review and approve procedures and
Set up a connector each read 0/1. The captured
Complete organization profile card is outstanding but has no
Go link, because the screen was captured as a Viewer.
Three sections continue below the fold, out of shot: the
Certification Roadmap, a
Need help? Ask Aegis AI panel, and a list of saved AI setup plans
and their action items. Each is covered below. Before you start, find these five
landmarks. They are numbered on the figure that follows.
- Find the help "?" button in the top bar, to the right of the light/dark theme toggle. Selecting it slides the in-app help panel out from the right, with short help topics for the page you are on and a search box.
- Next to it is the User Guide button — the open-book icon, between the "?" button and the notification bell. Selecting it opens this User Guide at the chapter for the screen you are on.
-
Look to the far right for your name and avatar — they
confirm who is signed in. Selecting them opens your own profile page
(
/account/profile).Sign outsits immediately beside them; the language picker (EN) is a little further left in the same bar. -
In the left sidebar, open the
GOVERNANCEgroup. It holdsAction Center— your way back to this checklist once the bookmark has gone — alongside governance bodies, action items, security processes and the other governance registers your licence includes. The other groups below it, down toADMINISTRATION, expand the same way. You rarely need them for the checklist, because eachGolink takes you straight to the right screen. - The rest of the screen is the Getting Started panel itself: progress header, checklist, roadmap, and AI panel, in that order down a single centred column. Everything in the rest of this chapter happens inside it.
Work through the checklist
You do not complete a task on this page. You follow its link, do the work on the proper screen, and come back to watch the card tick over. A new tenant sees eight universal tasks, and the framework you chose during setup may add one more.
| Task | What it means | Where Go takes you |
|---|---|---|
Complete onboarding |
Finish the initial setup wizard that configures your organisation.
This card has no
Go link — reaching this page at all means the wizard
has run.
|
Nowhere — see First-time setup. |
Complete organization profile |
Add your DPO (Data Protection Officer) name and email to the profile. Both fields must be filled in. |
/settings?tab=organization — link shown to Admins and
Managers only
|
Invite your team |
Invite at least one colleague, so compliance is not a one-person
job. The task completes once your tenant has at least two users;
until then it shows a counter such as 1/2.
|
/settings/users, which opens
/settings?tab=users — link shown to Admins only
|
Review and approve policies |
Check the draft policies generated from your framework templates and approve them. One approved policy completes the task. | /policies?status=Draft |
Review and approve procedures |
Check the draft procedures and approve them for your team. One approved procedure completes the task. | /procedures?status=Draft |
Set up a connector |
Connect an external service (AD, Okta, Jira and similar) to collect data for you. | /connectors |
Upload evidence |
Add your first piece of evidence (the proof a control works) to the Evidence Locker. | /evidence |
Start a compliance assessment |
Assess at least one framework control — move it off
Not started — so scoring can begin.
|
Your primary framework's assessment page, such as
/compliance/nis2; /compliance if no
primary framework is set
|
To clear one card:
-
Pick an outstanding task — one with an open circle on the left — and read
its one-line description. If it carries a counter such as
0/1, that is how many qualifying records Aegis has found against how many it expects. -
Select the
Golink on the right of the card. Aegis opens the matching screen, filtered where that helps: the policy and procedure links open their lists filtered toDraft, so the items awaiting approval come first. If the card has noGolink, your role cannot open its target — ask an Admin or Manager. - Do the work there — approve the draft, upload the file, send the invitation.
- Return to the Action Center. The card is now green and struck through, the step count has moved on, and the ring has redrawn to the new percentage.
The checklist is tailored to your primary framework. A CyFun tenant also
gets
Set CyFun assurance level; a NIS2 tenant gets
Create an incident workflow, which links to
/automation/workflows; a NEN 7510 tenant gets
Set up incident reporting, which completes only when an active
incident-triggered workflow names the AP, Z-CERT and the IGJ (the
NL Healthcare Incident Reporting template is the suggested
starting point). DORA adds Register an ICT provider and the EU
AI Act adds Register an AI system. A list that does not match
this chapter exactly is expected, not a fault.
Follow the certification roadmap
Scroll past the checklist. Where your framework has a roadmap, Aegis shows a
Certification Roadmap heading, with a line beneath it naming your
framework. It divides the journey into four phases —
Phase 1: Foundation, Phase 2: Implementation,
Phase 3: Verification and Phase 4: Certification —
each with a coloured dot and its own indented list of steps. The phase names are
the same for every framework, even one such as NIS2 that ends in a notification
to the authority rather than a certificate.
- Read the phase headings first to place yourself on the journey. For ISO 27001, Foundation covers the ISMS scope and the risk assessment; Implementation covers the Statement of Applicability, deploying controls and documenting policies; Verification covers awareness training, the internal audit and the management review; Certification covers the Stage 1 and Stage 2 audits by the certification body. For NIS2, the phases run from determining your scope and registering with the authorities, through governance and risk measures, to incident reporting, supply-chain security and policies, and end with the notification to the national authority (the CCB in Belgium).
-
Select
Learn morewhere a step offers it — only the steps with a written article carry the link. The help panel slides out from the right with that article, without losing your place on the page. -
Select
Goon a step to open the screen where that work happens — the risk register, the policies list, security awareness, incidents, vendors, or the framework's own assessment page. Steps that happen outside Aegis — an audit by the certification body, or a registration or notification sent to an authority — have noGolink.
The roadmap is reference material, not a second checklist: its steps do not tick themselves off and do not feed the ring. Treat it as the longer map behind the shorter list above.
The AI assist
Below the roadmap is a panel headed Need help? Ask Aegis AI, with
up to two controls. Which ones you see depends on your role and your licence:
the setup plan needs a role that may spend AI credits, so a Viewer does not see
it, and it also disappears while an administrator has switched AI off for the
tenant. Ask Aegis AI is hidden when the AI assist is not enabled
for your tenant.
-
Select
Generate my setup plan. A dialogue opens explaining that Aegis will order your remaining steps by fastest path. SelectGenerate planand the assistant works through three visible stages — reading your progress, ordering the path, and writing the plan — then streams the result into the dialogue. -
Read the plan and decide whether to keep it.
Save as recordstores it, after which it appears in the saved-insights list below the panel, along with any action items drawn from it.Regenerate planruns it again once your progress has moved on. -
Select
Ask Aegis AIinstead to open the general assistant, where a question such as "What should I do next?" is answered against your live checklist.
The assistant proposes an order and explains its reasoning. It does not complete tasks, approve anything, or alter records — a person reads the plan and decides. Generating a plan spends one AI credit; asking the assistant in chat does not. See AI assistant and agents and Action items.
Tips and limits
- The ticks come from real records. A task completes because the policy is approved or the connector is configured. Deleting that record moves the card back to outstanding.
- Progress is per organisation, not per person. A colleague's work moves your ring too.
-
The page steps aside when you are done. With every task
complete, the tab replaces the checklist with a short
You're all set!confirmation. If onboarding has not run yet, it showsComplete onboarding to access the getting started guide.instead — finish the wizard first. - Reaching 100% is not compliance. It confirms your tenant is set up and your programme has started. Certification, audit outcomes, and keeping in line with a framework are continuing work, tracked by the roadmap and the compliance module.
Where this connects
- Signing in — how you got here, and how to sign out.
- First-time setup — the onboarding wizard behind the first card.
- Action Center — the section this checklist lives in.
- The screen layout and The left menu — the top bar and sidebar groups, in full.
- Settings — the organisation profile and user invitations behind two cards.
- Policies and Procedures — where the draft approvals happen.
- Connectors and Evidence — the two sides of collecting proof.
- Compliance frameworks — the first assessment, and where roadmap steps land.
- Workflows — the incident workflow a NIS2 or NEN 7510 tenant is asked to create.
- Your dashboard — where you work once these tasks are done.