First-time setup
A five-step onboarding wizard records who your organisation is and which frameworks it works on, and then a live Getting Started checklist inside the Action Center walks you through the first week of real work.
Setting up Aegis happens in two parts, in order. First, the very first person to sign in to a brand-new workspace is routed through onboarding (a one-time wizard that records your company name, industry, sector, size, country and the frameworks you want to work on). Those answers decide which frameworks are switched on, which obligations Aegis surfaces, which starter templates are created, and which score becomes the headline figure on your dashboard. Second, the workspace opens on a Getting Started checklist — a page that watches your real records and ticks tasks off as the underlying work gets done. This chapter orientates you to both, then hands you over to the modules where each task is completed.
Who uses it
The wizard is run once, by the first user in the workspace, who is given the Admin role. The checklist is readable by every signed-in user, but the tasks it links to need a working role. An Admin can complete every step, and is the only role that can invite colleagues. A Manager can approve policies and procedures, set up a connector, upload evidence and edit the organisation profile. A Contributor can draft and edit policies and procedures and upload evidence, but cannot approve them — approval is a Manager or Admin action. A Viewer can watch the percentage climb but cannot complete any step, because creating and approving records is beyond read-only access.
The checklist adapts its links to your role. A card whose target is a settings
tab your role cannot open keeps its place in the list — so everyone sees the
same count — but shows no
Go link: Invite your team links only for an Admin, and
Complete organization profile only for roles that can open the
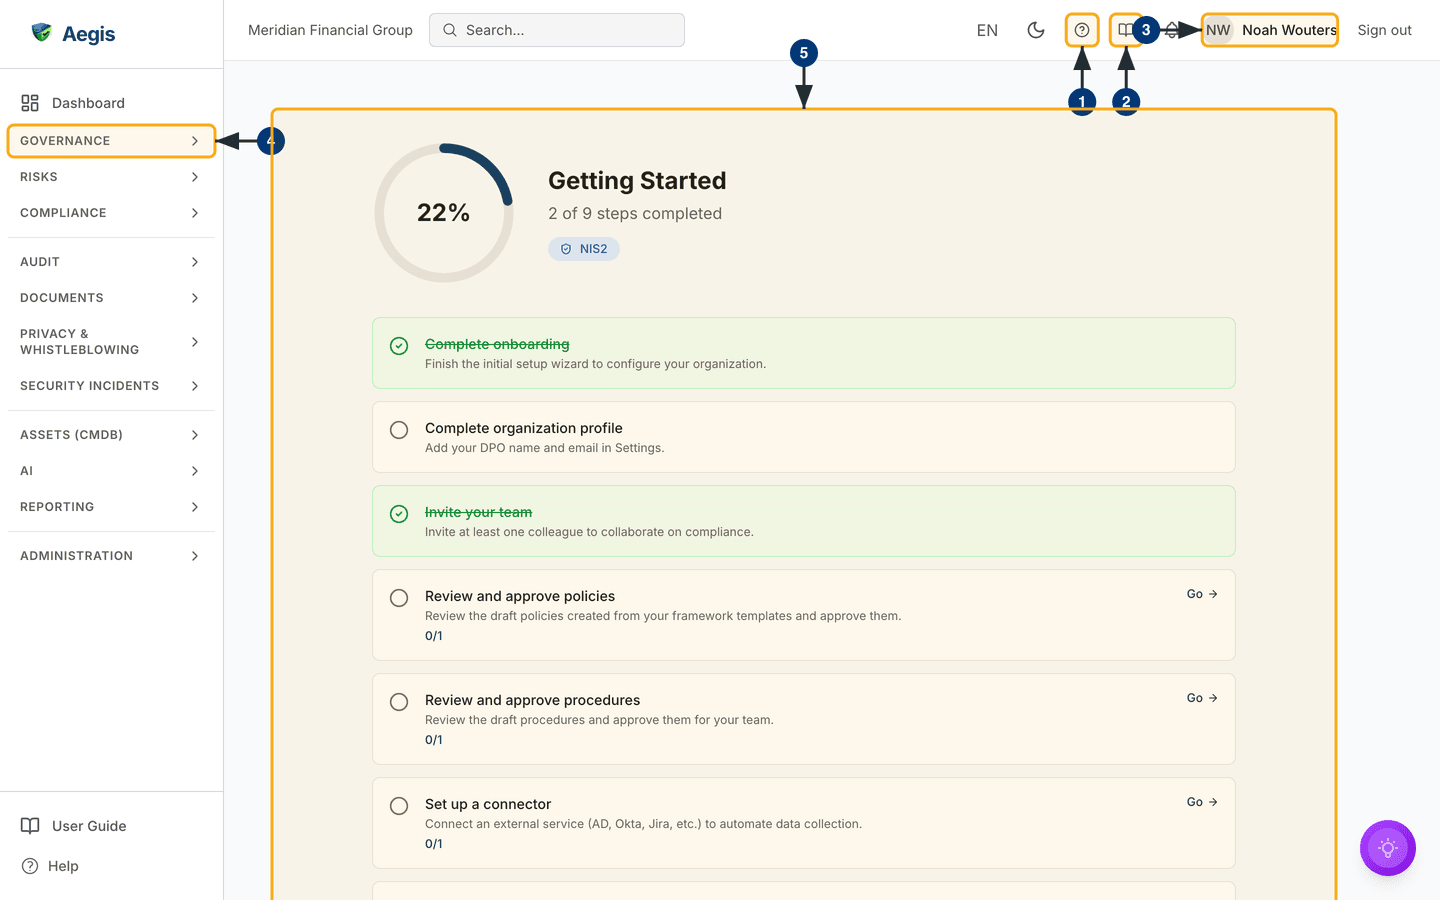
Organization tab of Settings. The screenshot below was
captured while signed in as a Viewer — Noah Wouters in the top bar
— so the checklist renders in full, the organisation-profile card carries no
Go link, and the remaining Go links lead to screens
this role can only read.
What's on this screen
The checklist lives inside the Action Center, which you open
from the Governance group of the left sidebar. The old
/getting-started address still works: it redirects to
/action-center?tab=getting-started, which is the screen shown here.
Getting Started is currently the Action Center's only tab, so no tab strip is
drawn above it — the panel starts directly under the top bar. A strip appears
once the Action Center has a second tab.
The panel opens with a hero row: a circular progress ring on
the left showing your completion percentage — 22% in the captured
screen — and, beside it, the heading Getting Started, a count such
as 2 of 9 steps completed, and a small pill naming your primary
framework. The captured workspace has NIS2 as its primary
framework, so that pill is shown; a workspace with no primary framework set
shows no pill.
Below the hero is the checklist — one card per task, stacked in
a single column. A completed card has a green tick, a green tint, and its title
struck through. An open card has an empty circle and, where your role can act on
it, a blue Go link on the right that jumps to the screen where the
work is done. Where the task counts something, an open card also shows a
fraction such as 0/1 — how many there are against how many the step
needs. In the captured screen, Complete onboarding and
Invite your team are ticked;
Complete organization profile is open with no Go link
(the Viewer cannot open that settings tab); and
Review and approve policies,
Review and approve procedures and
Set up a connector are open, each with 0/1 and a
Go link. The remaining cards — Upload evidence,
Start a compliance assessment and, because the primary framework is
NIS2, Create an incident workflow — sit below the fold of this
capture, as do the certification roadmap and the AI assist panel described later
in this chapter.
Around the panel sits the standard frame. The left sidebar carries the
Dashboard link and eleven collapsible groups, from
Governance at the top to Administration at the bottom,
with User Guide and Help pinned at its foot. The top
bar carries your organisation's name (Meridian Financial Group
in the capture), global search, the language selector, the light/dark toggle,
the help
? button, the User Guide book icon, the notification bell, your
avatar and name, and Sign out. The purple round button at the
bottom right opens the Aegis AI assistant.
-
Select the help
?button in the top bar. A help panel slides in from the side with short articles for the screen you are on and a search box; it is available on every screen the checklist sends you to. -
Select the book icon beside it. It opens the in-app copy of this guide at
/help, on the chapter for the screen you were on. -
Check the name at the top right —
Noah Woutershere, beside an avatar with the initials. The avatar and name are a link: selecting them opens your own profile page at/account/profile.Sign outbeside the name ends the session and returns you to the sign-in page. -
Select the
Governancegroup in the left sidebar. The group expands to revealAction Center— where this checklist lives — together withGovernance Bodies,Action Itemsand the other governance pages your role and licence allow (Roadmapappears from the Contributor role up). The remaining groups behave the same way, and the checklist'sGolinks land inside them. -
Scroll the checklist panel. Each card shows its state, a one-line
description of the task, any count, and — while the task is open and your
role can act on it — a
Golink on the right that takes you to the screen where it is completed.
A card turns green when the underlying work exists — a colleague is actually invited, a policy is actually approved, a connector is actually configured. There is no control to mark a card complete. Do the task the card links to, and the card updates the next time the page loads.
The onboarding wizard (runs once)
The first time you sign in to a brand-new workspace, Aegis routes you to
/onboarding instead of the dashboard. The wizard has five short
steps, shown in a progress bar as Company Info,
Sector Selection, Organization Size,
Compliance and Complete. There is no screenshot of it
in this guide: it runs once per workspace and is gone by the time most readers
arrive. Your answers can be changed afterwards under Settings, so a
wrong choice here is a correction, not a dead end — but the answers do shape
what the rest of Aegis shows you, so it is worth a careful first pass. Until the
wizard is finished, the Action Center shows only the line
Complete onboarding to access the getting started guide.
-
Company information. Enter your
Company Name(2 to 100 characters) and choose yourIndustry, then selectContinue. The name appears on every report and email Aegis sends; the industry steers which framework recommendations and regulatory feeds you see. -
Industry sector. Say where you sit under NIS2 (a European
cybersecurity law). Three tabs divide the choice —
High Criticality (Annex I),Other Critical (Annex II)andNot in NIS2 Scope— and picking a sector offers its sub-sectors, which are optional. SelectContinue. Your answer decides which NIS2 obligations the compliance module surfaces. -
Organisation size. Pick a
Number of Employeesband and anAnnual Turnover (EUR)band, then selectContinue. Under NIS2 these thresholds decide whether you are an essential or important entity, or out of scope, and the step shows the resulting classification. Aegis also uses size for risk weighting and benchmark comparisons. -
Scope your compliance. Choose your
Country, then tick the frameworks you want to work on — for exampleNIS2,ISO 27001,CyFun,DORA,GDPRor theEU AI Act. Only the frameworks your licence covers are offered, and each card is taggedIncludedorAdd-on. Aegis pre-ticks a recommendation based on your country, sector and size, markedRecommended; changing the country updates it until you tick or untick a card yourself. The first framework you choose is taggedPrimary: its score becomes the headline figure on your dashboard, and its certification roadmap appears on the Getting Started tab.Continuestays unavailable while nothing is ticked. -
All set. A
Setup Summarycard lists your organisation and chosen frameworks. Below it,Starter templateslists the policy, procedure and document templates for those frameworks, all ticked; untick what you do not need, because only ticked templates are created, as drafts. Because you are the first user, anAdmin Accessnotice tells you that you are being granted administrator rights. SelectGo to Dashboard. The workspace's organisation profile is stamped as onboarded, the frameworks you chose are switched on and the others are hidden (you can switch them back on inSettings), the ticked templates are created in the background, no one is sent to the wizard again, and the first checklist card,Complete onboarding, is now green.
The gate is the workspace's organisation profile, not your user account. Once the first user finishes, colleagues invited later go straight to the dashboard. If a colleague is sent to the wizard, either an administrator has reset onboarding for everyone (see Tips and limits below) or they have landed in a different workspace. A Viewer cannot complete the wizard — the role has read-only onboarding access — so a Viewer sent there should ask an administrator to finish it.
Working through the checklist
Work down the open cards; each Go link drops you where the task is
done, and you return here to watch the ring climb. The steps below are the cards
after Complete onboarding, in the order they appear.
-
Complete organisation profile. The card links to the
Organizationtab ofSettings. Add your Data Protection Officer's name and email, which the GDPR module needs, and save. The card turns green once both are filled in. -
Invite your team. For an Admin, the card opens the user
list under
Settings. Add at least one colleague and give them a role; the card turns green once a second user exists. -
Review and approve policies. The card opens
Policies filtered to
Draft. Read the drafts created from your starter templates, edit what does not fit, and approve them. The card shows0/1until the first policy is approved, then turns green. -
Review and approve procedures. The card opens
Procedures filtered to
Draftand shows0/1until the first procedure is approved. - Set up a connector. The card opens Connectors, where you link an external service — a directory, an identity provider, a ticketing tool — so that some evidence collects itself.
- Upload evidence. The card opens the Evidence locker. Add your first document or export, so a control can point at something concrete rather than an assertion.
- Start a compliance assessment. The card opens the assessment page of your primary framework under Compliance frameworks, or the framework overview when no primary framework is set. Assess at least one control and the card turns green.
-
Framework card, where there is one. Some primary frameworks
add a card of their own:
Create an incident workflowfor NIS2 (as in the captured workspace) andSet up incident reportingfor NEN 7510, both opening Workflows;Register an ICT providerfor DORA;Register an AI systemfor the EU AI Act; andSet CyFun assurance levelfor CyFun. Once every card is green, the whole tab is replaced by a shortYou're all set!confirmation.
The certification roadmap
Below the checklist — out of shot in the capture — Aegis shows a
Certification Roadmap for your primary framework, grouped into four
phases: Phase 1: Foundation, Phase 2: Implementation,
Phase 3: Verification and Phase 4: Certification. Each
entry names one milestone (for ISO 27001, defining the scope of your information
security management system, then a risk assessment, a Statement of
Applicability, and so on) with a Learn more link that opens the
help panel and, where the work happens inside Aegis, a Go link to
that module. The roadmap is reference guidance, not a tracker: entries do not
tick themselves off, and the final phase describes audits your certification
body runs, not screens in Aegis. With no primary framework set, or for a
framework that has no roadmap, the section does not appear at all.
The AI assist
At the foot of the tab sits an AI panel headed
Need help? Ask Aegis AI, with two controls.
Generate my setup plan opens a dialog,
Your personalized setup plan, where
Generate plan reads your live checklist progress and writes an
ordered plan for the steps you have left; Save as record keeps it,
and saved plans and any follow-up action items are listed below the panel.
Ask Aegis AI opens the assistant instead, so you can ask what to do
next in your own words. Generating a plan uses an AI credit, so the
Generate my setup plan button is not shown to a
Viewer, nor when AI is switched off
for the workspace. The AI only suggests: it never invites a user, approves a
policy, or connects a service — a person reads the plan and decides. See
AI assistant and
Action items.
Tips and limits
-
To change an answer, open
Settingsand edit the organisation profile; the change is recorded in the audit log. Frameworks you did not choose during onboarding can be switched back on, and further starter templates added, underSettings→Frameworks. -
To run the wizard again, an
Admin opens the
Accounttab ofSettings, finds theWizardscard and selectsReset Onboarding. A confirmation dialog warns that this re-shows the wizard for every user in the workspace at their next sign-in, and the reset is written to the audit log. On a re-run, the frameworks already switched on are pre-ticked, primary first, so finishing again does not hide frameworks in use, and templates the workspace already has are listed but cannot be ticked a second time. The same card carriesReset Getting Started, which only brings the checklist widget back on your own dashboard. -
A Viewer sees the checklist but
cannot complete most steps. If a
Golink lands you somewhere read-only, or a card has noGolink at all, ask an administrator to raise your role or to do the task. - The framework pill, the framework card and the certification roadmap all depend on a primary framework being set during onboarding, so the total number of cards is eight, or nine when the primary framework adds one.
- The percentage is a setup prompt, not a compliance score, and no auditor sees it. Reaching one hundred per cent means the workspace is ready to be worked in, not that any obligation has been met.
Where this connects
Next, learn the frame around every screen in The screen layout and The left menu, and how people get into the workspace in Signing in. Roles overview explains which role to give each colleague, and Getting Started covers the checklist tab in its own right. From there the modules each card links to — Policies, Procedures, Connectors, Evidence, Compliance frameworks and Workflows — take over. If something is stuck, see Getting help.