Webhooks
Register a webhook (an automatic message Aegis posts to a web address you choose) so another system hears about an event — a policy approved, a risk mitigated, an incident resolved — the moment it happens.
A webhook saves someone the job of signing in to check whether anything has
changed. You give Aegis a URL, tick the events you care about, and set a shared
secret; each time a matching event occurs, Aegis posts a small JSON message to
that URL and the receiving system decides what to do with it. Webhooks are
outbound only — they push information out of Aegis and never carry anything back
in. Webhook Settings is the one screen where an administrator
registers endpoints, switches them on and off, tests them, and reads what was
delivered.
Every webhook action is restricted to administrators. The endpoint list is
also gated behind the Webhook Integrations licence feature: if
your plan does not include it, the page still opens, but in place of the
list you get an amber padlock, the heading
Webhook Integrations, a line explaining that the feature is not
on your current plan, and a View Plans button that takes you to
/settings/license.
Who uses it
- Admin Full access — add, edit, enable, disable, test and delete endpoints, and read each one's delivery history.
-
Manager
Contributor
Viewer No access to this
screen. Opening
/settings/webhooksas any of these roles sends you to the/unauthorizedpage, andWebhooksdoes not appear in their menu.
Roles and what each can do lists the other
administrator-only areas. The shorter address /webhooks brings an
administrator here as well; on a plan without the feature it shows the same
locked notice instead.
What's on this screen
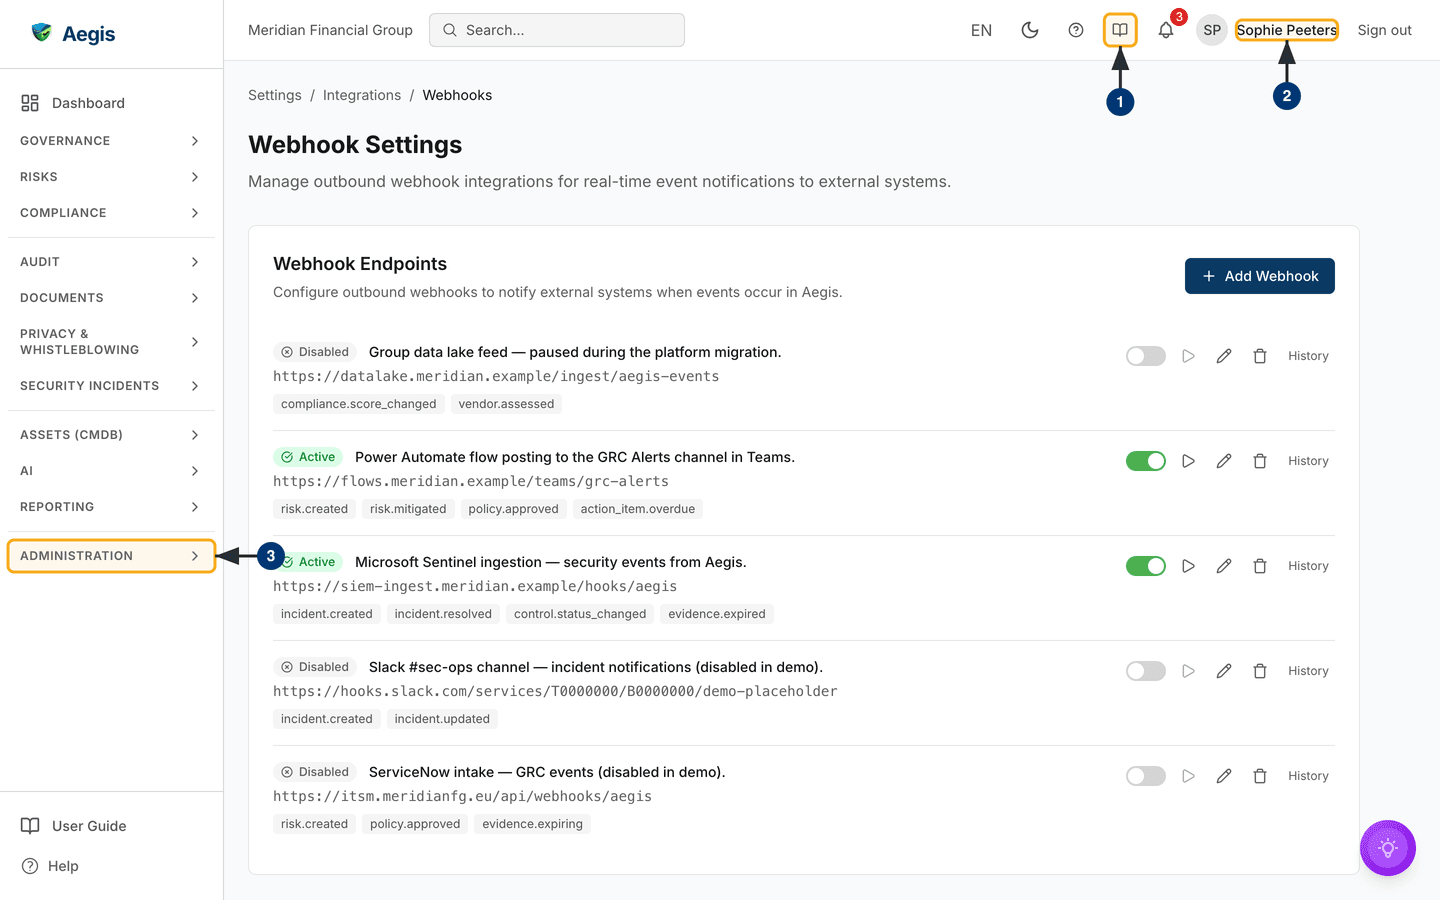
The page is short and has one job. At the top sits a breadcrumb reading
Settings / Integrations / Webhooks: Settings links
back to the settings index and Integrations to the Integrations tab
of Settings, where this page's card lives. Under it are the heading
Webhook Settings and the line
Manage outbound webhook integrations for real-time event notifications to
external systems.
Below that is a single white card titled Webhook Endpoints,
subtitled
Configure outbound webhooks to notify external systems when events occur in
Aegis.
A dark blue Add Webhook button sits in its top-right corner, and
everything else on the screen appears inside that card — no filter bar, no
search, no sorting, because the list is expected to stay short.
Each endpoint is a row in that card, separated by a thin line. From left to
right a row shows a status pill (Active with a tick, or
Disabled with a cross), the description if you gave one, the
destination URL in a monospaced font underneath, and small grey tags — one per
subscribed event. On the right sit its five controls: an on/off switch (green
when the endpoint is active, grey when it is not), a play icon that sends a test
delivery (dimmed on a disabled endpoint), a pencil icon that opens the edit
form, a bin icon that deletes the endpoint, and a History button
that expands the delivery log underneath.
The captured screen shows five demo endpoints — two Active and
three Disabled — for receivers such as a Teams channel flow, a
security-monitoring ingest and a ticketing system, each with its own mix of
event tags. On a new organisation the card is empty instead: a grey circle with
a plus sign, the line No webhooks configured, and beneath it
Create your first webhook to start receiving event notifications. That
is the normal starting point.
Around the card is the usual application frame: the left navigation, whose
ADMINISTRATION group holds Webhooks, and the top bar,
which carries the open-book User Guide icon and your account name —
the two controls the steps below use.
Opening Webhook Settings
-
Select the open-book icon labelled
User Guidein the top bar whenever you want these instructions to hand. Aegis opens this User Guide in the same tab, already at the chapter for the screen you were on; your browser's back button returns you to the screen. (The circled?beside it opens the slide-in help panel instead.) -
Check the name in the top-right corner is the account you mean to use.
Webhook Settings opens only for an administrator; any other role lands on
the
/unauthorizedpage instead. -
In the left navigation, select
ADMINISTRATIONto expand that group, then chooseWebhooks. The page loads at/settings/webhookswith theSettings / Integrations / Webhooksbreadcrumb and theWebhook Endpointscard — a grey placeholder stands in while the list is fetched. The Integrations tab of Settings has aWebhookscard that brings you here too.
Add an endpoint
Have the receiving URL ready, and decide on a signing secret — a long random string both sides hold. Aegis signs every message with it, so the receiver can prove the message came from Aegis and was not altered on the way.
-
Select
Add Webhookin the top-right of the card. A dialog opens titledAdd Webhook, with four fields, one option and aCancel/Create Webhookpair at the bottom. -
In
Endpoint URL(required), type the full address Aegis should post to — the field showshttps://example.com/webhooks/aegisas its example. The dialog checks the address against the same rules the server applies before it sends anything, and shows the problem in red under the field, clearing it as you correct it: an empty field readsURL is required; anything that is not a validhttporhttpsURL readsInvalid URL formatorURL must use HTTP or HTTPS protocol; on a production deployment anhttpaddress readsWebhook URL must use HTTPS; and an address on a known security-scanner host readsThis webhook host is not allowed. -
In
Description(optional), add a short label such as CI/CD pipeline notifications — it is what identifies the row in the list later. A placeholder word such asstringornullis refused withEnter a meaningful description, not a placeholder value. -
In
Signing Secret(required when adding), type your secret. The field is masked, showswhsec_...as its example, and the hint below reads Used to generate HMAC-SHA256 signatures for payload verification. Leaving it empty showsSecret is required for signature verification; a placeholder word showsEnter a real signing secret, not a placeholder value. Store the same value on the receiving side; Aegis never shows it back to you. -
Leave
Include employee identifiers (userId, actorId, ownerId)unticked unless the receiver needs to know which person acted. Those fields identify employees, so they are personal data; tick the box only when your processing agreement with the receiving party covers them. A new endpoint starts with the box unticked. Endpoints that existed before this option was introduced have it ticked, so they keep receiving exactly what they received before. You can change it later with the pencil icon (Edit webhook). -
Under
Event Types(at least one required), tick the events this endpoint should receive. The list scrolls inside the dialog. Ticking a group heading selects the whole group, and that heading shows a partial state when only some of its events are ticked. Submitting with nothing ticked showsSelect at least one event type. -
Select
Create Webhook. The button readsSaving..., then the dialog closes, Webhook created successfully appears, and the new endpoint replaces the empty state as anActiverow.Cancelkeeps nothing. On save Aegis checks the address before it stores anything: the URL must be HTTPS and its host name must already resolve to a public internet address. No delivery is sent at this point, so a receiver that is not running yet is accepted; useSend testafterwards to prove it answers. If the host name does not resolve yet (for example the DNS record is still to be created) or points into a private network, the dialog stays open and the URL field reads Aegis could not accept this address. It must be a public HTTPS URL whose host name already resolves on the internet. Create the DNS record first, then save again.
The events you can subscribe to
The list is fixed — these are the events Aegis can send today, and the dialog
offers no others. Each is named area.action. The server also
refuses any event name outside Aegis's own catalogue, so an endpoint can no
longer be saved with an event that would never be sent.
| Group | Events |
|---|---|
Policy |
policy.created, policy.updated,
policy.approved, policy.acknowledged
|
Risk |
risk.created, risk.updated,
risk.mitigated
|
Vendor |
vendor.created, vendor.assessed |
Evidence |
evidence.uploaded, evidence.expiring,
evidence.expired
|
Incident |
incident.created, incident.resolved |
Compliance |
compliance.score_changed,
control.status_changed
|
Action items |
action_item.due_soon, action_item.overdue
|
The three procedure.* events can be subscribed to through the
API but are not offered in the dialog, and an endpoint saved before the
catalogue was enforced may carry a tag for an event Aegis never sends — on
the captured screen one demo endpoint shows incident.updated,
which is not in the table above. When you open such an endpoint with the
pencil icon, those events are left unticked, and saving removes them. Add
procedure events back through the API afterwards if you need them.
What arrives at your endpoint
Aegis sends an HTTP POST with
Content-Type: application/json. Whoever builds the receiver should
check the signature, then reply with a 2xx status code. Aegis waits about ten
seconds and treats anything else — a timeout, a redirect, any non-2xx status —
as a failed delivery, and tries again up to three more times with a growing
pause (one minute, then longer).
Headers
-
X-Aegis-Event— the event name, the same aseventin the body. -
X-Aegis-Delivery— the delivery id, the same asdeliveryIdin the body and the id in the delivery history. It stays the same across retries, so use it to ignore a delivery you have already processed. -
X-Aegis-Timestamp— when this attempt was sent, as Unix time in milliseconds. It names the same moment astimestampin the body, and it is new on every retry. -
X-Aegis-Signature-V2— the signature to check:sha256=followed by the hex HMAC-SHA256 digest of the timestamp, a full stop and the exact body, keyed with the endpoint's signing secret. -
X-Aegis-SignatureandX-Aegis-Signature-256— two names for an older signature over the body alone. Aegis still sends them so that receivers built before the timestamp existed keep working, but new receivers should not rely on them.
The body
Every event, including the test delivery, arrives in the same envelope:
| Field | Type | Meaning |
|---|---|---|
event |
string | The event name, for example incident.created. |
timestamp |
string (ISO-8601, UTC) | When this attempt was sent. A retry carries a newer time. |
deliveryId |
string | Equal to the X-Aegis-Delivery header. |
data |
object | The record that changed — its fields per event are listed below. |
For example, a new incident:
{
  "event": "incident.created",
  "timestamp": "2026-10-12T09:15:02.311Z",
  "deliveryId": "6f1c2a7e-3b9d-4c55-9e1a-2d8f0b7c4e61",
  "data": {
    "id": "cmg8x1v2k0001qz8l4h3d9f2a",
    "title": "Phishing mail reported by finance",
    "status": "OPEN",
    "severity": "HIGH"
  }
}
The data fields per event
id is the Aegis id of the record; status and
severity use the values Aegis shows in the API. Read the record
through the API when you need more than these fields. Treat unknown fields as
optional — new ones may be added.
userId, actorId and ownerId identify an
employee. They are sent only to an endpoint with the employee-identifier option
ticked (see Add an endpoint above); every other endpoint receives the event
without these keys.
| Event | Fields in data |
Notes |
|---|---|---|
policy.created |
id, title, status |
|
policy.updated |
id, title, status |
|
policy.approved |
id, title, status |
title is left out when the approval came from a bulk
status change.
|
policy.acknowledged |
id, userId,
acknowledgedVersion,
acknowledgedAt
|
id is the policy, userId the reader. Sent
on every acknowledgment, including a re-acknowledgment.
|
procedure.created |
id, title, status |
API only — not offered in the dialog. |
procedure.updated |
id, title, status |
API only. |
procedure.approved |
id, title, status |
API only. title is left out after a bulk status change.
|
risk.created |
id, title, status |
|
risk.updated |
id, title, status |
Not sent when only the status changed. |
risk.mitigated |
id, title, status |
|
vendor.created |
id, name, status |
|
vendor.assessed |
id, name, assessmentId,
score
|
id is the vendor; assessmentId the new
assessment.
|
evidence.uploaded |
id, name, type |
|
evidence.expiring |
id, name, validUntil,
daysUntilExpiry
|
Sent once when the item enters the 30-day window and once when it enters the 7-day window. |
evidence.expired |
id, name, validUntil |
validUntil is an ISO-8601 time, or null.
|
incident.created |
id, title, status,
severity
|
|
incident.resolved |
id, title, status |
|
compliance.score_changed |
previousScore, score,
totalControls,
coveredControls
|
Organisation-wide score, no record id. |
control.status_changed |
id, ref, frameworkKey,
previousStatus, status,
trigger,
actorId
|
trigger is manual,
recalculated, cross_framework_sync or
workflow; actorId is
null when Aegis changed it.
|
action_item.due_soon |
entityType, id, title,
dueDate,
ownerId
|
Sent once, seven days before dueDate.
entityType is AuditFinding,
NonConformity, GovernanceActionItem or
BcmExerciseAction.
|
action_item.overdue |
entityType, id, title,
dueDate,
ownerId
|
Sent once, after dueDate has passed, while the item is
still open.
|
webhook.test |
message |
Sent by the test button only; cannot be subscribed to. |
Check the signature
Check X-Aegis-Signature-V2, and refuse a delivery whose
X-Aegis-Timestamp is more than a few minutes away from your own
clock. The timestamp is part of what is signed, so someone who captured a
delivery can neither send it again later nor change its timestamp. Compute the
digest over the timestamp, a full stop and the raw request body exactly as
received — not over JSON you parsed and re-serialised — and compare in constant
time. In Node.js, with the header names in lower case:
const crypto = require("node:crypto");

const TOLERANCE_MS = 5 * 60 * 1000;

function isFromAegis(rawBody, headers, secret) {
  const timestamp = headers["x-aegis-timestamp"] || "";
  if (!/^\d+$/.test(timestamp)) return false;
  if (Math.abs(Date.now() - Number(timestamp)) > TOLERANCE_MS) return false;

  const digest = crypto.createHmac("sha256", secret).update(timestamp + "." + rawBody).digest("hex");
  const a = Buffer.from("sha256=" + digest);
  const b = Buffer.from(headers["x-aegis-signature-v2"] || "");
  return a.length === b.length && crypto.timingSafeEqual(a, b);
}
A receiver built earlier compares X-Aegis-Signature with a
digest of the body alone. It keeps working, because that header still
carries the same value. But that check accepts a captured delivery for ever.
Move such a receiver to X-Aegis-Signature-V2 and the timestamp
check above.
Send a test delivery
Test an endpoint before you rely on it, so a wrong URL or a rejected signature turns up at a quiet moment rather than during a real incident. A test runs through the same pipeline as a real event — the address check, the signing and the retries.
- Find the endpoint's row. It has to be switched on — the play icon is dimmed and does nothing on a disabled endpoint.
-
Select the play icon (tooltip:
Send test delivery). It turns into a spinner, then Test delivery enqueued. Check delivery history for results. appears. The message carries the event typewebhook.test. -
Select
Historyon the same row to read the result. The delivery runs in the background, so it can take a few seconds to appear. If the row's history is already open when you send the test, the panel reloads itself several times over the next ten seconds or so, and the attempt usually shows up without you doing anything; otherwise use the panel's refresh icon.
Turn an endpoint off, on, or change it
-
To stop deliveries without losing the configuration, select the green switch
on the row (tooltip:
Disable; on a grey switch it readsEnable). It turns grey, the pill changes toDisabledand Webhook disabled appears. Selecting it again re-enables the endpoint. A disabled endpoint receives nothing and cannot be tested. -
To change an endpoint, select the pencil icon (tooltip:
Edit webhook). The same dialog opens, now titledEdit Webhookand pre-filled with the current URL, description, employee-identifier option and ticked events — only the events the dialog lists, as the warning above explains. -
Adjust whatever you need.
Signing Secretis deliberately blank and shows Leave blank to keep current secret — type a value only to replace the secret, and update the receiving system at the same moment, because messages signed with the new secret start straight away. -
Select
Update Webhook. The dialog closes, Webhook updated successfully appears and the row refreshes with the new URL, description and event tags.
Read the delivery history
Every attempt against an endpoint is recorded, failures included, so you can see what was sent and how the receiver replied.
-
Select
Historyon the row (tooltip:View delivery history). A panel opens beneath the row and the button now readsHide. Once there are attempts to show, the panel is headedRecent Deliveriesand lists the ten most recent. -
Read each line left to right: a green tick or a red cross, the event type,
the HTTP status code the receiver returned (green below 300, red otherwise,
N/Awhen there was no reply), any error text, and the time of the attempt on the right. -
Use the refresh icon at the top of the panel to reload it — worth doing
straight after a test. If nothing has been delivered the panel reads
No delivery history yet. with its own refresh icon beside it.
Select
Hideto close the panel.
A failed delivery is retried automatically — up to three further attempts, the first about a minute later and with a growing gap after that — and each gets its own line. Several red lines for one event usually mean the receiver is down or rejecting the signature, not that the event was lost.
Delete an endpoint
-
Select the bin icon on the row (tooltip:
Delete webhook). A confirmation dialog opens, titledDelete Webhook, naming the URL you are about to remove. - Read the message: it asks whether you are sure, states that the action cannot be undone, and that all delivery history for the endpoint will also be removed.
-
Select
Delete webhookto go ahead, orCancelto keep the endpoint. The row disappears and Webhook deleted successfully appears.
There is no undo, and the record of what was sent to that endpoint goes too. A message still queued when you delete is dropped and never sent. To stop messages for a while, disable the endpoint with the switch instead — that keeps both the configuration and its history.
Tips and limits
- One endpoint per receiving system, with its own secret. That lets you disable, re-key or delete one without disturbing the others.
- Treat the secret as a password. It is masked as you type and never displayed again. If it leaks, edit the endpoint, set a new secret, and update the receiver.
-
Use a publicly reachable URL, and the final one. Aegis
blocks destinations that resolve to your own internal network and does not
follow redirects — a 3xx reply is recorded as a failed delivery rather than
chased. The host name must already resolve when you save — a DNS record you
have not created yet is refused the same way as an internal address.
Placeholder text such as
stringornullis rejected in the signing secret and the description, and a URL pointing at a known security-scanner host is refused outright. -
Keep the URL under 2,048 characters. A longer address is
refused. The dialog then shows
This webhook host is not allowedunder the field, which names the wrong cause — if the host looks right, check the length. - Subscribe narrowly. The event list is fixed, and a receiver that gets everything has more to filter and more to go wrong. Tick only what the other system acts on; if you need an event that is not in the table above, raise it with your Aegis contact.
- Changes here are recorded. Adding, editing, testing and deleting endpoints is written to the Audit Log, as is each successful delivery. The signing secret is never included in that record.
Where this connects
- Settings — the area this page sits under, including your plan and licence details.
- Connectors — pulling data into Aegis from other services; the inbound counterpart to outbound webhooks.
- API Keys — letting your own scripts call Aegis directly instead of waiting to be told.
- Policies, Risks, Vendors, Evidence and Incidents — the modules whose events you can subscribe to.
- Getting help — if deliveries keep failing and the history does not explain why.