Connectors
The saved links that pull data from your other systems into Aegis and push Aegis notifications out to the tools your team already watches.
A connector is a stored configuration that joins Aegis to an external system — a mail server, a chat workspace, a cloud-security platform, an issue tracker, a directory. Once saved and tested, Aegis pulls that system's data in on a schedule, files it against your risks and incidents, and posts alerts into the channel your team already reads.
Who uses it
Every page under /connectors runs a role check on the server before
it renders anything — the catalogue, each connector's page and the sync settings
alike. Admin and
Manager can configure, test, sync,
schedule and delete any connector.
Contributor and
Viewer are redirected to the
/unauthorized page, so there is no read-only view for lower roles —
not even a list of which systems are connected. If you hold Manager and the
sidebar entry is missing, the connectors module is not switched on for your
organisation. Six tiles also depend on your licence tier: they still appear,
marked Premium, but are dimmed and cannot be opened.
What's on this screen
With a sufficient role, /connectors opens with the title
Connectors over the line “Configure integrations with external
services for notifications and webhooks.”, and one button on the right:
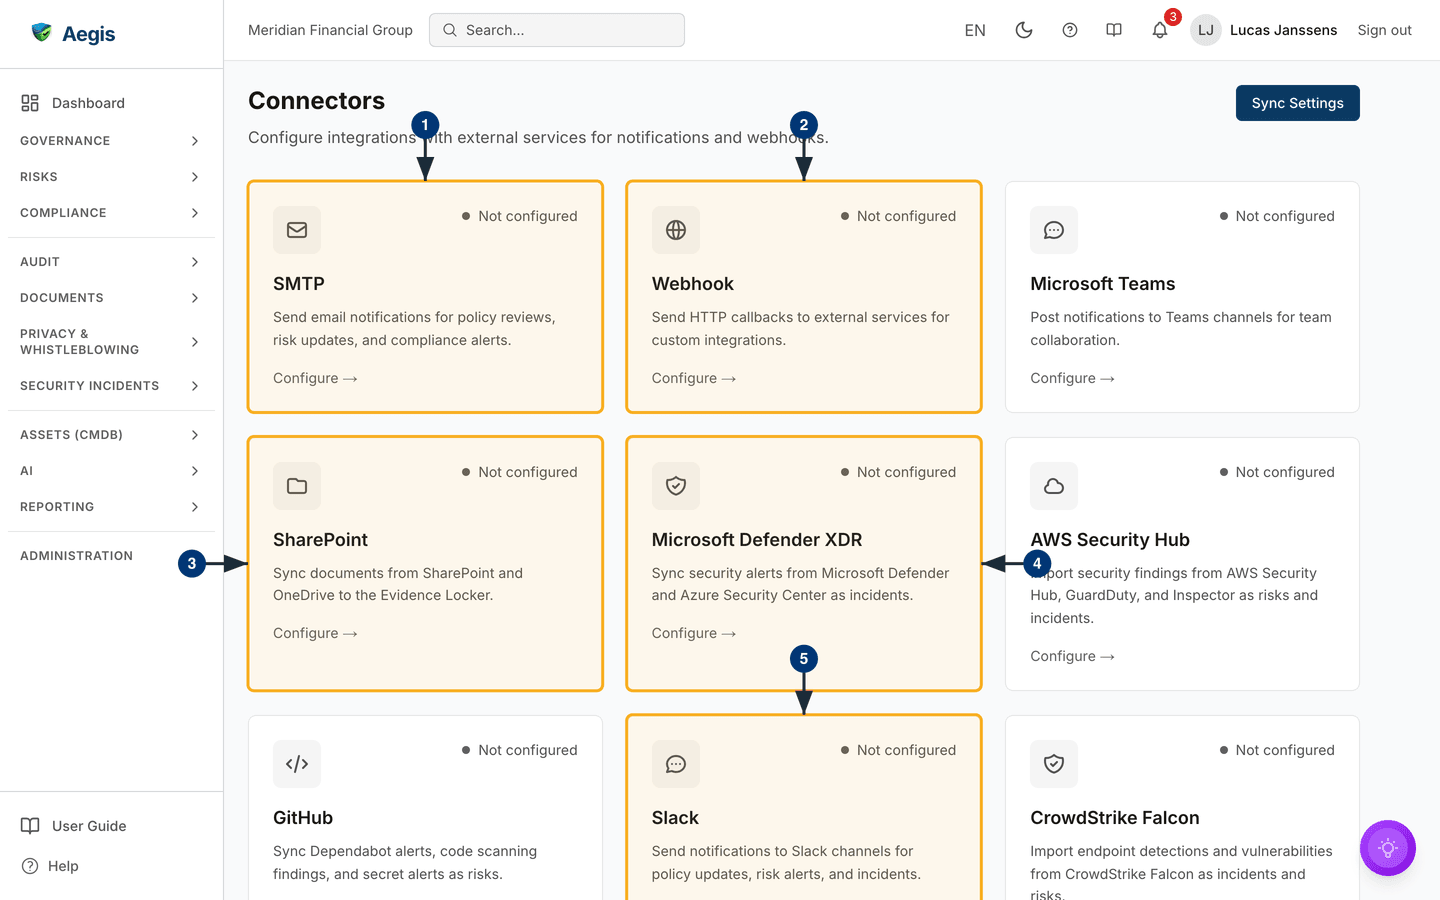
Sync Settings. Below sits the catalogue — twenty connector tiles,
three to a row on a wide display, two on a medium screen and one on a phone.
There is no filter bar and no search box, so you scan the grid.
A twenty-first tile, Microsoft Purview, appears only when the Data
Loss Monitoring module is switched on for your organisation and you may manage
it. That tile does not open a connector page: it leads to the Data Loss
settings, where the Purview connection is configured. Without that module it is
left out of the grid altogether rather than shown as Premium.
Every tile carries the same four things: an icon top-left; a coloured dot and a
status word top-right; the connector name in bold — SMTP,
Microsoft Teams, AWS Security Hub, Slack,
Jira and Active Directory / LDAP among them — over a
one-line description and the prompt Configure →. The whole tile is
the link. A tile your licence does not cover is dimmed, shows an amber
Premium tag in place of the status dot, and reads
Upgrade to unlock →.
Under the grid, a Security Note box states that credentials are
encrypted at rest, are reachable only by Manager and Admin roles, and are never
shown again after saving. If the live connection state cannot be loaded, an
amber banner opens above the grid and the full catalogue still renders beneath
it. When a connector's sign-in with the other system (OAuth, explained in the
lifecycle below) sends you back to the catalogue, a banner above the grid
reports the outcome: a green Connected successfully., or a red
explanation of what went wrong in plain words, with the provider's error code
where there is one. The dot and word on each tile tell you where that connector
stands:
| Status | Dot | Meaning |
|---|---|---|
Connected |
Green | Configured, the last test passed, syncs are running. |
Error |
Red | Configured, but the last test or sync failed. Open the page to see why. |
Disconnected |
Grey | A configuration is saved, but it has not passed a test. |
Not configured |
Grey | Nothing has been saved for this connector type yet. |
The captured screen shows the catalogue as a Manager sees it on a fresh demo
organisation: every tile reads Not configured, and the first nine
tiles in reading order are SMTP, Webhook,
Microsoft Teams, SharePoint,
Microsoft Defender XDR, AWS Security Hub,
GitHub, Slack and CrowdStrike Falcon. The
rest of the grid, and the Security Note, sit below the fold.
Open a connector
Each tile opens its own configuration page. The ones most organisations start with:
-
Select the
SMTPtile (“Send email notifications for policy reviews, risk updates, and compliance alerts.”). TheSMTP Configurationpage opens — see “Set up outbound email (SMTP)” below. -
Select the
Webhooktile to send HTTP callbacks to an external service of your own. Its page is covered in Webhooks. -
Select the
SharePointtile to sync documents from SharePoint and OneDrive into the Evidence Locker. The page opens on itsSetup Instructions. -
Select the
Microsoft Defender XDRtile to bring Defender and Azure security alerts in for review. It shares its Microsoft sign-in flow with SharePoint, described below. -
Select the
Slacktile to post notifications into a Slack channel. TheSlack Connectorpage opens on itsConfigurationbox.
The connector lifecycle
Each connector asks for different credentials, but they move through the same four stages.
- Open a tile, fill in the credentials, and save. The values are stored encrypted; the page then confirms a configuration exists, but never shows a saved secret again.
-
Select
Test Connection. Aegis calls the service live: a pass turns the tileConnected, a failure shows the error the service returned. Connectors that use OAuth (an authorisation handshake where you grant access in the other system rather than typing a password into Aegis) are proved by completing that authorisation instead. There is no separate activate step. -
Connectors that pull data then run on the schedules set under
Sync Settings, or on demand from there. Push-based connectors such as Slack and Teams have nothing to pull; they fire when an Aegis event occurs. -
Watch the status dot. A tile that moves to
Errormeans the most recent run failed — open its page for the detail, the audit log for the history.
Set up outbound email (SMTP)
SMTP (Simple Mail Transfer Protocol — the
standard for sending email) tells Aegis which mail server to send every
notification through, so most organisations configure it first. Select the
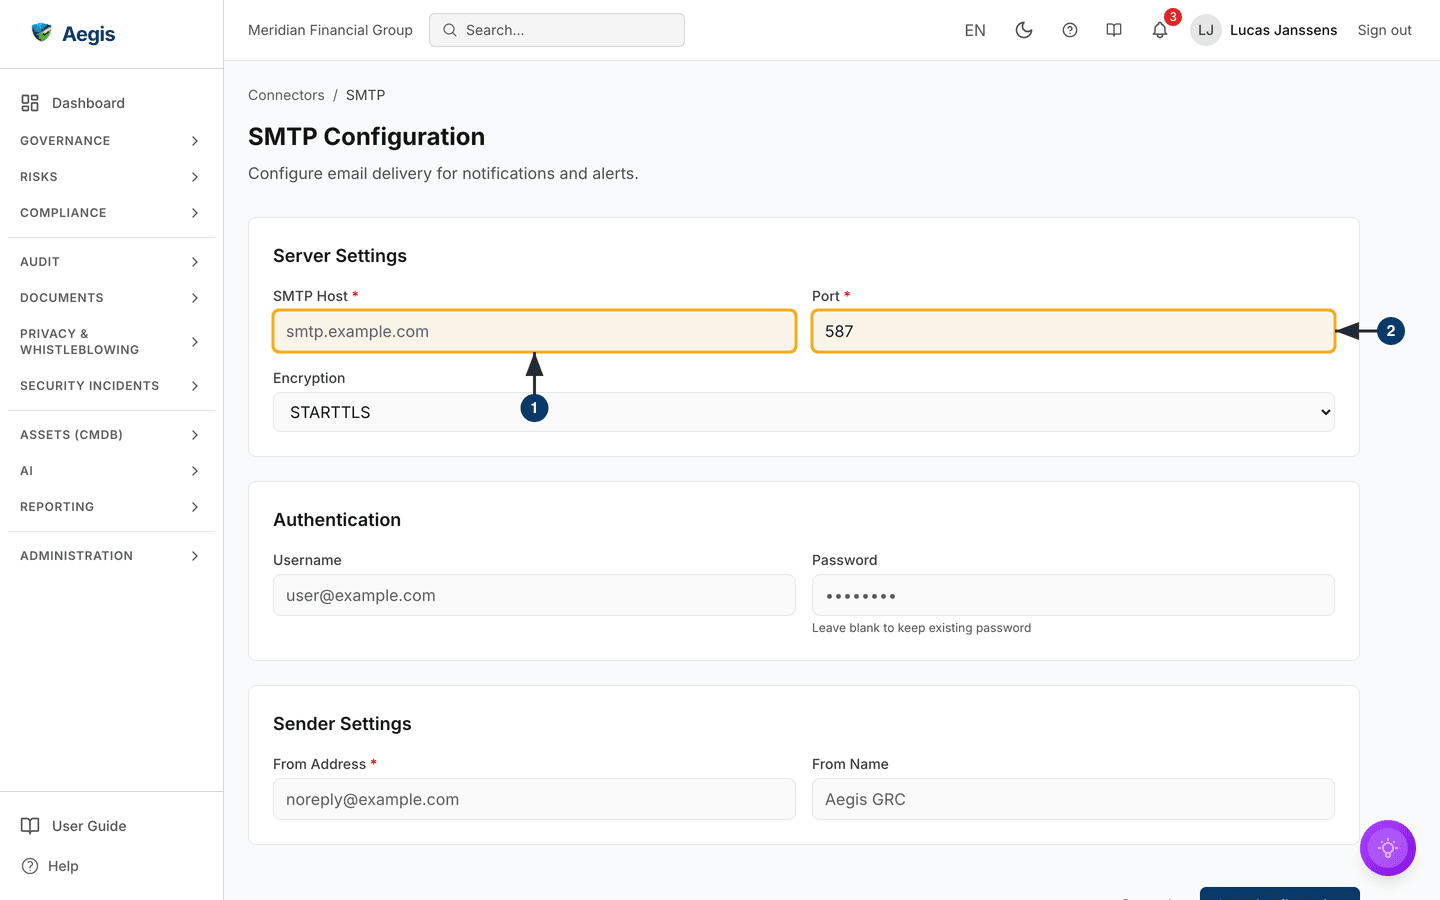
SMTP tile. Under the breadcrumb Connectors / SMTP and
the heading SMTP Configuration sits a Status: line, if
a configuration exists, and a form in three boxes. The captured screen has no
configuration saved yet, so it shows no Status: line and only the
example values greyed out in each field (smtp.example.com,
user@example.com, noreply@example.com,
Aegis GRC).
-
In
Server Settings, enter theSMTP Host. It is required; leaving it blank stops the save with “SMTP host is required”. -
Check the
Port, also required (“SMTP port is required” if blank), and theEncryptionlist under it. The form opens onSTARTTLSwith port587pre-filled, which suits most providers;NoneandSSL/TLSare the other choices. -
In
Authentication, enter theUsernameandPasswordof the mailbox Aegis sends as. The password field always shows a row of dots as its placeholder and the hint “Leave blank to keep existing password”; on an existing configuration that lets you change the sender details without retyping the secret. Two changes do need the password again: moving theSMTP HostorPort(the stored password is only ever sent to the server it was entered for), and switchingEncryptiontoNone(it is only sent over the protection it was entered with). Save either without re-entering it and the form stops with a red message telling you to re-enter the password. -
In
Sender Settings, enter theFrom Addressrecipients will see — required, and a blank one stops the save with “From address is required” — and, optionally, aFrom Namesuch asAegis GRC. -
Select
Save Configuration. The button changes toSaving..., then a green line confirms “Configuration saved successfully.” and theStatus:line updates. A save the server rejects shows “Failed to save configuration”; the technical reason goes to the application log rather than the screen.Cancelbeside the button returns you to the catalogue without saving. -
Select
Test Connection— it only appears once a configuration is saved, and readsTesting...while it runs. The result follows:Connection successfulin green, or a red line with the reason the test failed (Connection failedwhen no reason came back). A pass moves the tile toConnected. A failure is also kept on the connector: a redLast recorded errorpanel under theStatus:line shows the message and when it was recorded, so anErrorstatus explains itself the next time anyone opens the page.
To rotate the mailbox password later, type the new value into
Password and save again. Delete Configuration, bottom
left once a configuration exists, removes the whole thing — a confirmation
dialog asks “Are you sure you want to delete this connector configuration?”
first, then you return to the catalogue. Below the form, a
Configuration Notes box lists the common ports (25, 465 for SSL,
587 for TLS/STARTTLS), recommends STARTTLS on port 587 for most modern
providers, repeats that passwords are encrypted and never shown after saving,
and reminds you to test after saving.
Set up chat notifications (Slack)
The Slack connector posts Aegis notifications — critical incident alerts, new
high-severity risks, policy approval requests and compliance status updates —
into a channel you choose, and answers /aegis status,
/aegis risks, /aegis incidents and
/aegis help from inside Slack. It uses an OAuth install rather than
a saved password, so there is an extra authorisation step. The page stacks a
Configuration box, a Connection Status panel and —
once connected — a Test Notifications box over three reference
sections. Work through Setup Instructions in Slack first: it gives
the redirect, slash-command and events URLs for your own Aegis address.
-
In
Configuration, paste theClient ID,Client SecretandSigning Secretfrom your Slack app, and set aDefault Channelsuch as#security-alerts. The boxes above the fields —Required Slack App ScopesandSlash Command Setup— list what the Slack app needs. SelectSave Configuration; aConfiguration savednotice appears and theConnection Statuspanel then readsAuthorization Required. TheClient IDis required and the channel name may be at most 80 characters; a value the server refuses shows “Check the configuration values and re-enter any secrets before saving again.” over the form. The two secret fields show********once saved — leave them blank to keep the stored values. ClearingDefault Channeland saving removes the stored channel. -
Select
Authorize with Slack. Your browser leaves Aegis for Slack's install flow, where you pick the workspace and grant the scopes. On your return the panel readsConnected to Slackand offersTest ConnectionandRe-authorize. -
Select
Test Connection. A pass fills the panel in with theTeam, theBotaccount, theDefault Channeland whether aWebhookisConfigured. Those details are read back from Slack by the test itself, so the panel stays bare until you run one. -
A
Test Notificationsbox sits below the panel while the connection is good. SelectSend Test Message; a short notice in the corner of the screen reports either “Test message sent successfully” or “Failed to send the test message. Please try again.” Check the channel to confirm it arrived.
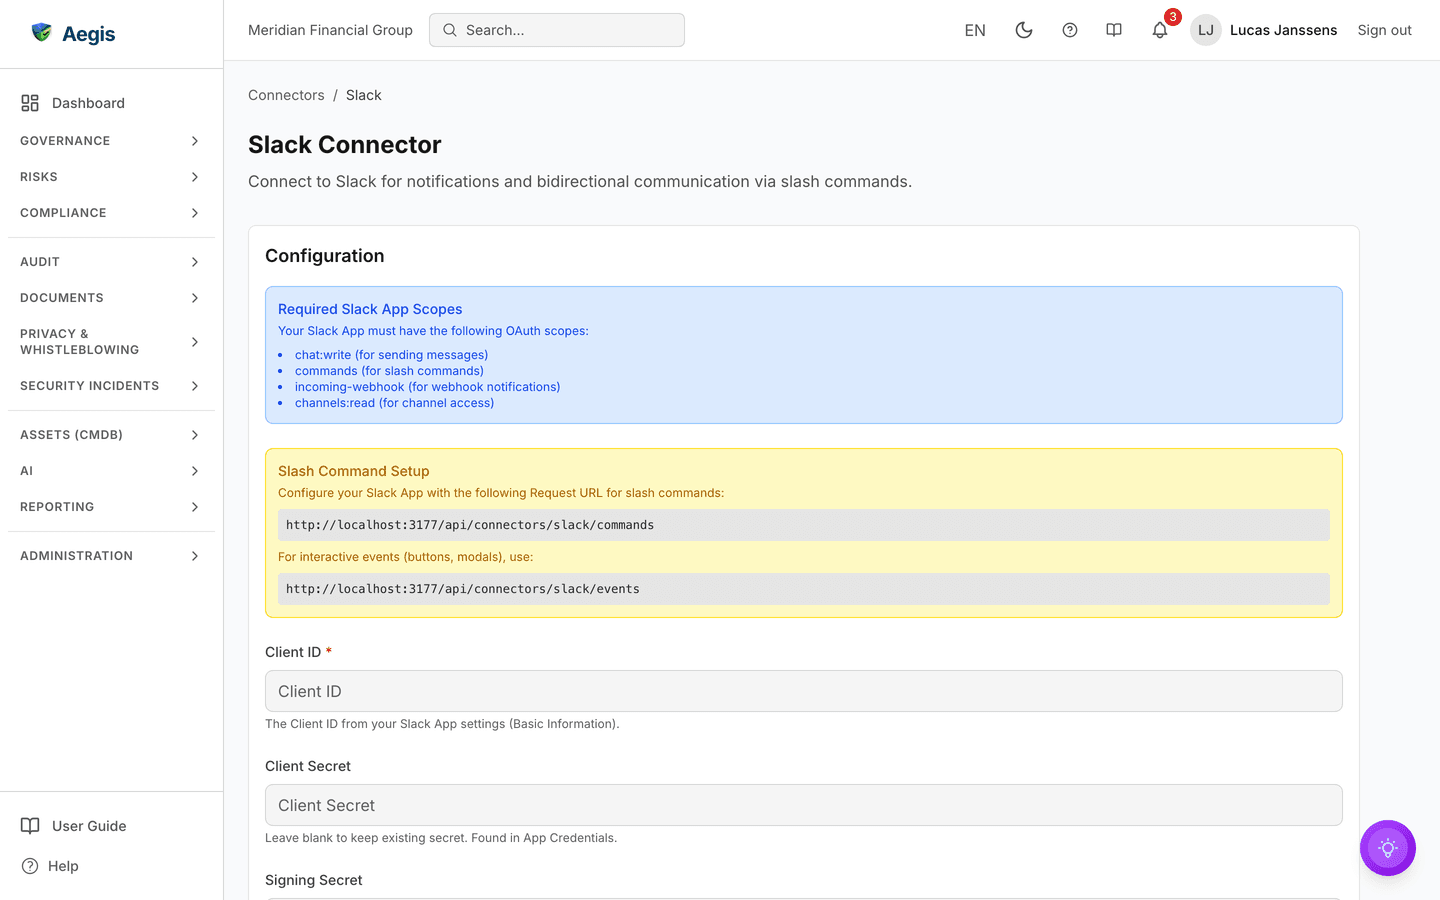
The figure shows the top of the Configuration box on a connector
with nothing saved, so it carries no numbered callouts. The blue
Required Slack App Scopes box lists the four OAuth scopes the Slack
app needs: chat:write (sending messages),
commands (slash commands), incoming-webhook (webhook
notifications) and channels:read (channel access). The yellow
Slash Command Setup
box gives the Request URL for slash commands, ending in
/api/connectors/slack/commands, and the one for interactive events
such as buttons and modals, ending in /api/connectors/slack/events;
both start with your own Aegis address. Under them,
Client ID carries the hint “The Client ID from your Slack App
settings (Basic Information).” and Client Secret the hint “Leave
blank to keep existing secret. Found in App Credentials.”
Once Slack is configured, a Disconnect connector box sits at the
foot of the connector panels. It explains that disconnecting deletes the stored
Slack configuration and credentials, and the sync schedules and mappings that
use it, while records already imported stay in Aegis. Select
Disconnect; a confirmation dialog asks you to confirm, and on
confirmation you return to the catalogue with the tile back at
Not configured. You can configure the connector again later. The
same box appears on the AWS, CrowdStrike, DSR mailbox, GitHub, Jira, KnowBe4,
Palo Alto Networks and Qualys pages once they hold a configuration. The
Microsoft Teams and Webhook pages instead have a
Delete Configuration button, as SMTP does.
Connect Microsoft 365 (SharePoint and Microsoft Defender XDR)
Two connectors sign in to Microsoft with OAuth:
SharePoint Connector syncs documents from SharePoint and OneDrive
into the Evidence Locker, and
Microsoft Defender XDR Connector brings Defender incidents into the
security signal inbox for review (see Incidents).
Both use an app registration in your own Microsoft Entra ID tenant, so part of
the setup happens in the Azure portal. Each page opens with
Setup Instructions that show the exact redirect URI for your Aegis
address.
- In the Azure portal, create an app registration (or reuse one for both connectors) and add a client secret. Copy the secret straight away — Microsoft shows it only once.
-
Under
API permissions, add the delegated Microsoft Graph permissions and grant admin consent. SharePoint needsFiles.Read.AllandSites.Read.All; Microsoft Defender XDR needsSecurityAlert.Read.All,SecurityIncident.Read.AllandUser.Read. A connection authorised beforeSecurityIncident.Read.Allwas added keeps syncing single alerts, and its sync result asks you to selectRe-authorizeso Defender's grouped incidents come through instead. -
Under
Authentication, add a platform of typeWeb— notSingle-page applicationorMobile and desktop— and register the redirect URI from the connector'sSetup Instructions. It must match character for character, scheme and path included, with no trailing slash:https://<your-domain>/api/connectors/sharepoint/callbackfor SharePoint andhttps://<your-domain>/api/connectors/azure/callbackfor Microsoft Defender XDR. One app registration serving both connectors needs both URIs. -
Back in Aegis, enter the
Client ID,Client SecretandTenant IDand selectSave Configuration. -
Select
Authorize with Microsoft, sign in and accept the consent screen. On your return a greenConnected successfully.banner sits at the top of the connector page and the panel readsConnected to SharePointorConnected to Azure Security API; selectTest Connectionto confirm. If the sign-in failed, a red banner takes its place instead: it says what went wrong in plain words, shows the Microsoft error code where there is one and, for a Microsoft error, quotes the exact redirect URI to register on the app registration.
If Microsoft stops you with “You can't sign in” instead, the code on that screen tells you what to fix:
-
AADSTS50011(the redirect URI does not match) orAADSTS900971(no reply address provided) — the redirect URI is not registered on the app, is registered under the wrong platform, or differs by a character. Fix it underAuthenticationas in step 3; the change takes effect within a few minutes. -
AADSTS650053(a scope does not exist) — the app asked for a permission Microsoft Graph does not have. Check the permission list in step 2. -
AADSTS65001or a request for admin approval — consent has not been granted. Ask a Global or Privileged Role Administrator to selectGrant admin consentunderAPI permissions. -
Sign-in works but the wrong directory appears — the
Tenant IDorClient IDin Aegis points at a different app registration than the one you edited. Compare it with theApplication (client) IDon the app's overview.
Choose what SharePoint imports
Once SharePoint is connected, the page shows Evidence sources:
“Only these folders are imported into the Evidence Locker, by Sync Now,
schedules and the API.” Until you add one, the panel reads
No evidence source yet. Nothing is imported until you add a folder., and Sync Now stays disabled with a note that it imports
configured evidence sources only.
-
Select
Add source. Pick aSite, then aLibrary, then browse to theFolder(Up one levelgoes back). TickInclude subfoldersto take the whole tree. -
Select
Preview files. Aegis lists the files with their count and total size, and marks any the Evidence Locker would refuse asnot accepted by the Evidence Locker. -
Optionally fill in
Name (optional), then selectSave source. A personal OneDrive (My OneDrive (personal)) is saved only after you tick the confirmation that its files may be imported as evidence. -
Each saved source has its own
Sync,EnableorDisable, andRemovebuttons.Sync Nowimports every enabled source.
Imported files land in the locker as drafts that still need a person's approval (see Evidence). They are recorded as uploaded by the SharePoint connector, so the admin who connected or synced the connector may approve them.
What a sync stores
Each imported file is copied into the Evidence Locker under its original
SharePoint file name, with its SHA-256 and a link back to the SharePoint item;
the stored copy, not the link, is the evidence. A file already in the locker is
skipped as
Already in the Evidence Locker. When a file changes in SharePoint
after its evidence was approved, the next sync adds the new content as a new
version awaiting review; while that version is in review, further changes wait
for the sync after the decision. A sync never removes anything: deleting or
moving a file in SharePoint leaves its evidence in the locker.
Imported evidence is owned by whoever clicked Sync Now or the
source's Sync. A scheduled sync gives it to the person who added
the source or, if that account is disabled, the longest-standing active Admin;
with neither, the scheduled sync fails instead of importing unowned evidence.
A source's Import mapping sets what its files become: the evidence
type, Valid for (days), tags and linked controls, with
File-name rules tried in order (the first match wins). Linked
controls count only after the evidence is approved.
The Sync Status panel lists each run under
Recent Syncs — from Sync Now, a source's
Sync button or a schedule — with how many files were synced,
skipped or failed.
Sync an Entra ID connection
The Microsoft Entra ID connector takes read-only snapshots of your
directory, which Aegis evaluates about every 30 minutes. Each connection row has
a Sync now button for people who may configure connectors, so you
can test a connection without waiting. The button reads
Syncing… while the run lasts, and repeated clicks do not queue
extra runs. When it ends, the row shows the new status, last sync time, any
error and the evidence it recorded; a longer run says
The sync is still running. Reload the page later to see the result.
Under Segregation of duties, two lists —
Developer group patterns and
Production access group patterns — define a conflict: a user in a
group matching each list is counted as an SoD violation from the next sync. Each
list takes 1 to 20 patterns of at most 64 characters, one per line; tabs
separate patterns like new lines, so a row pasted from a spreadsheet works.
Save patterns checks the lists first and names the list and line
that break a rule, and a refusal from the server says why (for example a missing
permission or an expired session) instead of a generic error.
Schedule the syncs
A connector that pulls data needs a schedule, or it only ever runs when you
trigger it by hand.
Sync Settings in the catalogue header opens
/connectors/sync, which has two tabs, Schedules and
Webhooks. No figure in this chapter shows it.
-
Select
Sync Settings. The page opens on theSchedulestab, headedSync Schedules. With nothing set up you get the empty stateNo sync schedulesand aCreate Schedulebutton in the panel. -
Select
Add Schedule. ACreate Scheduleform asks for theConnector, aCron Expression— the hint reads “Format: minute hour day-of-month month day-of-week”, and anything other than five parts is refused — an optionalSync Type,Max Retries,Retry Delay (seconds)and a tick box forEnable schedule immediately. -
Select
Create Schedule. The row joins the table underConnector,Schedule,Status,Last Run,Next RunandActions, with a status ofPending,Running,Success,FailedorDisabled. -
Use the icon buttons under
Actions:Sync now,Enable scheduleorDisable schedule,Edit scheduleandDelete Schedule. Deleting asks “Are you sure you want to delete this sync schedule? This action cannot be undone.” first.
Sync Type (Optional) only offers the choices that suit the chosen
connector, and the server refuses any other value. Microsoft Defender XDR offers
All Alerts, High Severity,
Medium Severity and Low Severity; GitHub offers
All, Dependabot Alerts and
Secret Scanning Alerts. Other connectors have no sync-type choice
and sync everything they cover.
For SharePoint, Sync Type (Optional) is either
Evidence (selected folders) — tick one or more of the
Evidence sources set up on the connector page — or
Questionnaires. An evidence schedule without a source is refused
with Select at least one evidence source, and a source removed
later is dropped from the schedule when you edit it. A schedule created before
this choice existed (the old “All Documents” or “Policies Only” types) now fails
and asks you to edit it, choose Evidence and select the source folders.
The Webhooks tab is reference material rather than a form.
Webhook Endpoints lists the inbound addresses Aegis exposes so an
external service can push an event in and trigger a sync at once —
GitHub, Azure Event Grid, SharePoint,
CrowdStrike and a Generic endpoint — each with its
URL, expected format, headers and a Copy URL button. A
Webhook Security note adds the condition: an inbound endpoint
refuses every call (503) until you set a webhook secret in that
connector's settings, and after that needs a valid signature (401
otherwise).
Tips and limits
-
Each connector type holds one configuration for the organisation. The
exceptions are
Active Directory / LDAPandLeen, which keep a list of connections under one tile; for a second destination elsewhere, add the generic webhook connector as an extra route. -
Credentials are never returned to the page or to the API once saved. If you
suspect one has been exposed, delete the configuration (
DisconnectorDelete Configuration, depending on the page) and set it up again — that clears every stored setting for that connector.Disconnectalso removes the sync schedules and mappings that use the connector, so recreate those afterwards; records it has already imported stay in Aegis. -
A connector that ran for weeks and now shows
Errorhas usually lost its credential — a rotated password, a revoked or expired token. Open its page — where the page shows aLast recorded errorpanel, it carries the reason — enter the new value, save and test again; an OAuth connector needsRe-authorizeinstead. - A healthy connector is not on its own enough for someone to receive a notification. Messages are sent per recipient, and only when that person has the channel switched on in their own notification preferences; quiet hours and a digest setting hold a message back.
- Connector saves, tests and sync runs are written to the audit log.
One page per integration
The Integrations part of this guide has a page for each connector — what it brings in and from where, the permissions it needs, who owns what it imports, and when it runs: SharePoint, Microsoft Entra ID, Microsoft Defender XDR, Jira, Webhooks, Active Directory / LDAP, AWS, GitHub, CrowdStrike Falcon, Palo Alto Networks, Qualys, PagerDuty, ServiceNow, Okta, Leen, KnowBe4, DSR mailbox, Slack, Microsoft Teams and SMTP. For your own scripts, see the API reference.
Where this connects
Connectors feed signals to Anomalies, findings to Risks and Incidents, documents to Evidence, training results to Security awareness and directory data to HR, alongside Entra ID single sign-on. Inbound endpoints are covered in Webhooks, outbound actions in Workflows, notification preferences in Settings and the role limits above in What each role can do.