Security Processes
Write down the security work your organisation actually performs — patching, vulnerability management, EDR, backups — and evidence that it runs by linking the tickets behind it.
A security process is a security activity you perform again and again: applying patches, chasing vulnerabilities, running endpoint detection, watching a SIEM (a system that collects and correlates security logs), restoring from backup. This module gives each one a named home — an owner, the tooling that powers it, a review cadence, an objective — and attaches the external tickets that show the work happening. When an auditor asks "how do you patch?", you open the process, read the objective, and show the tickets underneath it.
Aegis does not perform the work. You define the process and record the ticket references; the page counts how many are linked and how many are still open, so the picture stays honest. Each ticket also carries an SLA (service-level agreement — the number of days a ticket may stay open) verdict, and tickets pulled in from Jira can be checked against the procedure steps you define.
Who uses it
Reading is open to every role; editing sits with Contributor, and creating or deleting with Manager and above. Setting SLA targets and procedure steps is reserved for Admin.
| Role | What you can do here |
|---|---|
| Admin |
Everything a Manager can, plus the organisation-wide
SLA targets, a per-process
SLA override and the
Procedure steps rules.
|
| Manager | Create, edit and delete processes; link, edit, re-status and remove tickets; connect external ticket sources and start a sync on demand; review the SLA values Jira Service Management reports; run both AI actions. |
| Contributor | Read processes, edit a process, link tickets and change their status, run both AI actions. Cannot create or delete a process, and cannot remove a ticket link. |
| Viewer | Read-only: browse processes, tickets, sources, SLA verdicts and adherence evidence. The AI runs are also available, because they only read. |
What's on this screen
Open Security Processes from the Governance group in
the left sidebar. The page leads with its title and a one-line subtitle: define
the organisation's active security processes and track their operational
execution through linked tickets. Managers and Admins also see a
New security process button at the right of that header row, and
Admins see an SLA targets button beside it. The screenshot below
was captured as Contributor,
which is why neither button appears.
Under the header sits a three-part filter bar — a search box, an
All types dropdown and an All statuses dropdown.
Processes appear below as cards in a grid, up to three across on a wide screen
and 20 to a page. Each card shows the process name, a coloured type badge and a
status badge, the owner, the tooling, and the two ticket counts. Below the grid,
the foot of the page carries a page indicator such as
Page 1 of 1 with Previous and
Next buttons, each greyed out when there is no page in that
direction. The pagination sits below the captured area of the figure.
-
Type into
Search security processes...to narrow the grid by name. The list refreshes shortly after you stop typing and pagination returns to page one. -
Open
All typesto show one kind of process only —Patch management,Vulnerability management,SIEM monitoringand so on. The grid redraws at once. -
Open
All statusesto show onlyActiveor onlyInactiveprocesses. The three filters combine. -
Read a card's body for the working detail:
OwnerandToolingon the middle lines, then two counts at the foot —linked ticketsandopen tickets. The tooling line is left out when nothing is recorded. - Select the card to open the process. Aegis navigates to the detail page, where the tickets, the ticket sources, the controls and evidence, and the AI actions live.
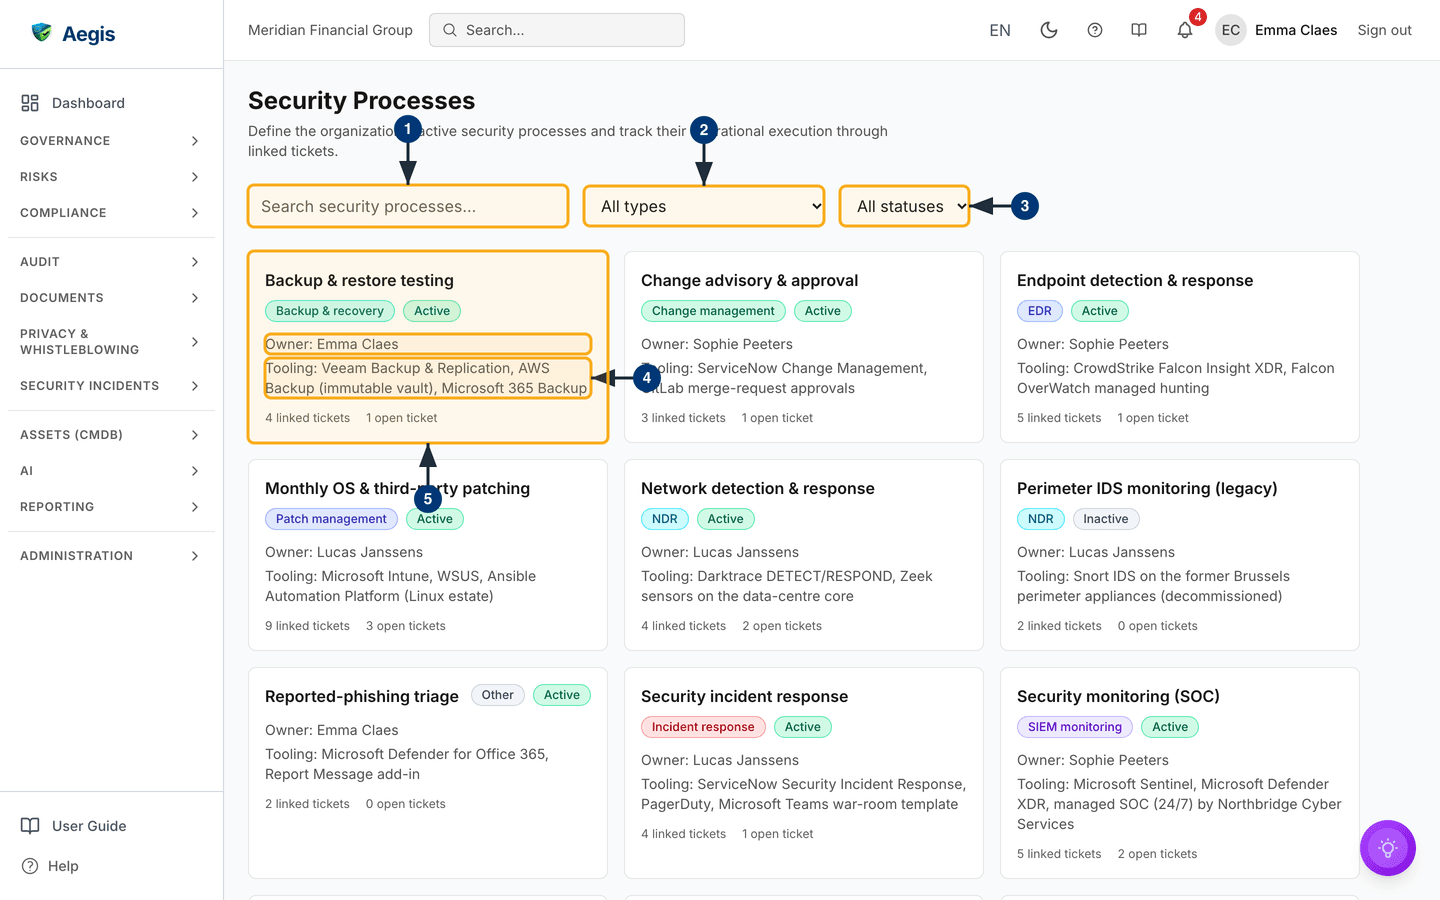
The captured screen shows a fuller register: processes for backup and restore
testing, change advisory, endpoint and network detection, monthly patching,
phishing triage, incident response and security monitoring, each with a named
owner and its tooling. Most are badged
Active; one legacy perimeter-monitoring process is badged
Inactive and shows 0 open tickets — a retired
capability whose history stays on record. The grid continues below the captured
area.
Define a new security process
Select New security process. A modal titled
Define security process
opens over the page.
-
Enter the
Name— what your organisation calls this work, such asMonthly OS patching. Required, up to 200 characters. -
Pick a
Typefrom the fixed list:Patch management,Vulnerability management,EDR,NDR,SIEM monitoring,Incident response,Backup & recovery,Access management,Change management,Other. Required; it drives the coloured badge on the card. -
Choose an
Owner. This picker appears only if your role may list users; otherwise the process is created without one and a Manager sets it later. -
Fill in the optional fields:
Tooling(free text, up to 500 characters — for exampleCrowdStrike Falcon) andReview cadence(free text, up to 200 — for exampleQuarterly), then theObjective— what the process must achieve and how success is measured — and aDescriptionof its scope, each up to 5,000 characters. -
Select
Create. The modal closes, aSecurity process createdconfirmation appears and the card joins the grid. New processes always startActive— there is no status field on the create form.
Only the overview was captured, as a Contributor — who cannot create a process. The controls described from here on are read from the product itself; there is no figure for them.
Open a process and read its detail
Selecting a card opens /security-processes/<id>, with a
← Back to security processes link at the top-left. The header
repeats the name and its two badges, shows the description, then a line of
facts: Owner, Review cadence (only when recorded) and
the live open ticket count. On the right sit
Review Gaps & Controls and
Validate & Optimize for every role, then
SLA override and Procedure steps for Admins, and
Edit and Delete for roles that hold them. Below come
the Objective and Tooling panels, shown only when
filled in, then Tickets, External ticket sources,
Controls & evidence, and the saved AI insight history.
Link a ticket as evidence
Linking tickets turns a definition into evidence, and it is a
Contributor task. A row here
is a reference to a ticket in your own tracker; the ticket itself stays where it
is. Until the first ticket arrives, the section shows
No tickets linked yet with a Link ticket
button for roles that may edit.
- In the Tickets section, select
Link ticket. A modal opens. -
Enter the
Ticket reference— its identifier in its home system, for exampleOPS-431. This is the only required field, up to 200 characters. -
Add a
Titleand aURLif you have them. A valid web address turns the reference into a clickable link in the table; unsafe addresses are stored but never linked. -
Set the
Systemthe ticket lives in and its startingStatus, and useNotesfor context a later reader will need. -
Select
Link. The ticket appears as the newest row, aTicket linkedconfirmation shows, and both counts — on the process and on its card in the overview — update.
The table has columns Reference, Title,
System, Status, SLA,
Procedure check, Linked by, Closed and
Actions, its own All statuses and
All systems filters, and pagination below. For roles that may edit,
Status is an inline dropdown: change it in the row and it saves at
once; read-only roles see the status as a badge instead. Moving a ticket to
Closed stamps the Closed date, and moving it back
clears the date — you never type it. Edit reopens the full form;
Delete is offered to
Manager and above behind a
confirmation.
A ticket brought in by a ticket source belongs to that source. Its edit form
says so: the reference, system and status follow the source, and only the title,
URL and notes stay editable here. Changing the status of such a row in the table
is refused with
Failed to update the ticket link. — change it in the source system
and let the next sync carry it across.
| Ticket status | What it means |
|---|---|
Open |
Raised, not started. Counts towards the process's open-ticket total. |
In progress |
Being worked. Still counts as open. |
Closed |
Finished. The closed date is stamped automatically and it leaves the open count. |
Read the SLA verdict on each ticket
Every ticket row carries an SLA badge in the SLA column, worked out
from the target that applies to it. Hover the badge to see the due date. Open
tickets are re-evaluated every hour; a closed ticket keeps the verdict it earned
under the targets in force when it closed, even if the targets change later.
| SLA badge | What it means |
|---|---|
Within SLA |
Open, with time left before the at-risk threshold. |
At risk |
Open, and past the share of the target set as the at-risk point. |
Breached |
Open, and past its due date. |
Met |
Closed on or before its due date. |
Missed |
Closed after its due date. |
Unknown (sync stale) |
A synced ticket that has not been refreshed from its source for a day, so Aegis no longer trusts its state. |
When a ticket turns At risk or Breached, the process
owner is notified once per stage — or the Admins, if the process has no owner.
The owner is also told, once per episode, when a process's synced tickets go
stale.
Set SLA targets
SLA targets are an Admin task. The
SLA targets button in the overview header sets them for every
security process; the SLA override button on one process's detail
page replaces them for that process alone, and shows an
Override active marker while one is saved. Until you save your own
targets, the shipped defaults apply.
-
Select
SLA targets(orSLA override). A modal opens with the current values. -
Under
Target days per severity, enter whole days forCritical,High,Medium,LowandNo severity (default)— between 1 and 3,650. Tickets without a severity use the default target. -
Set
At risk after (% of the target used), a whole number between 1 and 99. - Choose when the clock starts — when the source ticket was created, or when the ticket was linked in Aegis — and when it stops — when the ticket was resolved, or when it was closed.
-
Select
Save. AnSLA targets savedconfirmation appears.Reset to defaultsreturns the form to the shipped values; on an override,Remove overridehands the process back to the organisation-wide targets.
Connect an external ticket source
Under the tickets table sits External ticket sources. It binds a connector you
have already configured — a Jira connection, GitHub, SharePoint or ServiceNow —
to one list or project, so tickets from that list are pulled into the table
above. It needs connector-management rights, so it is a
Manager or
Admin task. With nothing bound, the
section reads No external ticket sources.
-
Select
Connect source. TheConnect ticket sourcemodal opens; with no eligible connector configured it says so and points you at the Connectors page — credentials are never entered here. -
Choose the
Connectorfrom the dropdown of what is already set up. It lists ordinary connectors underConnectorsand Jira connections underJira connections. -
Enter the
List / projectreference — a Jira project key, a repository, a SharePoint list or a ServiceNow queue. Required, up to 500 characters. For Jira, enter the project key, for exampleSEC. -
Add an optional
Filter(a JQL query, a label, a milestone) to narrow what is followed, and leaveIngestionenabled unless you want the binding recorded but dormant. A Jira filter must be well-formed JQL that narrows the chosen project; one that would reach beyond it is refused. -
Select
Connect. The source joins a table ofConnector,List / project,Filter,EnabledandLast sync, withSync now,EditandRemovebeside it. Removing it detaches the source and leaves the connector untouched.
Once a source is connected and left enabled, a background job walks it on a schedule — every 15 minutes unless your operator has changed that — and creates or updates a row in the Tickets table for each ticket it finds, filling the reference, title, URL, system, status and closed date from the source. Rows are matched by reference and system, so a ticket you had already linked by hand is adopted rather than duplicated. A ticket the source stops returning — moved, deleted, or outside a changed filter — stays linked to the process for its history but no longer belongs to the source.
To refresh at once, select Sync now. It is offered only on an
enabled source whose connector is connected (or whose Jira connection is
enabled). A Sync queued confirmation appears, the button reads
Syncing…, and a Sync completed message follows once
the source has been read. The Last sync column shows every reader
the outcome: Never synced, Synced,
Skipped or Failed, with the time and, when something
went wrong, a plain cause — rejected credentials, a list that was not found,
rate limiting, a disconnected connector, an invalid mapping.
Jira tickets are ingested only through a Jira connection. A binding made
earlier against a plain Jira connector is skipped and its
Last sync cell reads
Rebind this source to a Jira connection — edit or re-create it
against the Jira connection. Jira ingestion also stops while the Jira
connector module is switched off for your organisation.
Check tickets against procedure steps
For tickets that come from Jira, an
Admin can set the route a ticket
must follow. Aegis then reads each ticket's Jira history after a sync and
records a verdict in the Procedure check column. Tickets linked by
hand, or from other systems, show a dash there.
-
On the detail page, select
Procedure steps. A modal opens; with no rule yet it says tickets are not checked until you save one. -
Under
Required steps (in order), enter one Jira status per line, in the order a ticket must pass them. Names match regardless of capitals. -
Under
Forbidden shortcuts, useAdd shortcutto name aFrom statusandTo statuspair a ticket must never jump between. -
Under
Segregation of duties, list the statuses — such asApproved— that nobody who has held the ticket's assignment may set, even after handing it over. -
Select
Save new version. Each save is kept as a numbered version in theVersion history, and the tickets table refreshes with the new verdicts.
The verdict reads Compliant, Deviation,
Pending or Unknown; hover it for the rule version it
was checked against. A deviation lists its reasons under the badge — a missing
step, a forbidden shortcut, or a status set by the ticket's own assignee. When
Jira's history is too long or unavailable, the reason says so and the check is
retried at the next sync.
Review SLA values from Jira Service Management
A Jira Service Management ticket may arrive carrying its own SLA figures. They
do not count for the Aegis verdict until a person accepts them. Such tickets
show a
JSM SLA: pending review badge under the SLA verdict, and
Manager and above also see a
Review link beside it.
-
Select
Review. TheReview JSM SLA valuesmodal opens, with the values Jira reported — SLA name, goal and elapsed hours, and the result — beside the Aegis verdict and due date. -
Select
Acceptto let the reported values count. The badge changes toJSM SLA: accepted. -
Or enter a
Reason for refusingand selectRefuse. A reason is required; the badge changes toJSM SLA: refusedand shows the reason on hover.
Aegis refuses a review of a ticket assigned to you in Jira. Where Jira hides the assignee's email, Aegis cannot check this, and the modal warns you not to review a ticket assigned to you.
Controls and adherence evidence
The Controls & evidence section ties the process to your
control framework. On the left, Linked controls lists the controls
this process supports. You link them from the control's side, not here: open the
control, go to its Mappings, choose Security processes and link this process.
On the right, Latest adherence evidence shows what Aegis recorded
after the last successful sync of a Jira ticket source: the tickets in scope,
the share closed on time, open SLA breaches and procedure-step deviations, with
the time the state was recorded and last confirmed. A new evidence item is
created only when that state changes, and
Open evidence
takes you to it. The item stays in review until a reviewer approves it. Until a
Jira source has synced, the panel says there is no adherence evidence yet; a
process without an owner gets no evidence item at all.
The AI assist
Two AI actions sit in the detail header. Both read your own records only, both stream their working as they go, and both produce advice for a person to weigh — neither changes anything on its own.
-
Review Gaps & Controlscompares the objective against the tooling, the cadence and the evidence. It reports coverage gaps, proposes controls from the frameworks your organisation has enabled that this process should map to — each cited by its framework and reference — checks whether cadence and evidence are still fresh, and drafts a tighter description you may adopt or ignore. -
Validate & Optimizeworks on the linked tickets. It names mismatched, dangling, stale or duplicate links by reference; summarises KPIs — open against closed volume, mean time to close, on-time-close rate, overdue backlog, throughput, evidence freshness; and proposes a prioritised improvement plan. The KPIs and the main findings are calculated from your ticket rows; the AI ranks and narrates them.
Either button opens a modal that first sets out what the run covers; nothing is
sent until you select Run review or Run validation. In
the Validate & Optimize result, each proposed improvement
carries a Create action item button, which creates a tracked item
linked back to this process for follow-up under
Action Items. Either result can be kept as a
record; saved runs appear in the insight history panel at the foot of the page,
so a later reader sees what was advised and when.
Both actions require the AI assist feature on your licence and the Compliance module. Each run counts against your organisation's monthly AI allowance, is subject to a per-user rate limit, and is recorded in the AI usage log.
Edit, retire or delete a process
Edit reopens the same form you created with, now titled
Edit security process and carrying one extra field,
Status. Everything stays editable, including the type — a
mis-classified process can be re-typed at any time. To retire a capability you
no longer operate, set Status to Inactive: the
process, its tickets and its sources all remain, and the card is badged
Inactive in the overview. Delete is a
Manager-and-above action behind a confirmation warning that the ticket links
will no longer be visible.
Prefer Inactive over Delete: it preserves the
linked tickets as a record that the capability once ran and was evidenced.
Reserve delete for entries created in error.
The empty state
Before any processes exist, the grid is replaced by a panel headed
No security processes yet, with a
New security process button inside it for roles that may create.
The filter bar stays visible in every state, which matters for the other empty
case: when a search or filter matches nothing you see
No security processes match the current filters. — clear the search
box and return both dropdowns to All types and
All statuses.
Tips and limits
-
The counts are Aegis's counts: they reflect the ticket rows recorded here. A
ticket you linked by hand does not follow its tracker — close it in Jira and
it stays
Openin Aegis until someone changes it. Only rows brought in by an enabled source are refreshed for you, and then only as often as the job runs or someone selectsSync now. - Procedure checks, adherence evidence and JSM SLA review all depend on a Jira ticket source. Processes evidenced only by hand-linked tickets still get SLA verdicts, but not these.
- Tooling and cadence are free text with no controlled vocabulary. Agree a house style — "Quarterly" and "Every 3 months" will not group together.
-
Ticket references are not validated — Aegis accepts one that points nowhere.
The
Validate & Optimizerun is the check that flags dangling and stale links. -
An owner is optional but worth setting: a card reading
Owner: No owneris a process nobody has been asked to run, its SLA alerts go to the Admins instead, and it gets no adherence evidence item. - A ticket link is a pointer to evidence, not the evidence itself. For documents and artefacts an auditor will read, use Evidence.
Where this connects
Security Processes sits in the Governance group beside Security Standards, Governance Bodies and Security Awareness. The controls these processes support live under Compliance Frameworks and Control Monitoring, and adherence snapshots land in Evidence. Ticket sources reuse the integrations in Connectors — see Jira, GitHub, SharePoint and ServiceNow. SLA alerts arrive through Notifications; AI-raised improvements land in Action Items. For the limits of your role, see Roles Overview.