Exceptions Register
The read-only list of every risk your organisation has formally chosen to accept, with the justification, the person who accepted it, and the date the acceptance falls due for review — and, where Data Loss Monitoring is switched on, the policy exceptions and DLP overrides that Compliance reviews.
Sometimes the right answer to a risk is to accept it: the cost of treating it
outweighs the harm, or no practical control exists yet. An assessor will then
ask who decided, why, and until when. The
exceptions register (the formal list of
consciously accepted risks) is where those answers live. You do not accept a
risk here — the register reads back every risk whose status is
Accepted and lays the acceptance evidence out in one table.
Who uses it
- Viewer and above can open the register, search and filter it, and follow any row through to the risk behind it — the same rights as reading the risk register itself.
- Accepting a risk, and editing an acceptance afterwards, happens on the risk's own detail page (see Risks), not here — and it is not open to everyone who can edit risks. Only the risk's owner, or someone with risk-acceptance authority, may accept it. Manager and Admin hold that authority by default. A Contributor may accept a risk they own, but only while its residual score is within its category's risk appetite; above it, or when the category has no appetite set, the Contributor requests approval and a manager decides.
- With Data Loss Monitoring on, everyone who may read Data Loss sees two more tabs and can request a policy exception. Deciding on requests and exporting the audit report are Manager and Admin rights by default.
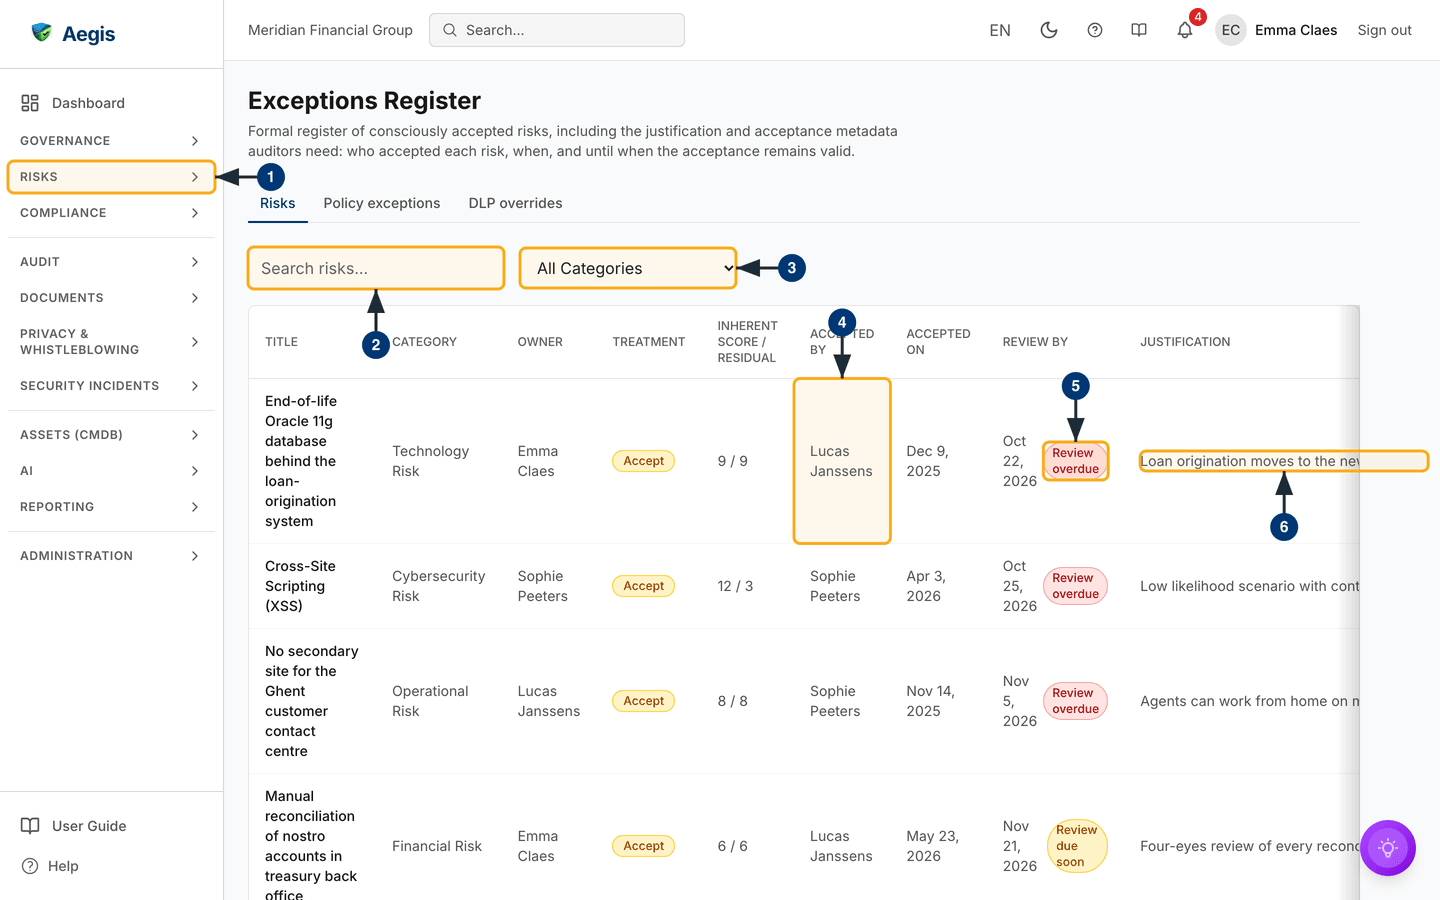
On the Risks tab nothing changes data: there is no
New button, no inline editing and no export — only the two filters
and the links out to each risk. The screenshot below was captured as a
Contributor, and a Viewer sees the same screen.
What's on this screen
The register sits under the RISKS group in the left sidebar. The
page opens with the heading Exceptions Register and a short
description: the register records who accepted each risk, when, and until when
the acceptance remains valid. In the captured screen a row of three tabs follows
— Risks, Policy exceptions and
DLP overrides. The two Data Loss tabs appear only when the Data
Loss Monitoring module and its licence are on and you may read Data Loss;
without them the page is the risks register alone, with no tab row.
The Risks tab carries a two-control filter bar — a
Search risks... box and an All Categories dropdown —
and below it the table, with nine columns: Title,
Category, Owner, Treatment,
Inherent Score / Residual, Accepted By,
Accepted On, Review By and Justification.
It is wide, so it scrolls sideways with a soft shadow at whichever edge has more
content off-screen; in the capture the Justification text runs past
the right edge for that reason.
In the captured screen every visible row carries a complete acceptance record:
an amber
Accept treatment badge, the scores, the name of the person who
accepted it, the acceptance date, a review date and the start of a written
justification. The first three rows show a red Review overdue badge
beside their review date and the fourth an amber
Review due soon badge — the order the register always uses, overdue
first.
-
Select
RISKSin the left sidebar and chooseExceptions Register. The page loads with its heading, the tabs where Data Loss is on, the filter bar, and a table of every risk currently markedAccepted. -
Type into
Search risks...to narrow the register. The search matches the risk title and its description, ignoring case. Aegis waits a moment after you stop typing, then reloads the table with the matching rows and returns you to page one. -
Choose a category from the
All Categoriesdropdown to see only the accepted risks in that category. The table reloads against that filter and returns to page one; set it back toAll Categoriesto bring the whole register back. -
Read a row from left to right: title, category, owner, treatment badge, the
inherent and residual scores, then
Accepted ByandAccepted On— who recorded the acceptance in Aegis, and when. Select the title to open the full risk record, where the acceptance can be edited. -
Check
Review By. A redReview overduebadge means the review date has passed; an amberReview due soonbadge means it falls within the next 30 days. A plain date is further away. -
Read
Justificationlast. A recorded reason appears as one truncated line — hover it for the full text — whileNo justification recordedin grey italics means the acceptance has no reason attached.
Aegis stamps Accepted By and Accepted On when a
risk moves into Accepted through the app. Risks that arrived
already marked as accepted — from an import or a migration off a spreadsheet
— appear with those columns showing an em-dash and
No justification recorded. They are real accepted risks
carrying no governance record. Their risk pages say so: the
Acceptance panel reports that no acceptance details were
recorded and asks you to re-accept the risk. Editing that panel adds a
justification and a review date but does not stamp an acceptor or a date —
only a fresh acceptance does. To record those too, move the risk to
Open or In Progress and then accept it again.
How a risk reaches the register
Membership is decided by one rule: the risk's status is Accepted.
Treatment is a separate field — a risk whose treatment reads
Accept is not on the register unless its status says so too, and an
accepted risk can carry a different treatment badge, such as
Mitigate.
-
Open the risk from Risks. Its detail page shows the
status buttons near the top for anyone who may edit risks; a Viewer sees no
buttons at all. If you are neither the owner nor an acceptance authority,
the
Acceptedbutton is greyed out with a note naming the risk owner who may accept it. -
Select the
Acceptedstatus button. Rather than switching the status straight away, Aegis opens theAccept Riskdialogue, which explains that formal acceptance places the risk on the exceptions register, and warns that the organisation then knowingly carries the risk at its current residual score until the review date, under your name. -
Fill in
Justification. It is required and holds up to 2,000 characters. The placeholder suggests reasoning that stands up later: residual risk within appetite, compensating controls in place, insured. -
Set
Review by— the date the acceptance must be looked at again. It is also required, and must be today or later; the confirm button stays greyed out until both fields are filled. -
Select
Accept Riskto confirm. Aegis sets the status toAccepted, records you as the acceptor with today's date, writes an entry to the Audit Log, and confirms withRisk accepted and added to the exceptions register. The risk now appears on the register with its evidence complete.
When a risk's residual score is above its category's risk appetite — or the
category has no appetite at all — an owner without risk-acceptance authority
sees
Request approval in place of Accepted. The
dialogue becomes Request approval to accept with the same two
fields. Sending it notifies the managers and does not change the status; the
risk joins the register only once a manager accepts it. When a manager opens
the accept dialogue for that risk, the proposed justification and review
date are already filled in, with a note saying who asked and when.
The risk's detail page then carries an Acceptance panel showing
Accepted by, Accepted on, Review by and
the justification. Anyone who may edit the risk and holds the acceptance mandate
for it — its owner or an acceptance authority — can use the small
Edit acceptance control there to correct the justification or move
the review date. That edit touches only those two fields, so it does not
re-stamp the acceptor or the date.
Setting several risks to Accepted at once from the risk
register opens a dialogue with the same warning, justification and review
date, stored on every risk the batch newly accepts. Each risk is judged
separately: only risks you own, or hold risk-acceptance authority for, are
accepted. Any others — for example one above its appetite that needs
approval — are listed back with the reason and left unchanged. A risk that
was already accepted keeps its own acceptance record.
Reading a register row
| Column | What it shows |
|---|---|
Title |
The risk name, as a link to the full risk record. |
Category |
The risk category — for example Technology Risk — or an
em-dash if none.
|
Owner |
The person accountable for the risk. |
Treatment |
Accept, Mitigate, Transfer,
Insure or Avoid; an em-dash means no
treatment has been decided. Separate from the acceptance.
|
Inherent Score / Residual |
The score before controls and the rest-risk after them. Where no residual score has been recorded, the inherent score is repeated. |
Accepted By |
The person who accepted the risk in Aegis, or an em-dash if none. |
Accepted On |
The date the acceptance was recorded, in your locale's date format, or an em-dash. |
Review By |
The review date. A red Review overdue badge marks a
date already past; an amber Review due soon badge marks
one due within 30 days. An em-dash means no review date was ever
set.
|
Justification |
The recorded reasoning, truncated to one line with the full text on
hover, or
No justification recorded.
|
Rows are sorted by review date, earliest first, so overdue acceptances come
first; acceptances with no review date fall to the end, most recently updated
first. The table shows 20 rows to a page. Beneath it — below the part of the
screen captured above — sit a
Page 1 of 2 style counter with Previous and
Next buttons, greyed out when there is nowhere to move to.
When the register shows nothing
There are two different kinds of empty here, and they mean different things:
-
No risk has been accepted at all. A panel headed
No accepted risksexplains that formally accepted risks will appear here with their justification, acceptor and review date. That is the normal starting point, not a fault. -
A filter matched nothing. A search term or category with no matches shows
No results foundinstead. The filter bar stays on screen, so clear the search box or set the dropdown back toAll Categoriesto recover the full register.
If the register fails to load, Aegis shows
Failed to load the exceptions register. with a
Retry button rather than an empty table — so an outage never reads
as "we have no accepted risks". The filter bar stays on screen in that state
too.
Policy exceptions and DLP overrides
These two tabs belong to Data Loss Monitoring (see Data Loss). A DLP override (an employee overriding a Microsoft Purview policy tip with a justification) and a policy exception (a request to be excused from a named policy) are both requests that Compliance reviews and records here. No screenshot of these tabs was captured for this guide, so the walkthrough below follows the screen's source.
Each tab has its own filter bar: an All statuses dropdown, a
Department box, a Policy box and an
Expiring within 30 days tick box. Its table lists
Employee (with the department beneath), Event on the
overrides tab or Policy on the policy-exceptions tab,
Justification, Status, Reviewer and
Valid until, 25 rows to a page. An override linked to an incident
carries an Open incident link. The status is one of
Pending review, Info requested, Approved,
Rejected, Expired or Revoked.
-
Select the
Policy exceptionsorDLP overridestab. The tab's filter bar and table load in place of the risks register; with nothing recorded yet you seeNo policy exceptions yetorNo DLP overrides yet. -
To ask for an exception yourself, select
Request policy exceptionon thePolicy exceptionstab. A form asks for thePolicyand aJustification, both required.Submit requestadds it to the list as pending; you cannot decide on your own request. -
Select
Reviewon a row. TheReview exception requestdialogue opens with the event summary (policy, channel, the action Purview took, severity and when it happened), anOpen in Purviewlink where one exists, the justification verbatim, the employee's role and department, and for an override the employee's earlier overrides. Without the decision right the dialogue is read-only. -
Choose a decision. A pending request can be approved with a
Valid untildate, rejected with a required reason, or sent back withAsk for more info; a request awaiting information can be resumed once the reply is recorded. An approved or expired exception can be renewed with a new end date, and an approved one revoked —RenewandRevokealso sit on the row itself. A reminder is sent 14 days before the end date. -
Managers and Admins can export the decisions: pick optional
Export fromandExport untildates and selectExport audit report. Aegis downloads a CSV file; more than 10,000 matching entries is refused with a request to choose a shorter period.
Aegis does not block or unblock anything. Microsoft Purview keeps enforcing the policy; the decision you record here is kept for your audit trail. The four-eyes rule applies: nobody can decide on their own request or their own DLP event. The review dialogue has no AI advice.
The AI assist
The register has no AI of its own, but each accepted risk does. The
Acceptance panel on the risk's detail page carries a
Review (AI) button, which opens
AI Exception Review — Justification, renewal & governance check. It reads the record and the signals Aegis has already calculated — severity,
how overdue or stale the acceptance is, whether a justification exists — and
reviews three things:
- whether the recorded justification is specific, risk-based and still plausible;
- what review-by date and compensating control themes to keep in place;
- whether the exception warrants governance attention.
The dialogue states its own limits: the review is read-only — it narrates your
record and the computed signals, and never changes the exception or invents
data. It cannot renew an acceptance, move a review date, or take a risk off the
register; a person reads it and decides.
Save as record keeps a review with the risk's acceptance section
for the next reviewer. Each run counts as one AI action against your
organisation's AI credits and is audit-logged.
Tips and limits
- The search box matches a risk's title and description — not the recorded justification — so the category dropdown is the only other way to slice the risks register.
-
Rows reading
No justification recordedare the ones to fix first: an accepted risk with no stated reason is difficult to defend in an audit. -
Work the
Review overduerows at the top of the register: each is an acceptance the organisation committed to revisit and has not. An acceptance with noReview Bydate — possible only for risks accepted outside the current accept dialogue — never expires and never turns amber or red. -
There is no export button on the
Riskstab. Risks has one,Export register, for Managers and Admins by default: set its status filter toAcceptedand the Excel or CSV file includesAccepted by(name and date),Acceptance rationaleandAcceptance review datecolumns alongside the risk itself. -
To withdraw an acceptance, move the risk back to
OpenorIn Progresson its detail page. It leaves the register at once, and its acceptance record — acceptor, date, justification and review date — is cleared from the risk, so a later acceptance never inherits an earlier person's reasoning. The Audit Log keeps the history of the earlier decision.
Where this connects
- Risks — where risks are created and scored, and where the decision to accept one is actually taken.
- Data Loss — the Purview events behind the policy exceptions and DLP overrides.
- Threat Actors — who might exploit a risk you are considering accepting.
- Audit Readiness — accepted risks and their justifications are part of what an assessor asks to see.
- Audit Log — every acceptance, edit and AI review is recorded there with the person and the timestamp.
- Roles — who may read the register and who may accept a risk.