Notifications
Every alert Aegis has sent you — approvals waiting, deadlines approaching, records assigned to you — on one page where you can filter, catch up and clear the backlog.
Aegis notifies you when something needs your attention: a policy pending your
approval, an incident assigned to you, a vendor review falling due, a training
module about to fall due, a deadline about to pass. Each event lands in two
places — a brief entry under the
bell in the top bar, and this full page at
/notifications. The bell is for a quick glance; this page is where
you work through the list properly. Notifications are personal: you see only
your own, and every signed-in user has this page regardless of role.
Who uses it
Everyone. Admin,
Manager,
Contributor and
Viewer all receive notifications
and manage them the same way — what differs is which events each role tends to
receive. An approver sees Policy Pending Approval; a Viewer mostly
sees status changes on records they follow, read requests for approved policies
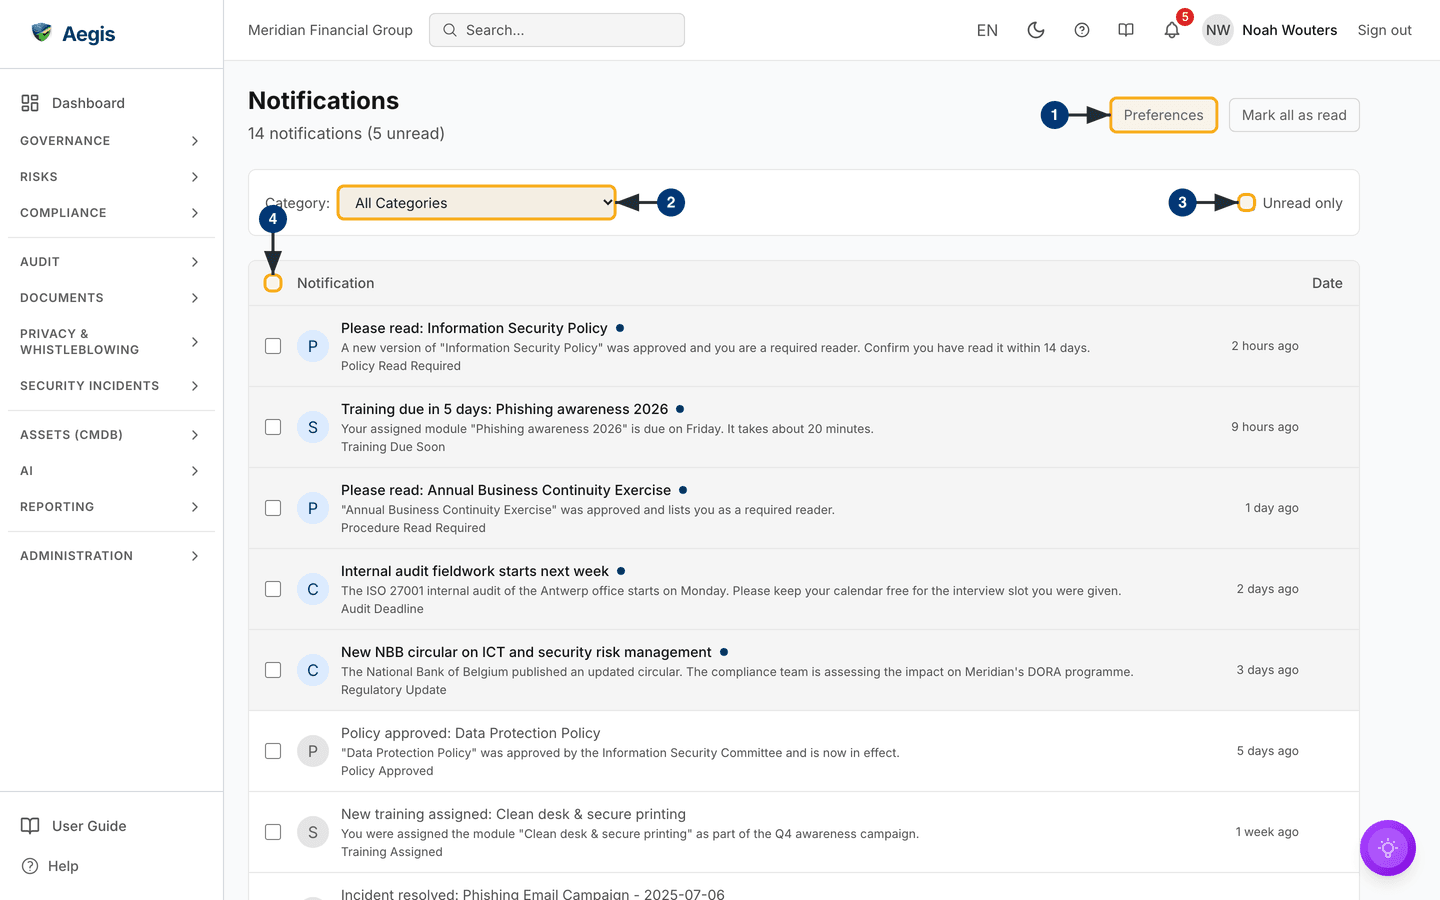
and procedures, and training reminders. The figure below was captured as a
Viewer.
What's on this screen
The header shows a count such as 14 notifications (5 unread) — the
figure on the captured screen; the bell badge in the top bar carries the same
unread number. Unread rows are shaded, their round category initial is tinted
blue and a small dot follows the title. Each row shows the notification's title,
a one-line message and its type (for example
Policy Read Required or Training Due Soon), with a
relative date such as 2 hours ago on the right. The numbered
landmarks:
-
Preferences, top right, opensNotification Settings— where you configure how and when you receive notifications across the available channels.Mark all as readappears beside it whenever anything is unread. -
The
Category:filter narrows the list to one notification type. It starts onAll Categoriesand lists every type Aegis can send — fromIncident AssignedandRisk Review DuetoPolicy Read Required,Regulatory UpdateandTraining Due Soon. The unread count in the header follows the filter. -
The
Unread onlytick-box hides everything you have already seen — the quickest way to catch up after a few days away. -
The list itself, headed by a select-all tick-box and the
NotificationandDatecolumns. The header tick-box selects every row on the current page. Each row has its own tick-box for bulk actions and a bin icon to delete it (on a desktop screen the bin appears when you hover over the row).
Catch up after time away
-
Tick
Unread only. The list drops to what you have not yet seen. - Select any row to act on it. Opening a notification marks it read and, where it points at a record — the incident, the policy, the vendor — takes you straight there.
-
For rows that need no action, tick their boxes. A count such as
3 selectedand aMark as readbutton appear at the right of the filter bar; select it — or selectMark all as readin the header to clear everything at once. Marking read never deletes anything; the rows stay in the list for reference. -
Use
PreviousandNextunder the list if there is more than one page; the list shows 20 rows per page and the footer shows which slice you are on, for exampleShowing 1 to 20 of 64andPage 1 of 4.
Delete a notification
-
Hover over the row and select the bin icon (
Delete notification). A confirmation dialog asks whether you are sure, naming the notification. -
Select
Deleteto remove it, orCancelto keep it. Deletion cannot be undone; the header count drops by one.
Choose what reaches you
-
Select
Preferences. TheNotification Settingspage (also reachable via Settings) lists the notification types, grouped by area, with a toggle per channel. - Turn off what you do not need rather than ignoring it — a feed you trust is one you will actually read. Deadline and approval notifications are worth keeping on for anyone who owns records.
-
Pick how email reaches you in the
Digestcolumn of each row:Immediatesends one email per notification,Hourly,DailyandWeeklygather them into one digest email. Daily digests go out at 09:00 and weekly ones on Monday at 09:00. Slack, Teams and in-app notifications still arrive one by one. -
To change every row at once, choose a mode in
Set all digest modesabove the list (it offersImmediate,DailyandWeekly), then selectSave Changes.DailyandWeeklyleave the time-critical alerts onImmediate; change those one by one if you really want them batched.
Organisation default (administrators)
A notification type you never set follows the organisation default, which is
Daily unless an administrator changes it. Administrators set it in
Organisation default delivery at the top of the same page. Rows a
user has already saved keep their own setting.
Time-critical alerts ignore the default and always arrive immediately unless the user chooses otherwise: incident, NIS2 and DORA reporting deadlines, GDPR breach alerts, DSR deadlines, security alerts and new whistleblowing reports. They also ignore quiet hours. Anything else that falls inside your quiet hours is held back and delivered when the quiet period ends, never dropped. Sign-in, account and invitation emails are not notifications and are never batched.
Tips and limits
-
The bell and the page always agree. The badge on the bell
is your global unread count;
View all notificationsat the foot of the bell's dropdown brings you here. Mark something read under the bell and this page updates to match. - Deleting is per row and permanent. There is no bulk delete and no undelete, and every delete asks you to confirm first. If you only want a quieter list, mark rows read instead.
-
An empty list is a good sign. When nothing matches, the
page says
No notifications found. With no filter set it addsYou're all caught up!; with a category orUnread onlyapplied it suggestsTry adjusting your filters. -
A loading failure is not an empty list. If the list cannot
be fetched, the page shows
Couldn't load notificationswith aRetrybutton, and hides the filters and count until it loads. If your account is not allowed to read notifications you seeAccess restrictedinstead — contact your administrator. -
On a phone the
Datecolumn is dropped and each row's date moves under its title, after the type; the bin icon stays visible. - Notifications are pointers, not the record. The truth lives on the record's own page; a notification only tells you to go and look. Deleting one changes nothing about the underlying record.
Where this connects
- The screen layout — where the bell sits in the top bar.
-
Settings — the home of
Notification Settings. - Incidents and Policies — two of the modules that notify most: assignments and deadlines from one, approval and read requests from the other.
- Workflows — automations that can generate notifications of their own.