Policies
Policies state how your organisation works and what it commits to — this chapter walks through drafting one, setting its review cycle, routing it for approval and keeping it under review.
A policy is a written statement of intent: this is what we do, and what staff and auditors can hold us to. The module carries one through its whole life — draft, review, approval, re-review, retirement — and writes every status change to the audit log. It records that work; it does not make the organisation compliant on its own.
Who uses it
-
Viewer — read the register,
open a policy, run
Review Triage (AI)andExport to Word. NoCreate Policy, no editing or lifecycle controls. - Contributor — create and edit policies, run the AI writing aids, set required readers, link evidence, and move a policy through every step except approval.
-
Manager and
Admin — all of that, plus
Approve,Retire without approvaland delete; see What each role can do.
The screenshots were taken with three accounts. The register, the overview, the
details form and the Evidences tab show a
Contributor, so
Approve and delete are absent there. The reviewers, approvers and
required-readers screens show an
Admin, and the blocked submission
and the policy in review show a
Manager.
What's on this screen
Open Policies from the Compliance group in the
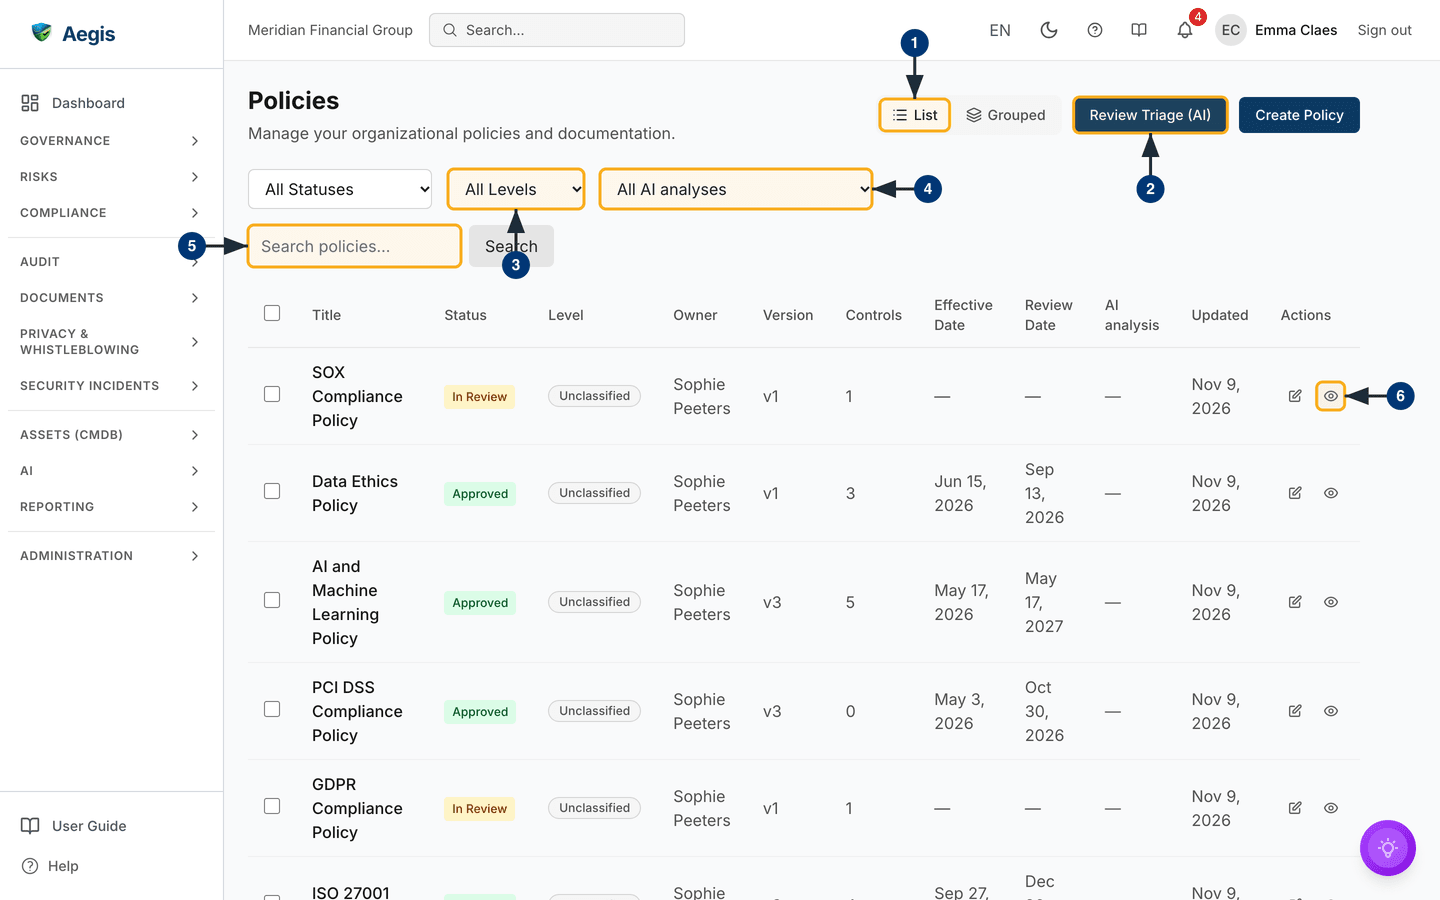
left sidebar; the register opens at /policies. The header carries
the title and three controls: a List / Grouped view
toggle, Review Triage (AI), and the navy
Create Policy button. Below sit three dropdowns —
All Statuses, All Levels and
All AI analyses — then a Search policies… box with its
Search button.
The table lists every policy — Title,
Status (a coloured badge — grey Draft, amber
In Review, green Approved), Level,
Owner, Version,
Controls mapped, Effective Date,
Review Date, AI analysis and
Updated. The Review Date column shows the
scheduled review date where one is set, and otherwise the effective date plus
the review cycle; with neither it shows a dash.
AI analysis shows the state of the policy's latest
AI Enhance run — Queued, Analysing,
Ready or Failed — or a dash when none has run, as on
every row of the captured screen. Each row begins with a tick-box and ends with
a pencil and an eye under Actions; a
Manager or above also sees a third
icon there, Delete policy.
-
Choose how the register is drawn:
Listis the flat table shown here;Groupedredraws it with one section per governance level. -
Select
Review Triage (AI)to have Aegis rank policies and procedures by their next review date and narrate a plan — the ranking comes from the dates, not the model. Saved briefings collect below the table. -
Narrow the register with
All Levels, marked here, orAll Statusesbeside it; the rows reload to matches only. The status list also offersNeeds ReviewandActive (not retired), and approvers getPending My Approval. -
Set
All AI analysestoAI analysis: queued or runningto show only policies with anAI Enhancerun in progress. While any row's run is queued or running, the list refreshes itself every ten seconds until it finishes. -
Type part of a title into
Search policies…and selectSearch. The table filters to matches. -
On any row, select the eye to open the policy on its
Document information & detailstab, or the pencil to open it straight onContent. The title is a link to the sameDocument information & detailstab; a click elsewhere on the row opensContent.
With no policies yet, the table is replaced by "No policies yet. Create your first policy to get started."; when a filter or search matches nothing, it reads "No policies match your search criteria."
Creating a policy
Creating a policy now happens on a page of its own at
/policies/new, not in a dialog over the register. Titles need not
be unique, so check the register first.
-
Type the title you have in mind into
Search policies…and selectSearch. The table filters to policies with a matching title. - If one already exists, open it by its title and work on that policy rather than starting a duplicate.
-
Otherwise select
Create Policy. The Create New Policy page opens, with aPolicies / Create New Policybreadcrumb above its heading.
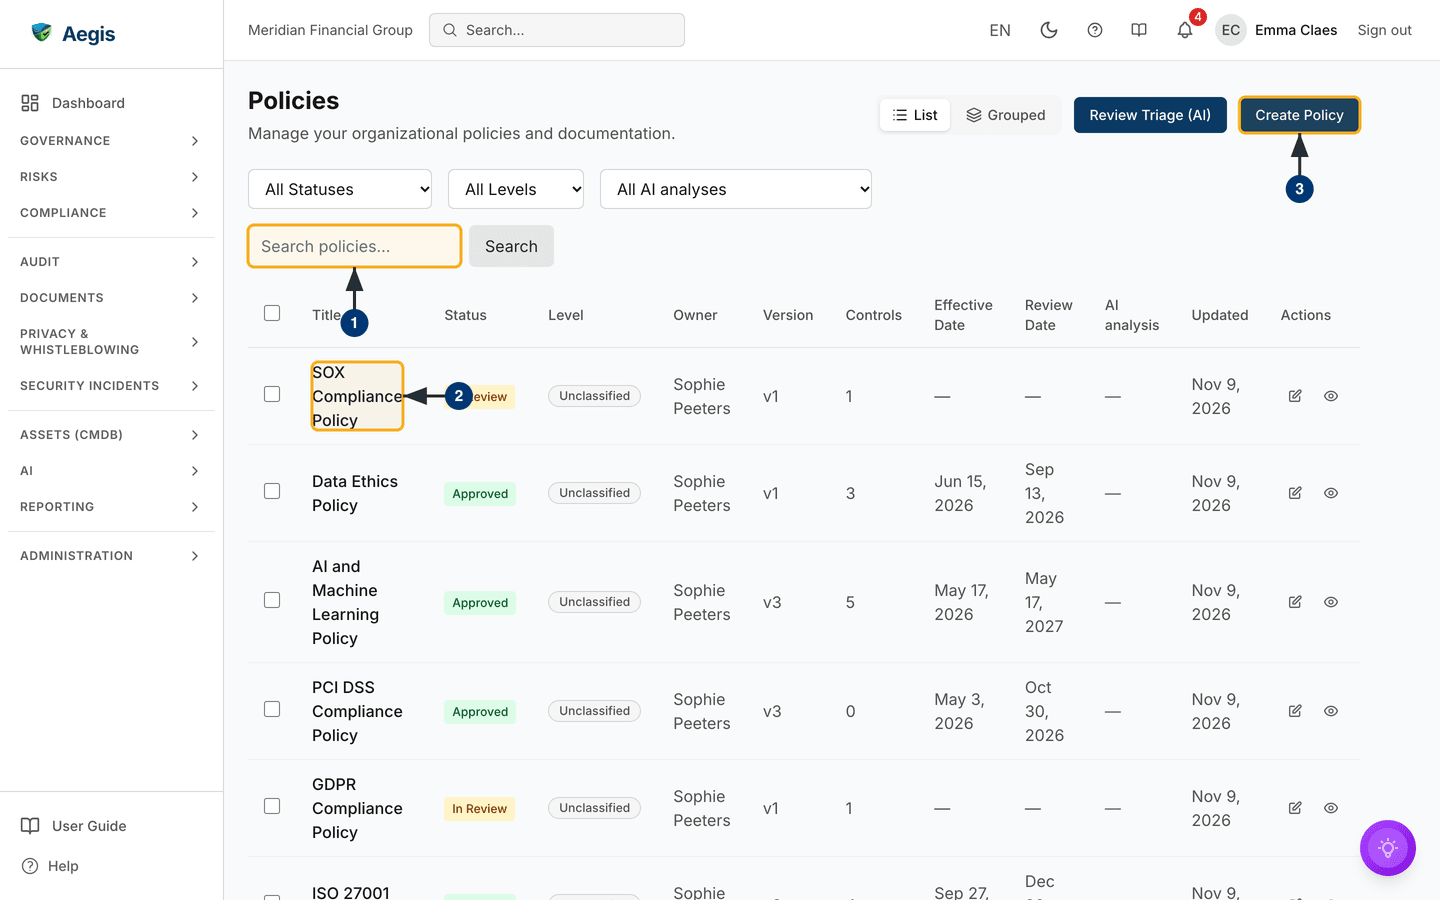
This capture shows the register at the moment before you select
Create Policy; the create page itself is not captured. It is laid
out in two cards side by side — Policy Details and
Timeline & Review — with a
Policy Content card beneath them, a
What happens next? box, and Cancel and
Create Policy at the bottom right.
-
Enter a
Policy Title. Required, as the red asterisk shows; leaving it empty returns "Title is required". -
Set the
Level— the governance level theGroupedview groups by. It starts atUnclassified; the other choices areStrategic,TacticalandOperational, and the hint below explains each. -
Under Timeline & Review, set an optional
Effective Dateand an optionalReview Date, and pick aReview Cyclepreset. The cycle starts atQuarterly; the presets are described under Changing a policy's details. -
Write the
Policy Contentin the formatted editor; thePreviewtab besideEditshows how it will read. The grey# Purpose/# Scope/# Policy Statementoutline is placeholder text that vanishes as you type. Where your organisation has a company document template, the box opens pre-filled from it with the note "Pre-filled from your company template — edit freely."; a template that loads late never overwrites what you have already typed. Also required: leaving it empty returns "Policy content is required". -
Select
Create Policy. The policy is saved as aDraft, a "Policy created successfully" message appears and the new policy's own page opens.Cancelreturns to the register and discards what you typed.
Level, dates and review cycle carry defaults — capture the draft while it is
fresh and refine everything later through Edit details.
The policy's own page
A policy opens at /policies/[id], on its Content tab
unless the link names another. A Policies breadcrumb leads back to
the register. The header shows the title, status badge, version and last-updated
date; a status line on the right reads Ready between AI jobs. Under
it runs a single row of labelled buttons — Edit, the lifecycle
action where your role allows it (Submit for Review on a draft,
Approve on a policy in review for approvers),
Export to Word and More — then the tab strip:
Document information & details, Content,
Required Readers, Audit, Translations,
Version history, Controls and Evidences.
An Improve Writing or AI Enhance tab joins the row
after Content once that aid has been run on the policy.
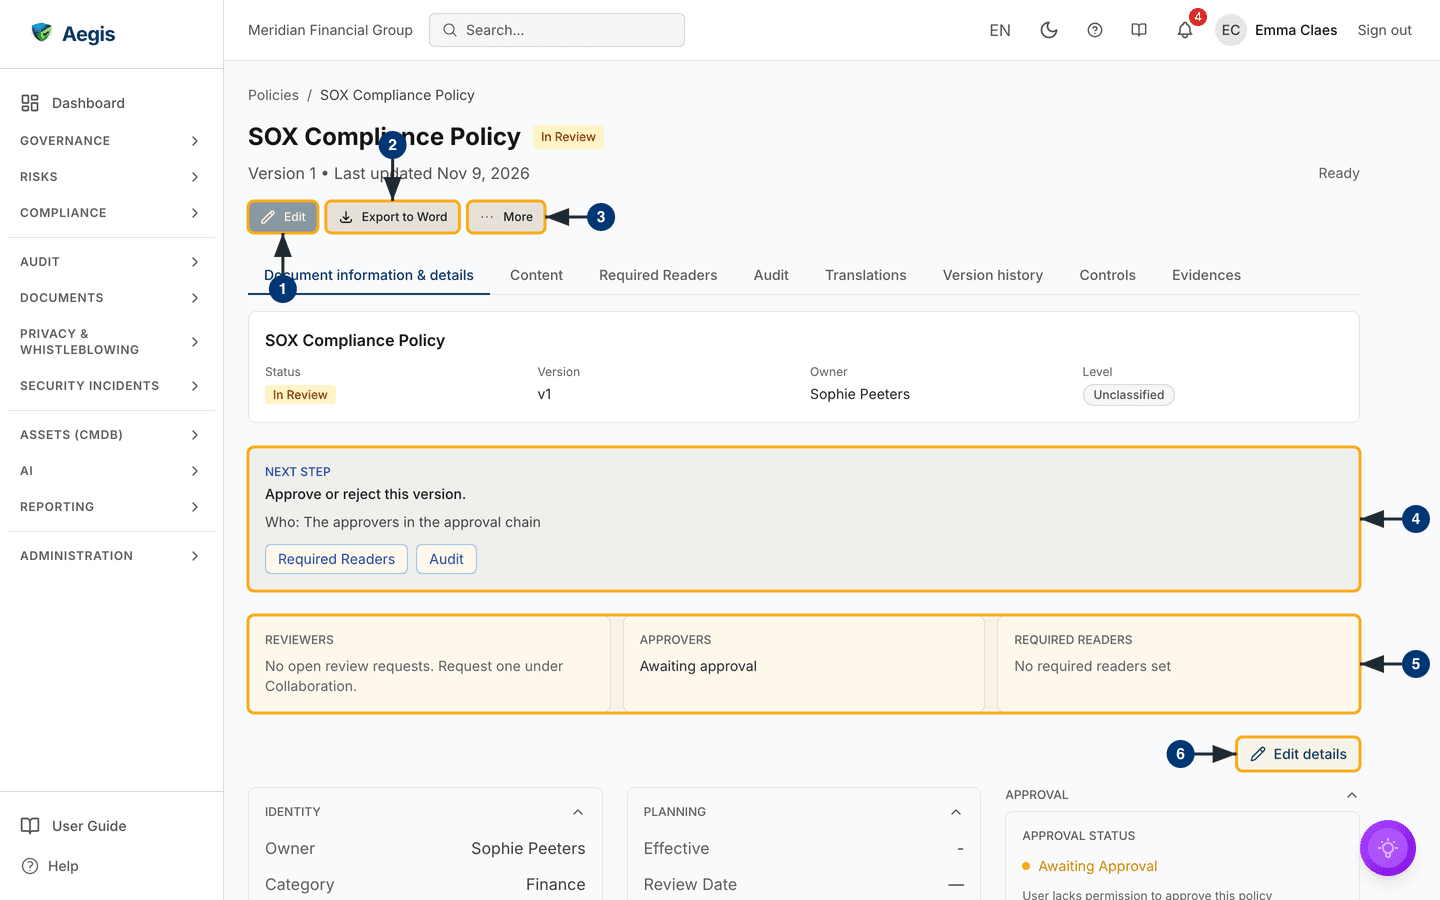
The first tab is an overview. A summary band repeats the title, status, version,
owner and level. The Next step banner says what the policy needs
now — submit it, approve it, or review it by its next review date — and who
acts. Three tiles follow: Reviewers (open review requests, raised
under Collaboration), Approvers and
Required readers (how many of the required readers have read the
current version, with a progress bar). When your licence includes multi-approver
chains and the policy's approval setting asks for more than one approver, the
Approvers tile lists each step with its role or person and shows
progress such as "1 of 2 approved", with a Partially approved badge
after the first approval; otherwise it shows the single approval ("Not yet
submitted for approval", "Awaiting approval" or who approved it). Below sit an
Edit details button and three collapsible cards:
Identity (owner, category, level and policy ID),
Planning (effective date, the next review date — the effective date
plus the review cycle, unless a review date was set — review cycle, created and
updated) and Approval (approve or reject, and the
Approval History; an account that may not approve sees "User lacks
permission to approve this policy" there instead). Then come a collapsible
Changes since last approved version panel and, for users who may
read the audit log, Recent activity with the latest five audit
entries on this policy, followed by any roadmap work and action items linked to
the policy. On a phone the band, tiles and cards stack in one column, and each
card folds shut when you tap its title.
The policy in this capture is In Review and the account is a
Contributor, so
Edit is greyed out, there is no lifecycle button, and the banner
reads "Approve or reject this version" with the approvers in the approval chain
as the ones to act.
-
Select
Editto change the body on theContenttab — on aDraftonly; otherwise the button is greyed out, as here, and its tooltip reads "Policy must be in Draft status to edit content." -
Select
Export to Wordto download the policy as a.docx. -
Open
Morefor the remaining actions, each with its icon and full label: the writing aidsImprove Writing(drafts only) andAI Enhance(aDraftor anIn Reviewpolicy), the secondary lifecycle action (Return to Drafton a policy in review,Reviseon an approved one),Retire without approvalfor approvers,Upload Word/PDFon a draft, which shows what an edited file would change before it replaces the draft, andHelp, which explains every button. -
Read the
Next stepbanner; itsRequired ReadersandAuditshortcuts open those tabs directly. -
Check the three tiles. Each one is a link:
Reviewersto the Collaboration panel below the tabs,Approversto theApprovalcard andRequired readersto theAudittab. -
Select
Edit detailsto change the title, level, dates and review cycle: the cards are replaced in place by a form — covered below. For the level alone,Classifyin theIdentitycard sets it without opening the form.
Choosing reviewers and approvers
The top of the Required Readers tab, headed
Reviewers and approvers, sets who reviews the policy and who
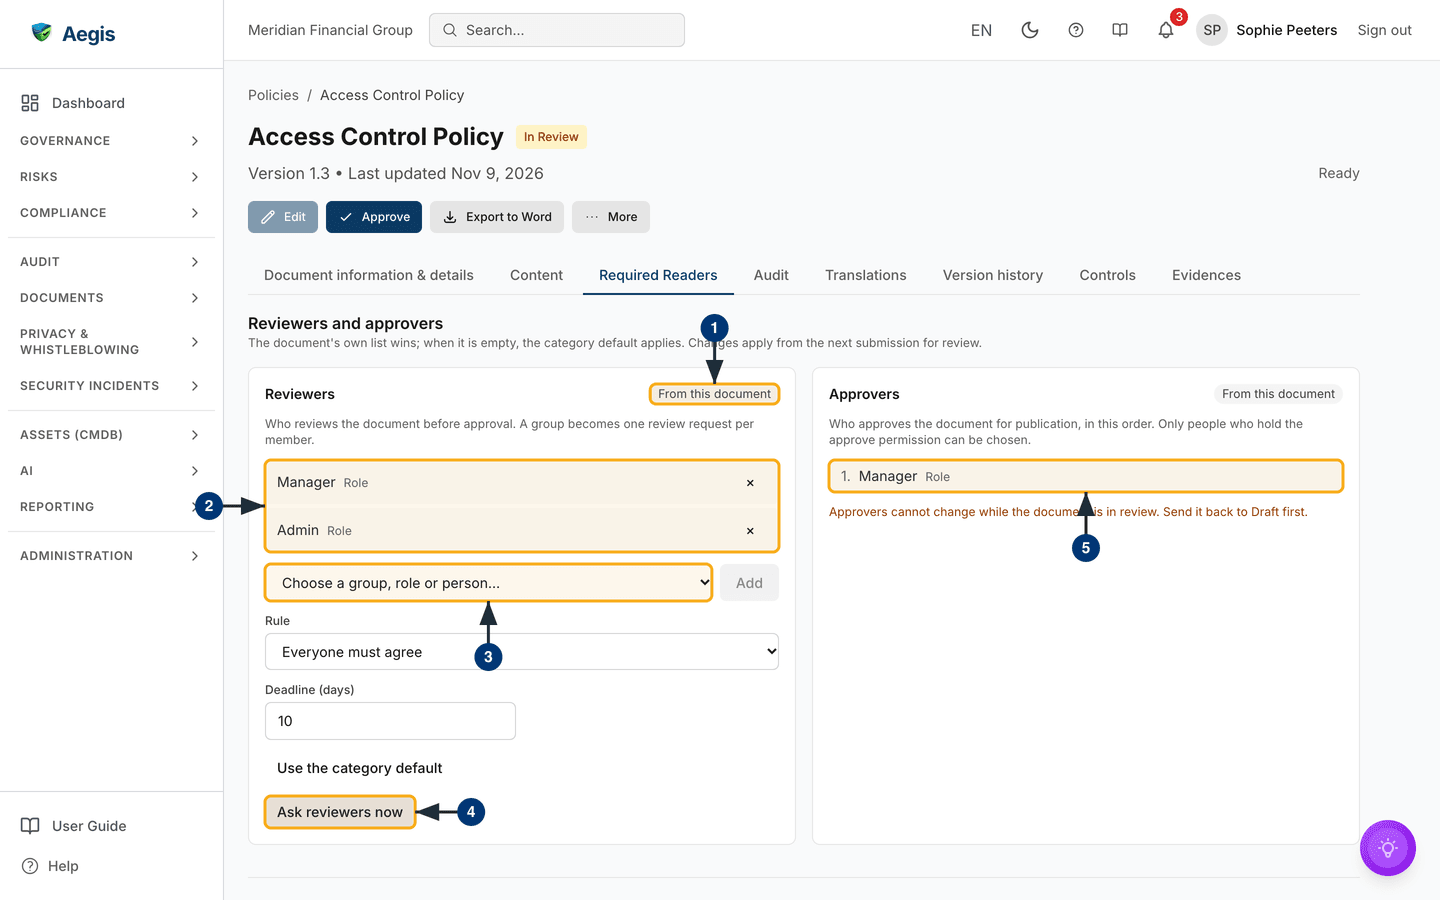
approves it. Each card carries a label saying where its list comes from:
From this document, From the category or
Organisation default. The policy's own list wins; when it is empty,
the category default from Settings → Documents applies. Changes
apply from the next submission for review.
-
Check the source label. It reads
From this documentonce the policy has its own list;Use the category default, further down the card, hands the list back to the category. -
Read the current reviewers — each with its type (
Role,GrouporPerson) — and remove one with its ×. -
Choose a group, role or person in
Choose a group, role or person…and selectAdd. A group becomes one review request per member who may decide reviews. Set theRule—Everyone must agreeorAt least a minimum numberwith itsMinimum number (N)— and theDeadline (days). -
Select
Ask reviewers nowto start a review round. Each reviewer gets an e-mail and an in-app notification that opens the policy on itsContenttab; a person without an e-mail address gets the notification only. -
Under
Approvers, add the people, roles or groups who approve, in order; the arrows change the order. Only holders of the approve permission — Admin and Manager — are offered. On a policy in review, as here, the list is locked and the card reads "Approvers cannot change while the document is in review. Send it back to Draft first."
Changes to either list are not stored until you save them: a bar appears reading
"Unsaved changes" with Discard and Save, and
"Reviewers and approvers saved." confirms the save. Below the approvers sits
Owner does not approve own document, ticked by default (it is
visible at the top of the next capture). Leave it ticked: the owner then
approves only when nobody else can and the organisation allows it under
Settings → Documents; that approval is marked as the owner's own in
the approval history.
The Reviewers tile on the details tab follows the round, for
example 1 of 2 reviews approved, then Review passed,
or Overdue once the deadline has gone by. When the policy is
submitted, the approvers of the current step get an e-mail and an in-app
notification; with a multi-approver chain, the next step's approvers are told
once the step before them has approved.
When nobody can approve
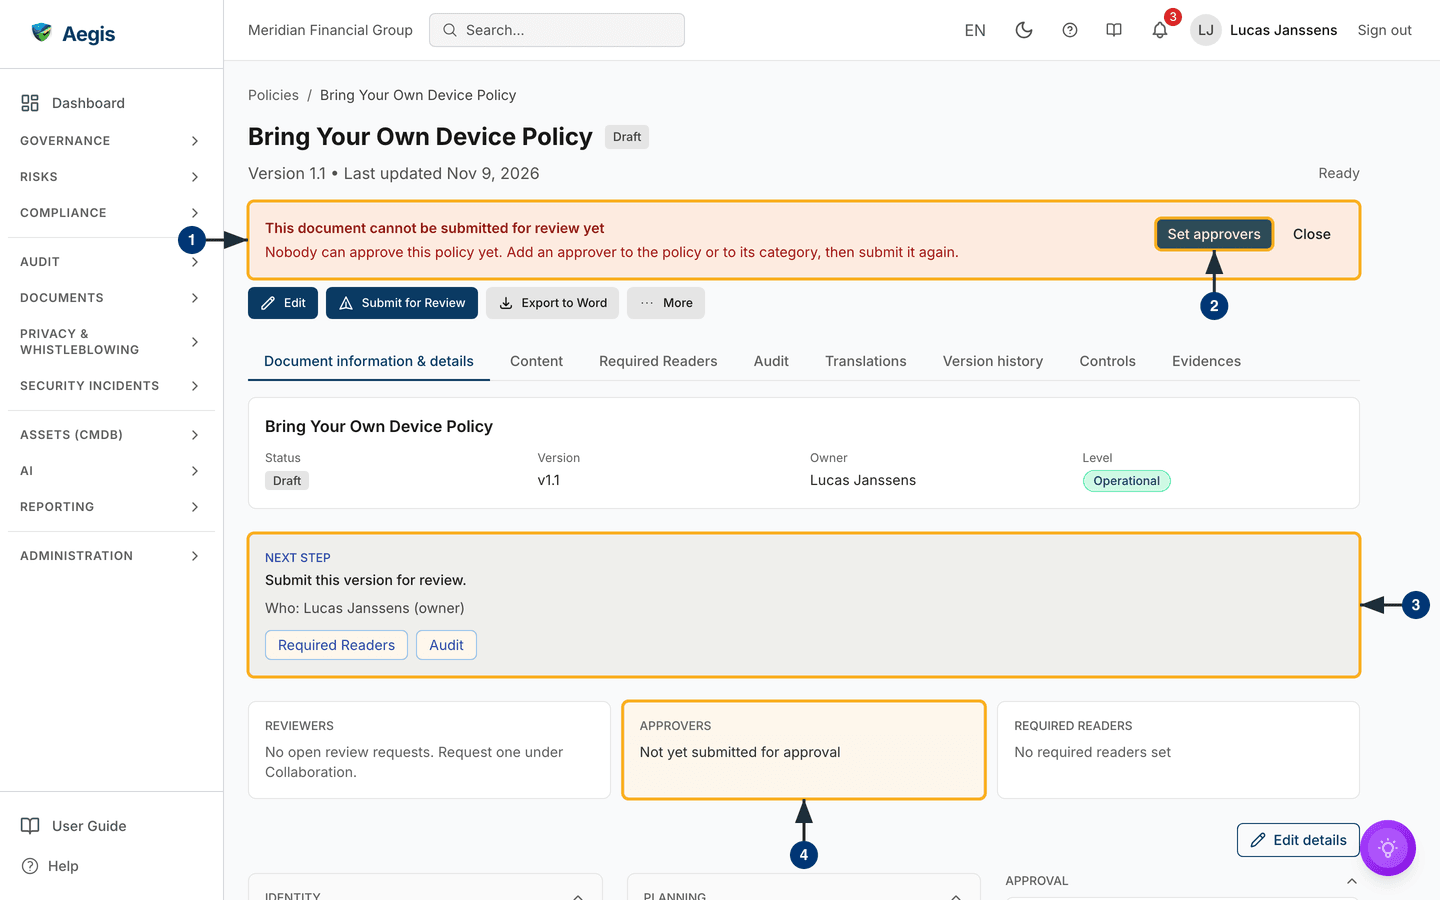
Submitting a policy that nobody but its owner can approve is refused. The captured draft below is owned by the Manager who tried to submit it.
-
A red notice appears above the toolbar: "This document cannot be submitted
for review yet — Nobody can approve this policy yet. Add an approver to the
policy or to its category, then submit it again."
Closedismisses it. -
Select
Set approvers. TheRequired Readerstab opens on the reviewers and approvers cards so you can add one. -
The
Next stepbanner still reads "Submit this version for review", with the owner as the one to act — the policy stays aDraft. -
The
Approverstile keeps reading "Not yet submitted for approval" until a submission succeeds.
Choosing who must read a policy
The Required Readers section, further down the same tab, holds the
audience that must read and acknowledge the policy; the Audit tab
shows who has. Both tabs can be linked to directly —
/policies/[id]?tab=required-readers and
/policies/[id]?tab=audit. Without permission to edit the policy,
the tab says so instead of showing the form.
-
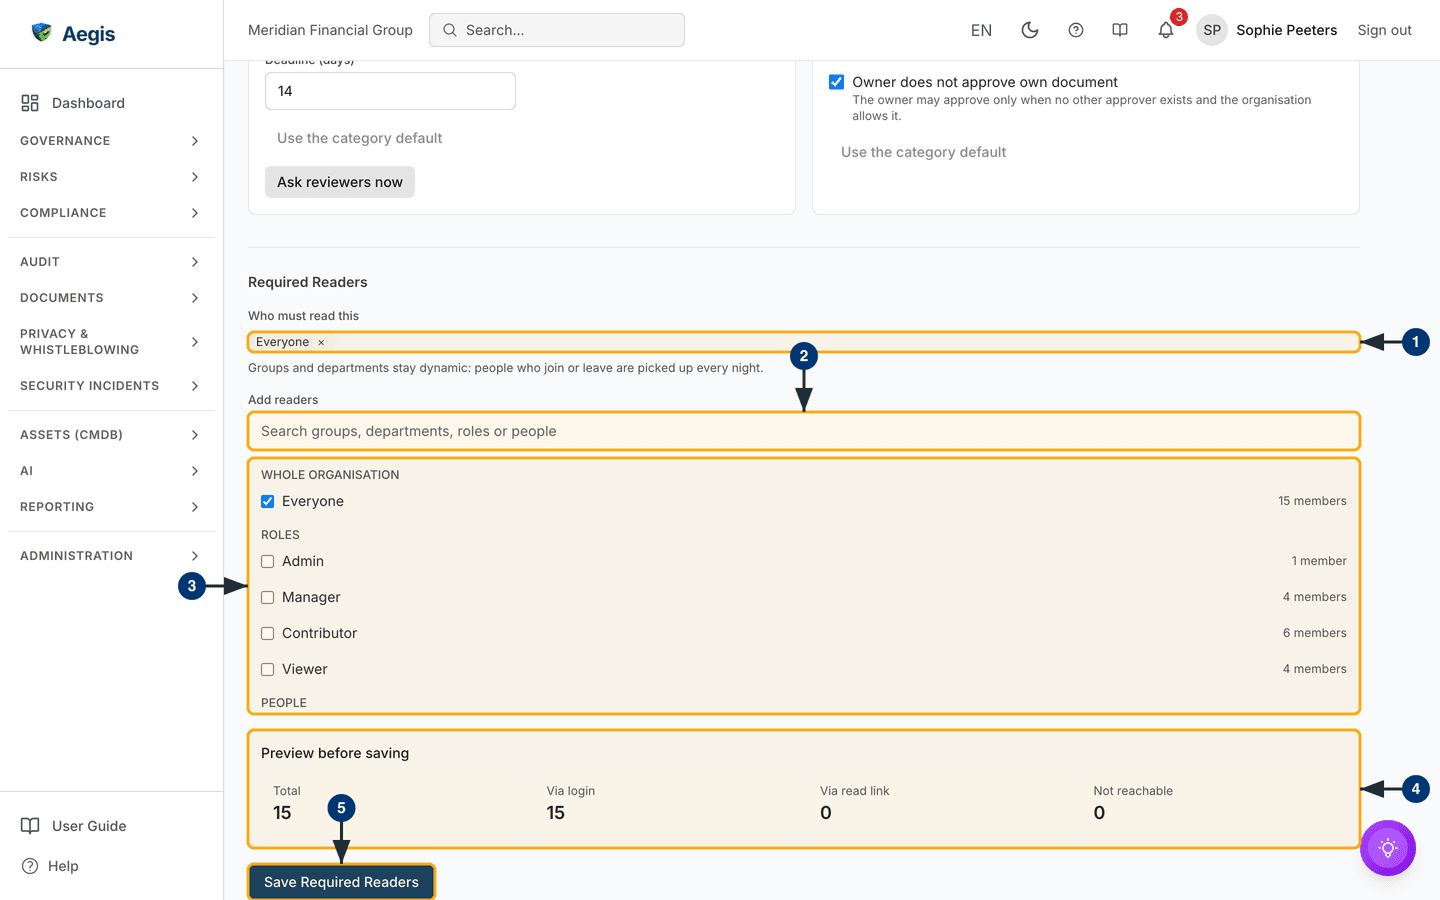
Who must read thislists the audience as chips — an Aegis group, an Entra ID group, an HR department, a role, a person or everyone. Remove one with its cross. -
Type in
Add readersto search groups, departments, roles and people. -
Tick the ones to add. The matches are grouped —
Whole organisation,Roles,Peopleand so on — each with its member count. Groups and departments stay dynamic: every night Aegis adds people who joined and marks people who left as no longer required, keeping their acknowledgements. -
Read
Preview before saving: the total, how many read via login, via a read link, and how many cannot be reached. People without an e-mail address are listed and skipped for invitations; they never block saving or publishing. On the captured screen,Everyoneis selected and all fifteen people read via login. - Select
Save Required Readers.
The Must Read list on the Audit tab then shows each
required reader and whether they have acknowledged the current version, and the
Required readers tile counts them.
Following up on readers — the Audit tab
For anyone who may edit the policy, the Audit tab opens with a
Required readers audit above the Must Read list; a
Viewer sees the list only. Nobody
appears there until a version is published — readers are assigned at approval.
The audit shows:
-
a
Document versionpicker and tiles forRequired,Read,Opened,Overdue,Older versionandExempt, with a reading-progress bar; -
filters for
Audience source,Channel,Reading statusand a name or e-mail search, kept in the address so they survive a reload; -
a table of readers —
Reader,Audience source,Channel,Reading status,Read onandVersion read— with people who have no e-mail address highlighted. Selecting a reader opens their reading timeline.
Remind… prepares a reminder for a selection or the whole version
and shows who will receive it and who is skipped (already read, exempt, no
e-mail address, reminded recently) before you select
Send reminders. From a reader's timeline you can
Resend link to a read-link reader. Holders of the
readers-management permission also get Exempt… (with a reason and
an end date) and Export…, which downloads the reading evidence as
CSV or PDF, optionally as it stood on an earlier date. The IP address and
read-link reference appear in the timeline only for a
Manager or
Admin.
Reader view — confirming a read without a login
A required reader who has no Aegis account reads and confirms the policy through
a single-use read link, not through the application. The link is issued
automatically the moment the policy reaches Approved: Aegis writes
the reader assignments for the approved version and e-mails each read-link
reader invitation E1 with their own link. The link works once
and, by default, for 24 hours; it opens the last approved version of the policy
— never a working draft — and grants nothing else.
When the approved version carries an owner-accepted change note, E1 and the
reader view both show it under the heading
What changed in this version, so the reader sees what is new before
they confirm. The reminder (E2) never repeats it. The note is absent on a first
approval, or where it was left empty, and its absence never holds up the
invitation.
The reader opens the link and lands on the document view. At the top sit the
policy's type, status, owner, version and dates; the approved text follows;
then, where present, the
What changed in this version summary; and last, the
Confirm you have read this document panel, which repeats the
Version and, where one is set, the reader's Deadline.
Before the reader confirms, the panel states plainly how the confirmation is recorded: "When you confirm, your IP address is stored as evidence of your acknowledgment and kept for 24 months on the basis of our legitimate interest (proof of acknowledgment)." Twenty-four months is the fixed default retention term for the confirmation IP; it is not a self-service setting in the app. The IP address is corroborating evidence with its own term — once it lapses only the IP is cleared, while the confirmation itself (version, time, channel, reference and device category) is kept as lasting proof that the reader acknowledged the policy.
-
Select
Send code. Aegis e-mails a six-digit confirmation code to the same address the link was sent to. A reader without a login always confirms with the link and a code, never the link alone. -
Enter the six digits in
Confirmation code.Confirmstays disabled until all six are typed;Send a new codeissues a fresh one if the first did not arrive or has expired. -
Select
Confirm. A wrong, expired, already-used or locked code (a code locks after several wrong guesses) is refused with a single, neutral message — "That code is not valid or has expired. Request a new code and try again." — and the reader can ask for another. Submitting codes too quickly is throttled separately and shows a distinct message — "Too many attempts. Please wait a few minutes and try again." — so the reader waits rather than requesting a new code. -
On success the panel is replaced by the confirmation page, headed "Reading
confirmed", showing the
Version, theConfirmed attime and aReference; a receipt is e-mailed to the reader. A reader who returns to a version they have already confirmed sees this page straight away.
A link that has lapsed — already used once, or older than its lifetime — opens
the
Link expired or invalid page instead. From there the reader can ask
for a fresh link through the Request a new link form without
involving the owner; that page is covered in
External access. Requesting a new link, or
re-approving the policy while the reader still holds a live link, extends the
reader's existing invitation and sends a fresh single-use link rather than
creating a second one. Only once every link has been revoked or has lapsed does
the owner need to re-invite from the Required Readers tab, or send
a fresh link with Resend link on the Audit tab.
Linking to a policy
Every policy has a stable address you can put on an intranet page, in an e-mail
or in another document:
https://<your-domain>/policies/<id>. Copy it from the
browser's address bar while the policy is open. The address stays the same
across versions — after a new version is approved, the same link opens the
current one.
Anyone who follows the link needs their own account and must sign in. A reader who is not signed in yet is taken to the sign-in page first and, once signed in — with a password, an authenticator code or single sign-on (SSO) — lands directly on the policy, not on the dashboard. The link grants no access by itself: the reader's role and the policy's access rules still decide what they can see and do.
Changing a policy's details
Edit details replaces the three cards with a form on the same page
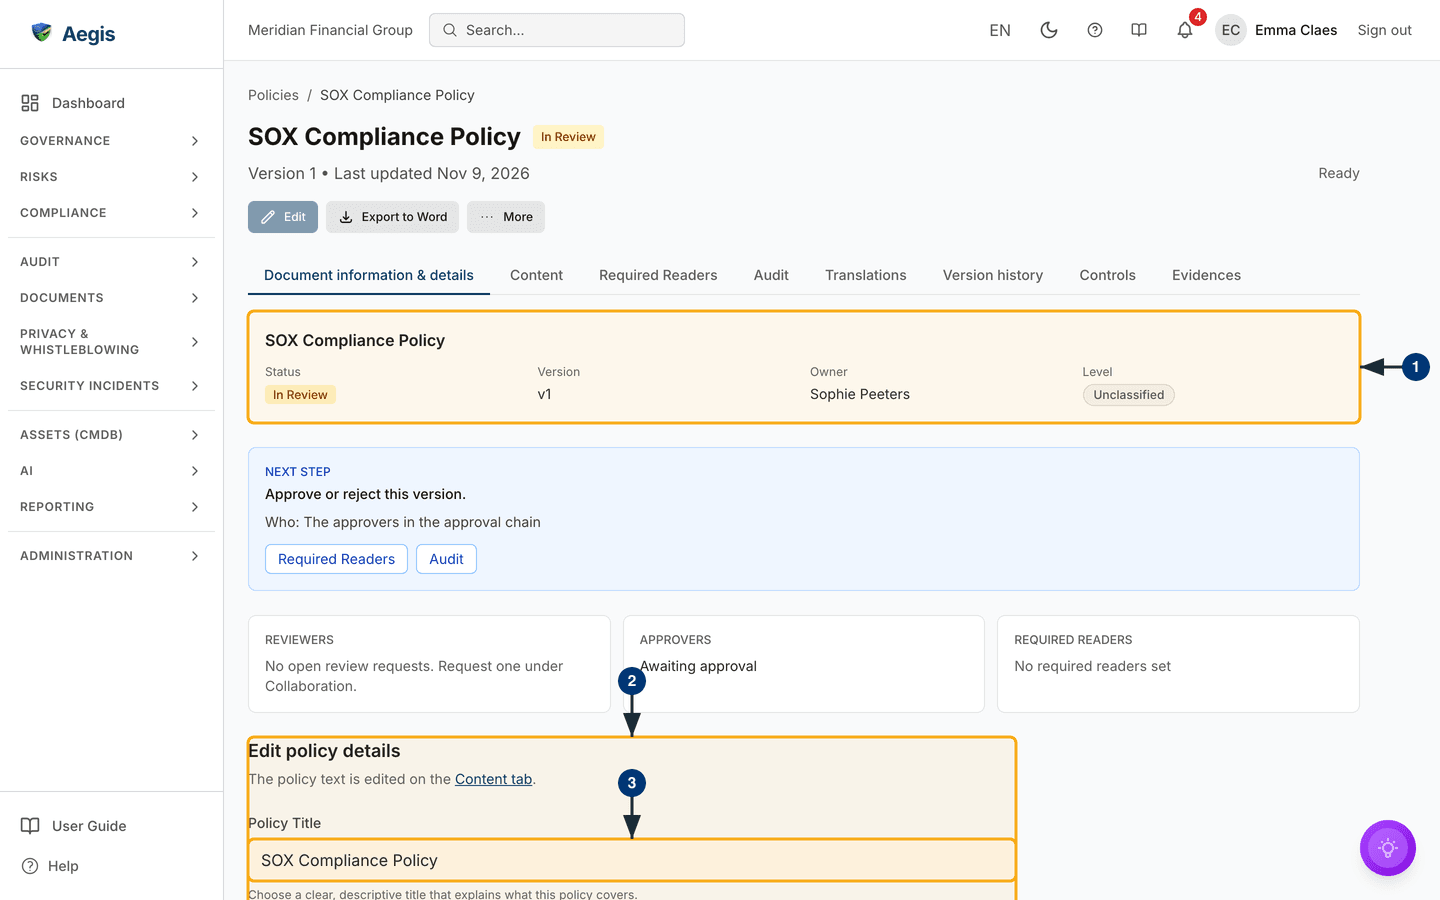
— there is no dialog. The heading reads Edit policy details,
with the reminder "The policy text is edited on the Content tab" underneath.
While the form is open the address bar reads
/policies/[id]?tab=details&edit=1, so the editor can be linked
to directly.
- The summary band, banner and tiles stay above the form and keep showing the saved values until you save.
-
The form opens under the Edit policy details heading; its
Content tablink takes you to the body instead. -
Change the
Policy Title— the one field the form insists on: emptying it and saving returns "Title is required".
Further down the form, below the edge of this capture:
-
Set the
Level—Unclassified,Strategic,TacticalorOperational; the hint spells out what each means. -
Set the
Effective Date— blank means the policy takes effect on approval. -
Set the
Review Date— when the policy is next due for review. Where it is set, it is the date the register's Review Date column andReview Triage (AI)use; where it is blank, both use the effective date plus the review cycle. -
Pick a
Review Cyclepreset —Monthly(30 days),Quarterly(90, markedRecommended),Bi-annual(180),Annual(365) orCustom cycle. The create page offers the same presets.
Finish with Save changes at the foot of the form. A "Policy details
updated" toast confirms it and the cards return with the new values;
Cancel discards what you typed. Unlike the body, details can be
edited at any status — an approved policy need not return to
Draft for a new review date.
The approval lifecycle
A policy carries one status at a time, shown as a badge wherever it appears.
| Status | What it means | What the toolbar offers |
|---|---|---|
Draft |
Being written. Not binding. |
Submit for Review; under More,
Retire without approval for approvers
|
In Review |
Waiting on an approver. |
Approve for
Manager and above;
under More, Return to Draft for editors
and Retire without approval for approvers
|
Partially Approved |
Some, not all, steps of a multi-approver chain have signed off (only where that chain is switched on for your tenant). |
No lifecycle button: the remaining approvers act in the
approval-chain panel; under
More, Retire without approval for
approvers
|
Approved |
The current binding version. |
Retire Policy; under More,
Revise
|
Retired |
No longer in force, kept for the record. | Reactivate |
Retire without approval retires a policy that was never approved,
for example a framework template your organisation will never adopt. It needs
the approve permission and a reason of at least 10 characters, skips the
approval chain and never counts as an approval. The reason and date show on the
retired policy and in the audit log (POLICY_RETIRE). In the policy
list, Change Status → Retired asks approvers for one
shared reason for the whole selection.
In exports and audit-log entries these read as Draft,
InReview, PartiallyApproved, Approved and
Retired. Revise is the way to change an approved
policy: it asks for a change summary, snapshots the text into
Version history and returns the policy to Draft; each
submission and approval lands in Approval History.
Reviewing and approving a policy in review
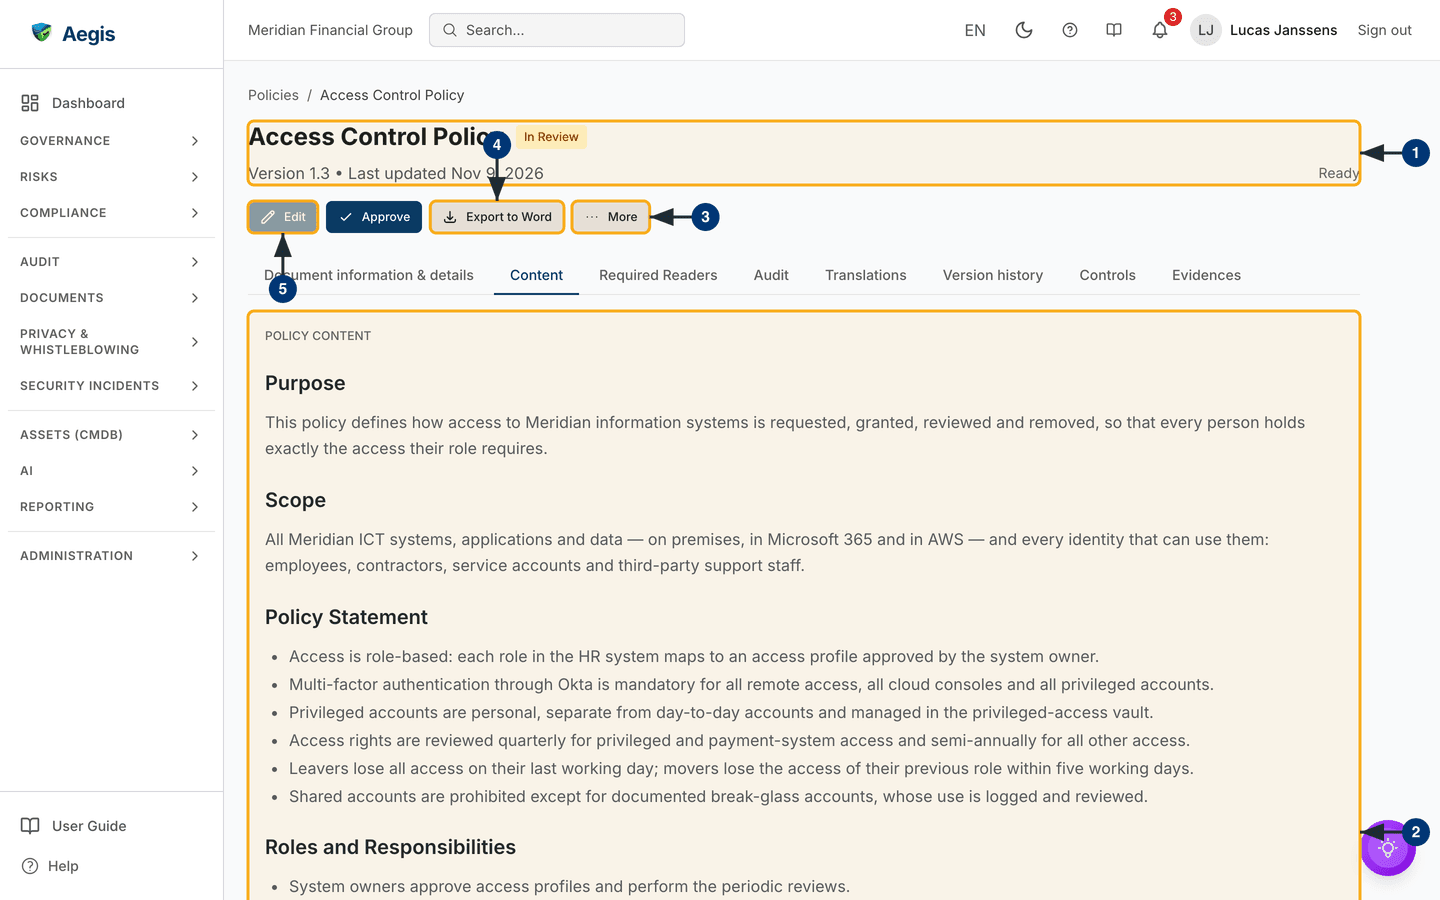
Open a policy whose badge reads In Review. On a
Manager account the toolbar shows
Edit greyed out — the body can no longer be typed into directly —
then the navy Approve, Export to Word and
More. The capture shows the Content tab, where the
version under review is read.
- Note the version number under the title. Your approval covers this version only.
-
Read the text on the
Contenttab, and use the other tabs — controls, evidence, changes since the last approved version — as you need. -
Open
Morewhen the text needs work.AI Enhancehas Aegis propose improvements while the policy is still in review; the suggestions land on theAI Enhancetab, and applying one creates a new version, as described under Reviewing an AI Enhance result below.Return to Draftsends the policy back toDraftso the editor can change it by hand before submitting it again.Retire without approvalretires a policy that should never come into force; it asks for a reason of at least 10 characters. -
Select
Export to Wordto take a copy of the version you are reviewing, for example to read it offline. -
Select
Approve— the navy button immediately to the right of the greyed-outEdit— once you have read the version on screen. Where a multi-approver chain is switched on, approvers act in the approval-chain panel instead.
Approval is tied to the version number shown on screen. If the policy changed after you opened it — for example because someone applied an AI suggestion, which creates a new version — Aegis refuses the approval with "This policy changed since you opened it (now version n). Review the new version before approving." and reloads the page. Read the new version, then approve again. The approval-chain panel and the approval dialog behave the same way, and an edit that races an approval is refused rather than saved under the approval.
Neither editing nor approval changes the Review Date or the
Effective Date, and Review Triage (AI) ranks
on the next review date derived from them. A policy whose review you have
completed keeps reading as overdue until you open
Edit details and set the next date yourself.
Linking evidence and discussing a policy
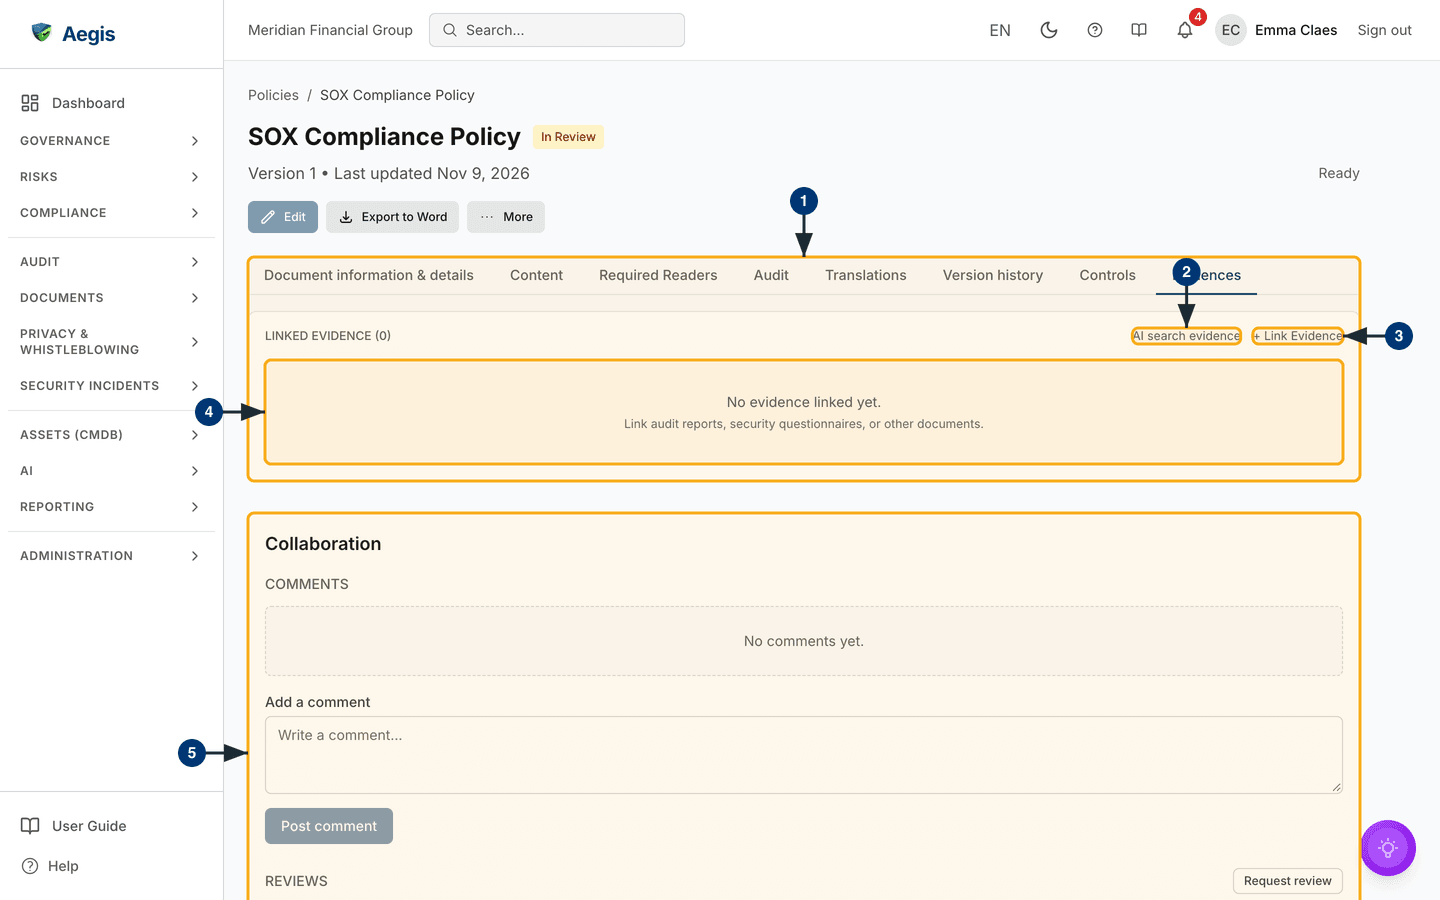
The Evidences tab ties a policy to
evidence (documents that show a control
works), held in Evidence. Below the tab strip — on
whichever tab is open — sits a Collaboration section carrying
the policy's comments and review requests.
-
Select
Evidences, the last tab. The panel header readsLINKED EVIDENCEwith the count in brackets. -
Select
AI search evidenceto have Aegis propose items from your library that appear to support this policy — you review each suggestion and decide. -
Or select
+ Link Evidenceto search the library and pick items yourself. - Until something is linked, the panel reads "No evidence linked yet." with the hint "Link audit reports, security questionnaires, or other documents." — as below.
-
Scroll to Collaboration. Under
COMMENTS, read existing comments ("No comments yet." when there are none), type in theWrite a comment…box and selectPost comment. UnderREVIEWS,Request reviewasks a colleague to review the policy.
The AI assist
Policies has five AI aids: Review Triage (AI) on the register,
Improve Writing on a draft, AI Enhance on a draft or a
policy in review, AI search evidence on the
Evidences tab, and the upload preview's summary of what a file
would change. Each output is a suggestion: a person reads it, edits it and
decides — nothing is approved, published or linked without that decision. Where
AI is switched off for your tenant, the buttons are absent and every task still
works by hand.
Reviewing an AI Enhance result
The AI Enhance tab holds Suggested Improvements and
Suggested Framework Mappings. While a run waits for a free slot,
the status line reads "AI Enhance is queued for this policy and starts when an
earlier analysis finishes…"; it changes to "AI Enhance is analysing this
policy…" once the run starts. While the run is in flight the tab shows a pulsing
marker, so you can tell from another tab, and the register's
AI analysis column shows Queued or
Analysing.
-
Select
Generateon an improvement to open aPreview Generated Contentpanel. Most suggestions add text, andAdd to Policyappends it to the body. -
On a policy that is
In Review,GenerateandAdd to Policywork as well. The preview warns that applying creates a new version: the reviewer sees it in the policy's version history, and the audit log records it as an AI suggestion applied during review. AnApprovedorRetiredpolicy cannot be changed this way; useRevisefirst. -
A suggestion that fixes a contradiction, a duplicate or the structure of one
section replaces that section instead. The preview names the section ("This
suggestion replaces the existing section …") and shows a before-and-after
comparison,
Changes to this section.Replace sectionoverwrites that heading's section, its subsections included, and nothing else. If the heading is missing, appears more than once, or the section is too long to review, the preview explains why and offers no apply; edit the section by hand. If the policy or that section has changed since the preview, the apply is refused; generate the suggestion again. -
Controls already linked to the policy are not proposed again. When nothing
new remains, the panel reads "No new framework controls to propose — the
relevant controls are already linked." A citation that covers several
controls offers one
Linkper control, so you choose; one that is not in the Aegis catalogue says so, and you link a control by hand from theControlstab.
Tips and limits
-
Row tick-boxes reveal a bulk-action bar with
Change Status(for those who may edit policies) andExport; a Manager or above also getsDelete policy. PreferRetire Policyto deletion for anything ever in force. When some rows cannot take the new status, the notice says why, for example "currently Draft, In Review; only Approved can be changed to this status", and leaves those rows selected. -
On the
Controlstab,+ Link Controlsearches the catalogue a page at a time. A broad search such asNIS2-shows "Showing n of total matching controls" and aShow morebutton for the next page; "All matching controls are already linked." appears only once no further page remains. -
Translationssends the text to DeepL. E-mail addresses, phone numbers and other personal data are replaced by placeholders before sending and put back in the translation, so they never leave Aegis. Secrets (API keys, passwords, access tokens, connection strings, private keys) and classification banners such as "STRICTLY CONFIDENTIAL" stop the translation, and the panel names what it found. While DeepL is retrying, the panel says so with the attempt number and the last error; a failure reads "Translation failed:" followed by the reason. - Titles need not be unique — tell duplicates apart by owner or version.
-
Review Triage (AI)reads up to 200 policies and 200 procedures per run and skips retired ones — on a larger register its plan is a sample, not the whole picture. -
To change an approved policy's text, use
Revisefirst —Edit,Improve WritingandUpload Word/PDFwork on aDraftonly, andAI Enhanceon aDraftor a policy in review. -
Controls you lack the role for are hidden, not shown and refused: no
Create Policymeans Viewer, noApprovemeans below Manager. A Viewer who types/policies/newis sent to the access-denied page. -
Required readers are not chased on a schedule you set here: reminders go out
when someone selects
Remind…on theAudittab. For a fixed follow-up plan, use Action items.
Where this connects
A policy maps to controls through its Controls tab, feeding the
coverage in Compliance frameworks and
Control mapping. The step-by-step
how belongs in Procedures; the proof it
is followed lives in Evidence. A policy can treat a
risk, comments work as in
Collaboration, and every status change reaches
the Audit log.