Service Inventory
Keep a register of the business and IT services your organisation runs, each one labelled with how critical it is, so that everyone names the same service the same way when they write up a risk, an incident or an audit scope.
A service here is something your organisation provides or depends on — a customer portal, a payroll system, an internal API. It lives in the CMDB (Configuration Management Database — the record of the technology you operate) beside machines, software, information assets and external services. The Service Inventory is the lightest of those registers. A service is a name, a criticality, an optional type, an owner and a service-level target, and you fill it in by hand, one service at a time. That is deliberate: this is the compliance-facing list of services that matter for your posture, not a copy of your IT operations catalogue.
Who uses it
The CMDB module must be switched on for your tenant. While it is
off the ASSETS (CMDB) entries are left out of the left menu and the
underlying requests are refused. After that, what you can do depends on your
role:
-
Viewer can open the inventory,
search, filter and read every row. Neither the
Add Servicebutton nor theActionscolumn is drawn for a Viewer, so there is nothing on this screen a Viewer can press and then be refused. -
Contributor,
Manager and
Admin hold the same rights here:
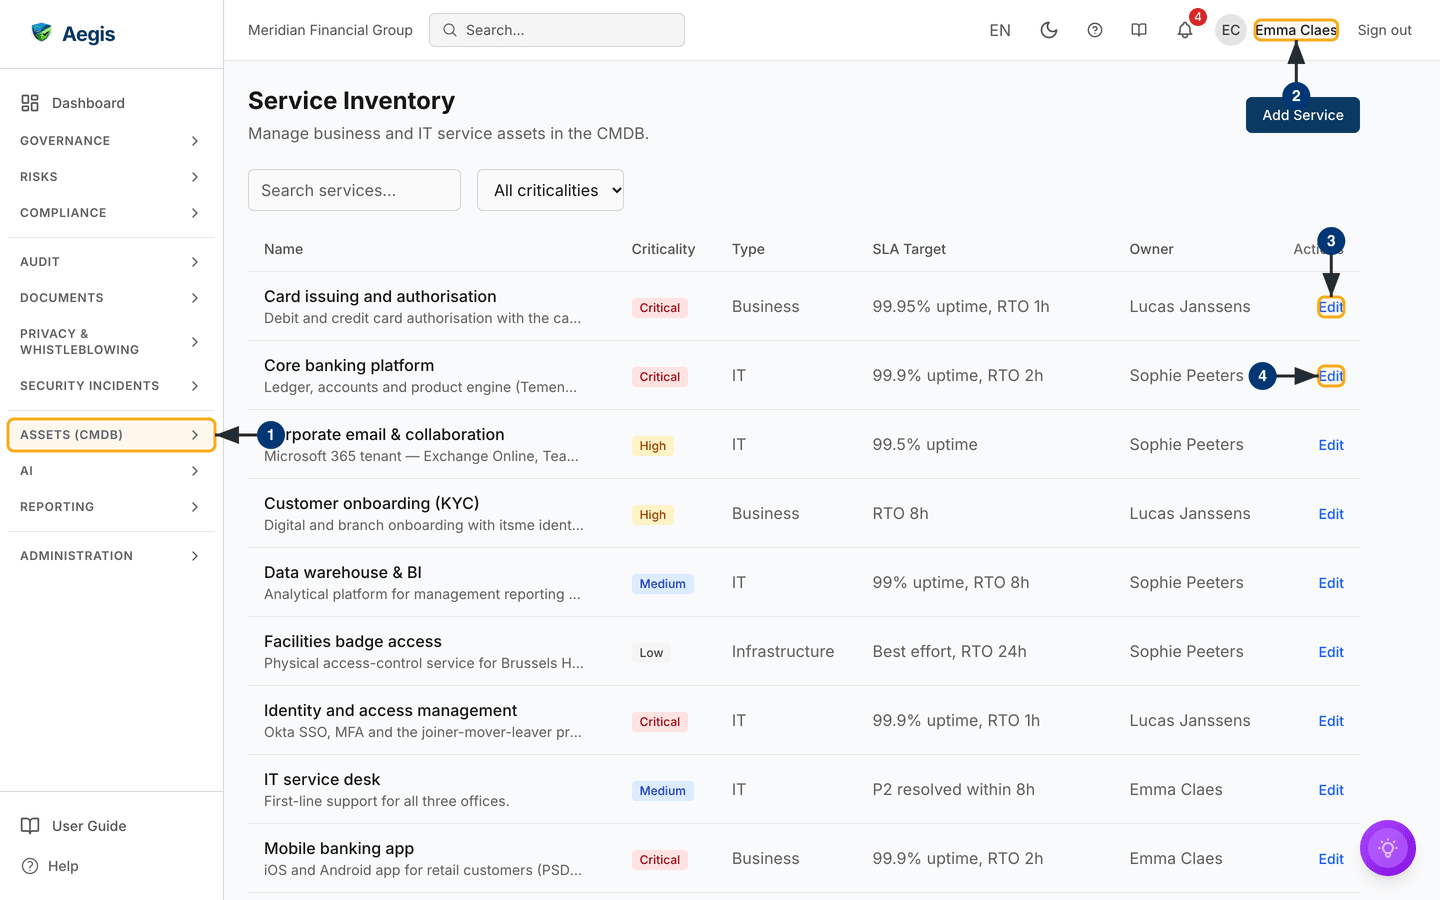
add a service, and edit any service. The screenshot below was captured as a
Contributor, which is why both
Add Serviceand the per-rowEditlinks are visible.
What's on this screen
Open /cmdb/services. The page is headed
Service Inventory with the subtitle
Manage business and IT service assets in the CMDB., and the primary
action, Add Service, sits at the top right. Under the header is a
slim filter bar holding two controls: a Search services... box and
an All criticalities dropdown. Both apply as you change them; there
is no separate search button to press.
Below the filter bar is the table. Its columns are Name — with the
description in smaller grey text under the name, where one has been entered —
then Criticality as a coloured badge, Type,
SLA Target, Owner and Actions. Rows are
ordered by name and are not clickable: there is no service detail page, so the
only row action is the Edit link in the last column. In the
Type, SLA Target and Owner columns a
value that was never filled in shows as - rather than an empty
cell; a service with no description shows nothing under its name. A long
description is cut to one line and ends in an ellipsis (…); open
the edit dialog to read it in full. Type and
SLA Target are free text, so they show whatever was typed — the
captured screen mixes uptime figures, recovery-time objectives such as
RTO 8h, and a service-desk target such as
P2 resolved within 8h.
Under the table sits the pagination row — on the left a
Showing line giving the range of rows on this page and the total,
and on the right Previous, a Page … of … marker and
Next, each button greyed out when there is no page in that
direction. The page holds twenty services at a time. In the capture the
pagination row sits below the visible area: the screenshot shows nine rows of
the demo register for a fictional bank, from
Card issuing and authorisation and
Core banking platform (both Critical) down to
Mobile banking app, with criticalities from Low to
Critical, types Business, IT and
Infrastructure, and three different owners. The round violet button
at the bottom right is the app-wide AI assistant, not a service feature — this
screen has no AI of its own.
The four numbered circles on the figure below mark what to find first, in the order the steps walk them.
-
In the left menu, open the
ASSETS (CMDB)group and selectCMDB Services. The Service Inventory opens. A group stays open or closed exactly as you last left it — Aegis remembers your choice and does not open it for you — so in the captureASSETS (CMDB)appears collapsed even though you are on one of its pages. Leave it open to move between the sibling registers. -
Check the account name in the top bar before you judge what is missing. That
account's role decides whether the
Add Servicebutton and the wholeActionscolumn are drawn — the capture is signed in as a Contributor (Emma Claesin the demo data), so both appear. -
Each row ends with an
Editlink. Select it on theCard issuing and authorisationrow and theEdit Service Assetdialog opens over the table, already filled with that service's stored values. -
The same link on the
Core banking platformrow opens the same dialog for that record. Aegis builds the dialog fresh for whichever row you chose, so opening a second row never shows you the first row's details.
Add a service
There is no separate page for creating a service. It happens in a dialog over the list, and the list reloads itself when you are done.
-
Select
Add Serviceat the top right. A dialog titledAdd Service Assetopens over the table. -
Type a
Name— the placeholder suggestse.g. Customer Portal. This is the only required field. Submit without it and the dialog stays open withName is requiredin red under the box. -
Add a
Descriptionif it helps a colleague recognise the service. Whatever you write appears under the name in the list, and the search box looks inside it. -
Set the
Criticality. The choices areLow,Medium,HighandCritical, and it starts onMedium. This is what the coloured badge in the list shows. -
Fill in the optional fields as you have them:
Service Type(the placeholder offerse.g. Business, IT, Infrastructure),SLA Target(such ase.g. 99.9% uptime), comma-separatedTags, and free-textNotes. -
Select
Add Servicein the dialog to save, orCancelto abandon it — cancelling discards what you typed. On save the dialog closes, the table reloads, and the new row takes its place in name order.
Neither dialog has an owner picker. Aegis records the person creating the
service as its owner and keeps showing that name in the
Owner column, whoever opens the page later. The captured screen
shows several owners because the demo register was loaded with owners
already assigned; a service you add through the dialog takes your name. If
ownership has to move, raise it with your Aegis contact. The column shows
the owner's name, falls back to their email address when no name is set, and
shows - only when no owner can be resolved at all.
Saving a name that already exists is refused. The dialog stays open with
your text intact and
A service with this name already exists appears above the
fields. The same rule applies when you rename a service in the edit dialog.
Check the list first if two teams might describe the same service
differently — one register with agreed names is worth more than several
near-duplicates that nobody can reconcile later.
Correct an existing service
Criticality, service type and SLA target all change over time. Editing a row is what keeps the register honest, and it is the only way to correct a criticality through the product.
-
Find the row and select
Edit. TheEdit Service Assetdialog opens with every field already carrying the stored value. -
Change what needs changing. The dialog lays the fields out in two columns —
Name,Criticality,Service Type,SLA TargetandTagsacross the top, withDescriptionandNotesrunning the full width beneath. -
Select
Save Changes. The dialog closes and the table reloads, so a changed criticality shows straight away as a differently coloured badge, and a renamed service moves to its new position because the list is ordered by name. The change is written to the audit log under your name.
The edit dialog always sends the whole record, so emptying
Tags and saving removes every tag from that service.
Owner is not one of the fields in the dialog, and saving leaves
it exactly as it was.
Find a service
The two filters work together, and changing either sends you back to the first page.
-
Type into the
Search services...box. After a short pause the table reloads by itself, matching your text against the name, the description and the type, ignoring case. There is no button to press, and the Enter key changes nothing further — the list has already updated. -
Pick a level from the
All criticalitiesdropdown —Critical, say — to show only services at that level. Set it back toAll criticalitiesto drop the restriction. -
If nothing matches, the table is replaced by
No services match the current filters.Clear the box and reset the dropdown to bring the full register back.
The empty state
Before anyone has added a service, the page shows
No services yet. Add your first service asset to get started. in
place of the table. That is not an error — the register has not been started
yet. Add one service and the table, the pagination row and (if your role allows
it) the Edit links take its place. Read that message as a different
thing from No services match the current filters., which means
services do exist but your search text or criticality filter is hiding them.
Two other states can take the table's place for a moment. While the list is
loading, grey placeholder rows show where the table will be. If the list cannot
be fetched, a red banner reads
Could not load the services. Please try again. and no rows are
shown; reload the page, and if the banner stays, see
Getting help.
Removing a service
Deleting is the exception on this screen. Contributor and above hold the delete permission and the API endpoint exists, but no screen in Aegis draws a delete control for a service. In practice a service you no longer run is edited — a note recording that it was retired, and a lower criticality — rather than removed. If a row genuinely has to go, raise it with your Aegis contact. A service delete marks the record as deleted rather than erasing it: the service disappears from every list, export, count and AI context, while the record and its audit trail are kept. No screen offers a way to restore it, so be sure first. The deletion itself is written to the audit log.
Tips and limits
-
No automatic discovery, and no import. Nothing on your
network is scanned, and there is no spreadsheet upload here of the kind the
machine register has. Every row arrives through
Add Service, typed by a person. There is no bulk load from an IT service management tool either — the keys issued on API keys do not reach the CMDB endpoints. Bring across the services your obligations turn on rather than the whole catalogue. - Criticality is a judgement you record, not one Aegis calculates. It is not derived from linked risks or incidents. Agree what the four levels mean across your teams before you start, or the register will be inconsistent within a month.
- There is no service detail page. Everything a service holds is either in the columns or in the edit dialog. Risks and incidents are not linked to services from this screen the way they are for machines.
- Notes and tags are stored but not shown in the list. They reappear when you open the edit dialog. Neither the search box nor the criticality dropdown filters on a tag, so a tag is a label you read in the dialog rather than a way to narrow the list.
- The list is sorted by name and cannot be re-sorted from the screen. The column headings are labels, not sort controls.
- Keep the register to what matters for compliance. A short, accurate list of the services your obligations actually turn on is more useful to an auditor than an exhaustive one nobody maintains.
Where this connects
- CMDB and asset inventory — the machine register, which does have a detail panel, and how the CMDB fits together.
- Software inventory, Information assets, External services and SBOM — the sibling registers in the same sidebar group.
- Risks and Incidents — what a critical service is exposed to, and what you record when one of them is disrupted. You name the service in those records; Aegis holds no link between them and this register.
- Audit log — where every service created, changed or deleted is recorded.
-
Roles and what they can do — which role
sees which control, and The left menu for
the
ASSETS (CMDB)group. - Getting help — what to do if the module or the page is not where you expect it.