Software inventory
Keep a searchable register of the applications and components your organisation runs — each with its vendor, version, status and licence type — inside the Aegis CMDB.
The CMDB (Configuration Management Database — the record of the technology you operate) holds several separate registers. This one is for software: every application, package or component you want compliance and audit work to see. When an auditor asks which version of your finance system was running last March, the answer should come from this page rather than from a spreadsheet on someone's laptop.
Most of the register is built by hand: each entry is typed into a short form,
and each correction is made in the same form. Aegis does not scan your network
for installed software. There is one automatic source: when the
Entra ID connector
syncs and the CMDB module is on, it adds your organisation's enterprise
applications from Microsoft Entra ID (Microsoft's own first-party apps are left
out). The GRC Coach's
List what you use step can also add software rows on your behalf.
Who uses it
Reading the register and changing it are separate permissions.
-
Viewer — can read every entry,
search and filter. The
Softwarelink in the sidebar is shown to every role. NeitherAdd Softwarenor theActionscolumn is drawn, so a Viewer sees a seven-column table and no buttons. - Contributor — everything a Viewer can do, plus adding software and editing any existing entry.
- Manager and Admin — the same add and edit access. They also hold the delete permission, but no delete control is drawn on this page, so nothing can be removed from the screen.
The page also sits behind the CMDB module, which your operator switches on; if
it is off, opening the page sends you back to the dashboard. The screenshot
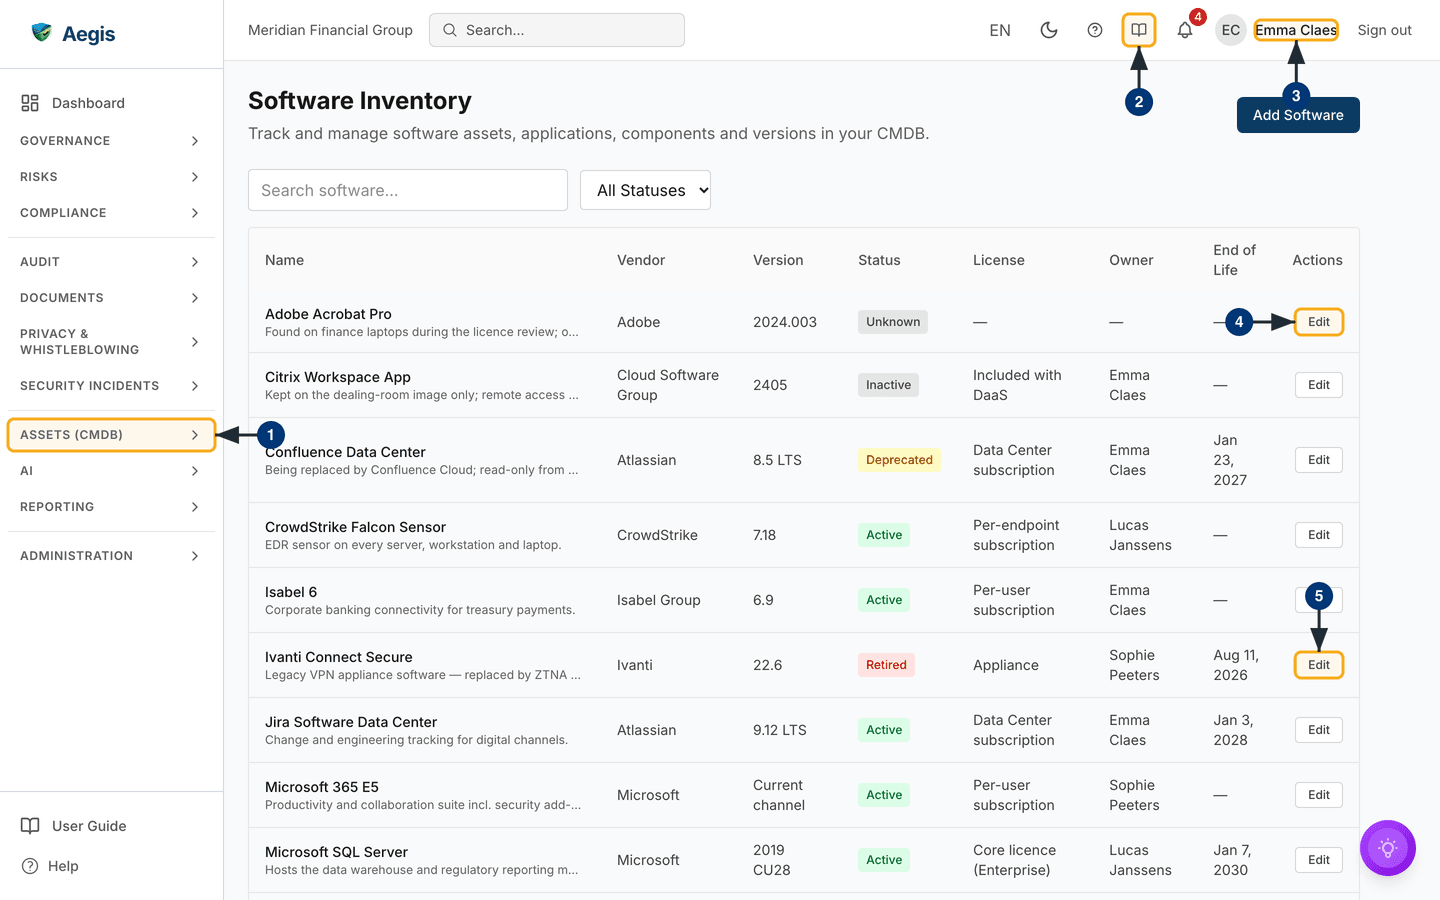
below was captured as a Contributor (the demo user Emma Claes), so the add
action and the per-row Edit
buttons are visible in it.
What's on this screen
The page opens straight onto the full register — there is no dashboard in front
of it. The heading reads Software Inventory, with the line "Track
and manage software assets, applications, components and versions in your CMDB."
beneath it and the primary action Add Software at the far right of
that same row. Under the heading sits a two-control filter bar: a
Search software... box and an All Statuses
dropdown. That is the whole of it — no date range, owner picker or tag filter.
Below that is the table, sorted by name. The captured screen shows nine demo
entries, from
Adobe Acrobat Pro to Microsoft SQL Server, covering
every status from Active to Retired. The columns are
Name (with the description in small grey type beneath it, cut short
when it is long), Vendor, Version,
Status as a coloured badge, License,
Owner, End of Life, and — only for roles that can edit
— Actions, holding one Edit button per row. An empty
value shows as an em dash (—), as in the licence and owner of the first row.
Rows are not clickable: software has no detail page and no side panel, so
Edit is the only way into a record.
Under the table (below the part of the page in the capture), a "Showing … of …
software assets" line sits opposite Previous, the page numbers and
Next; twenty rows fit on a page. On a narrow window the table
scrolls sideways, with a soft shadow at the edge that still has columns hidden.
Around it is the standard Aegis frame: the sidebar, with
ASSETS (CMDB) collapsed in the capture, and the top bar with the
language picker, theme toggle, help, user guide, notifications and your name.
The numbered steps below match the callouts on the figure.
-
Open the
ASSETS (CMDB)group in the sidebar to reach this register. It expands to showSoftwarealongside the other registers —CMDB(machines),Information Assets,CMDB Services,External ServicesandSBOM, which each have their own chapter. - Select the book icon in the top bar to open this user guide at the chapter for the page you are on. The question-mark icon beside it opens the slide-in help panel instead.
-
Your account name sits at the top right. If
Add Softwareand theEditbuttons are missing for you, check your role here — a Viewer gets the read-only table. -
Select
Editat the right-hand end of the first row. A dialog titledEdit Software Assetopens over the list with the stored values filled in. -
Every row carries its own
Editbutton — this one opens theRetiredentryIvanti Connect Secure, version22.6. Clicking the row itself does nothing; the button is the way in.
Add a software asset
Recording a piece of software takes one short form. Three fields identify the entry and are required; the rest is optional context you can add later. The steps below run through the fields in the order they appear on the form.
-
Select
Add Softwareat the top right. A dialog titledAdd New Software Assetopens over the list, its fields in two columns. -
Enter the
Nameof the application or component — the placeholder reads "e.g., Acme CRM". Required, and capped at 255 characters. -
Enter the
Vendor / Publisher— who supplies it; the placeholder reads "e.g., Acme Corp". Required when you add an entry, capped at 255 characters, and free text: it is not linked to Vendors. -
Enter the
Versionin use, such as4.2.1. Required, up to 100 characters. Name and version together identify the entry. -
Set
Statusfrom the dropdown. It starts onActive; the other choices areInactive,Deprecated,RetiredandUnknown. -
Optionally add a
License Type(the placeholder suggests "Perpetual, Subscription, Open Source"), comma-separatedTags, and aDescriptionin the wide box below. Each tag can be up to 50 characters, and an entry holds at most 50 tags. -
Select
Add Softwareinside the dialog to save. A blank required field is flagged beneath itself and nothing is sent; on success the dialog closes and the table redraws with the new row in its alphabetical place. You become the entry's owner.
Correct an existing entry
Versions change and licences get renegotiated, so entries are meant to be revised. The edit dialog shows the same seven fields, pre-filled with what is stored.
-
Find the row and select
Editin theActionscolumn. A dialog titledEdit Software Assetopens with the stored values already in place. -
Change what you need.
NameandVersionmust still hold a value, or the dialog flags the empty field and refuses to save.Vendor / Publisheris optional here: an entry imported from Entra ID may arrive without a publisher, so you can save it with the vendor blank, and the table then shows an em dash. -
Select
Save Changesto save. The dialog closes and the row redraws with the new values; the change is written to the audit log as a CMDB software update, recording who made it and when.
Emptying Tags and saving sends an empty list rather than
leaving the previous tags in place, so retype the whole comma-separated list
to correct one tag. On an entry imported from Entra ID, removing the
entra-id tag also stops that row following Entra ID at the next
sync.
Entries imported from Entra ID
If your organisation uses the Entra ID connector, each sync brings your organisation's enterprise applications into this register when the CMDB module is on. You will recognise these rows by a few traits:
-
The version reads
n/a, because Entra ID does not report one. - The vendor is the app's verified publisher or publisher name; when Entra ID gives neither, it stays blank and shows as an em dash.
-
The status is
Active, orInactivewhen the app is disabled in Entra ID. -
The row carries the
entra-idtag (tags are stored, not shown in the table), and has no owner.
Rows that the import created follow Entra ID: at each sync their name, vendor and status are set again from Entra ID, so a correction to those three fields here does not last. Correct them in Entra ID instead, or use this page for the fields the import leaves alone, such as licence type and description. If an app's name matches an entry you registered by hand, the import links to that entry rather than creating a duplicate, and your entry keeps its own values.
Find something in the register
Two controls narrow the table, and they apply together.
-
Type into
Search software.... The list refreshes shortly after you stop typing and matches on name, vendor or version, ignoring capitalisation — not on the description or the tags. -
Open the
All Statusesdropdown and pick one value to show only software in that state. ChoosingAll Statusesagain clears it and the full list returns. -
Use
Previous, the page numbers andNextbeneath the table for registers longer than twenty rows. Changing either filter returns you to page one. - If a filter matches nothing, the table is replaced by "No software assets match your search criteria." Clear the search box or reset the status to bring the rows back.
If the register cannot be loaded, a banner above the table reads "Failed to load software assets. Please try again." Reload the page; if it persists, see Getting help.
What the status values mean
The Status column shows a coloured badge recording where a piece of
software sits in its life. Agree with your team what each value means before
filling the register in — Aegis never moves software between these states on its
own. The one exception is an entry imported from Entra ID, which the sync sets
to Active or Inactive to match the app in Entra ID.
| Status | Badge | Use it for |
|---|---|---|
Active |
Green | In use and supported. The default for a new entry. |
Inactive |
Grey | Recorded and installed, but not currently in use. |
Deprecated |
Yellow | Still running but being phased out; plan a replacement. |
Retired |
Red | No longer in use; the entry is kept for the record. |
Unknown |
Grey | The state has not been established yet. |
Starting from an empty register
On a new organisation the table is replaced by "No software assets registered. Add your first software asset to get started." That first-run wording differs from the filtered one, so the screen tells you which situation you are in.
A workable way to fill it is to start with the software inside your compliance scope: anything holding personal data, anything an auditor has asked about, and anything from a supplier you assess in Vendors. A short, accurate register beats a long, stale one and can grow as questions arrive. If you use Entra ID, connecting it first fills in your enterprise applications, and you then add what Entra ID does not know about.
Tips and limits
- Mostly manual, one row at a time. Apart from the Entra ID import there is no discovery behind this page, and — unlike the machine inventory in CMDB — there is no CSV import or export control.
- Name plus version must be unique. A second entry with the same pair is refused with a conflict message; record the genuinely different version instead.
- The order is fixed. Rows always come back sorted by name; the column headings are plain labels, not sort controls, so you cannot reorder by vendor or status on screen.
-
Nothing can be deleted from the screen, even by an Admin. Set software you
no longer run to
Retiredso its history stays in the register. - Vendor is free text, not tied to your Vendors records, so keep the spelling consistent if you want to group by supplier later.
-
End of Lifeshows a date only when one is stored. Neither form has an end-of-life field, so entries made on this page show an em dash; the dates in the captured screen come from the demo data, which was loaded another way. - Owner is set for you — an entry added on this page belongs to whoever created it, entries imported from Entra ID have none, and neither form has an owner picker, so ownership cannot be set or transferred here.
- Tags are stored but not shown. The table has no tag column and the filter bar no tag filter, so recorded tags stay out of sight here.
Where this connects
- CMDB — the machine inventory and the wider configuration database this register belongs to.
- Entra ID connector — the sync that brings your enterprise applications into this register.
- SBOM — component-level detail for the applications listed here. It is a separate register: entries are not linked to software rows.
- CMDB services and External services — the services your software supports, and the third-party ones you depend on.
- Vendors — the suppliers behind your software and the due diligence you hold on them.
- Risks — where to raise a risk when something here is out of support or carries a known vulnerability.
- Other records can point at an entry here: Cyber Resilience Act product records and emergency-access records each have an optional software-asset picker filled from this register.
- Audit log — who added or changed an entry, and when.
- The screen layout — the sidebar groups and top bar around this page, and Getting help if it does not behave as described.