Risks
The risk register is where your organisation records what could go wrong, scores it, decides what to do about it, and keeps a history an auditor can follow.
A risk is something that could harm your
operations, assets or compliance position before it turns into an incident. You
give each one an owner, a review date and a treatment decision, and drive it to
a settled state; changes are written to the audit log. The register sits in the
Risks group of the left menu, at /risks, and each
risk has its own page at /risks/{id}.
Who uses it
Everyone signed in can read the register. A
Viewer sees the list, the heatmap
and the detail pages, but the create, import, treatment and status controls are
hidden rather than shown and refused; the read-only AI actions —
Smart Triage (AI) and the acceptance Review (AI) —
stay available. A
Contributor adds risks,
imports a spreadsheet, records treatment and residual figures, changes status
and runs the AI assists that write to a risk. A
Manager also deletes risks, singly
or in bulk, exports the register, and maintains what the register depends on:
the methodologies (which carry the severity bands), the risk templates, the
appetite, the groupings and the risk categories.
Manage categories above the register opens
Risk Categories at /risks/categories, where a
Manager creates, renames and removes unused categories; other roles can read the
list there. An Admin has all of that
plus the wider organisation settings.
How risks are scored
Aegis stores the inherent score —
impact × likelihood, before treatment — and works out the band
name at display time, so changing the bands relabels risks you already hold. The
size of the grid comes from the risk's methodology: 3 × 3,
4 × 4 or 5 × 5. On the standard five-level grid,
impact runs Minimal to Critical and likelihood
Rare to Almost Certain, giving 1 to 25; a smaller grid
gives a lower top score, and its score bands are scaled to fit. Beside it sits
the residual score: what remains after
treatment. The bands come from your default risk methodology; the standard
methodology ships with four (a score of 25 shows as
25 (Critical) on the captured register):
| Score | Band |
|---|---|
| 15–25 | Critical |
| 10–14 | High |
| 5–9 | Medium |
| 1–4 | Low |
A badge reads Unknown when the row has no score to place in a
band — the inherent score was never worked out for that risk. Open the risk
and check its impact and likelihood; rows loaded before scoring was recorded
are the usual cause.
What's on this screen
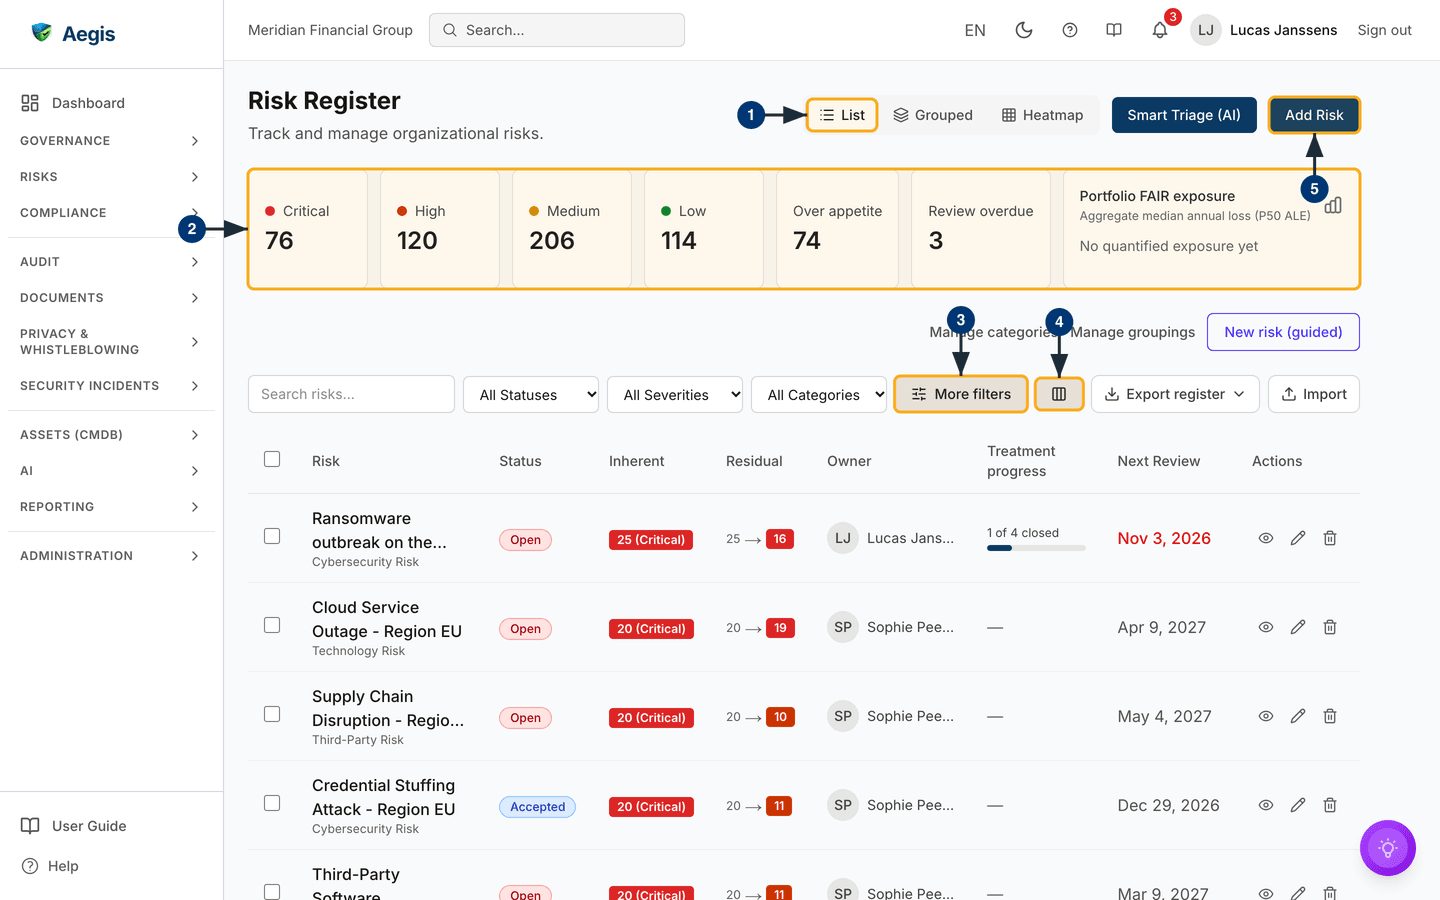
The register is laid out like Policies. The header
holds the title Risk Register and its subtitle on the left and,
on the right, a three-way view switch — List,
Grouped and Heatmap — then
Smart Triage (AI) and Add Risk. The view you pick is
saved to your profile, so it is still selected after you sign out or open Aegis
on another device.
Below the header sits the summary bar: one tile per severity
band (Critical, High, Medium,
Low on the standard bands), then Over appetite and
Review overdue, and the
Portfolio FAIR exposure card at the end. The FAIR card shows
the aggregate median annual loss (P50 ALE) once risks have a quantified
exposure; until then it reads No quantified exposure yet, as it
does on the captured screen. The tiles always count the whole register; they do
not change when you filter the list. Under the tiles are the
Manage categories and Manage groupings links and
New risk (guided).
The filter bar is one row: Search risks…,
All Statuses, All Severities,
All Categories and More filters, then the columns
button, Export register and Import. The table shows
eight columns by default — Risk (the title with its category
underneath), Status, Inherent,
Residual (inherent → residual, the residual figure coloured by its
band), Owner, Treatment progress (for example
1 of 4 closed with a bar, or a dash when the risk has no mitigating
actions), Next Review (red when overdue) and Actions.
A tick box at the start of each row, and one in the header for the whole page,
selects risks for the bulk bar. At a 1440 px wide screen all eight fit without
scrolling sideways. The row actions are the eye (open the risk), the pencil
(edit) and the bin (delete); each appears only for a role allowed to use it.
Finding and opening a risk
-
Choose a view in the switch.
Listis the table described here;GroupedandHeatmapare covered below. The switch remembers your choice for next time. -
Select a tile in the summary bar —
Critical, say — to show only those risks. The tile is outlined, the filter is written into the page address (for example/risks?severity=Critical) and a chip with its name appears under the tiles. Select the tile again, or the chip, to remove the filter. The counts on the tiles stay the same while you filter. -
Select
More filtersfor the rarer filters, described in the next section. When any of them is active, the button carries a number: how many extra filters are on. - Select the columns button to choose which columns the table shows. Your choice is saved to your profile like the view.
-
Select
Add Riskfor the form at/risks/new. Select a title in the table, or the eye icon at the end of the row, to open that risk at/risks/{id}.
Every filter, including search, lives in the page address: a reload keeps it,
and copying the URL shares the filtered list. The × button at the
end of the filters clears them all at once.
More filters
-
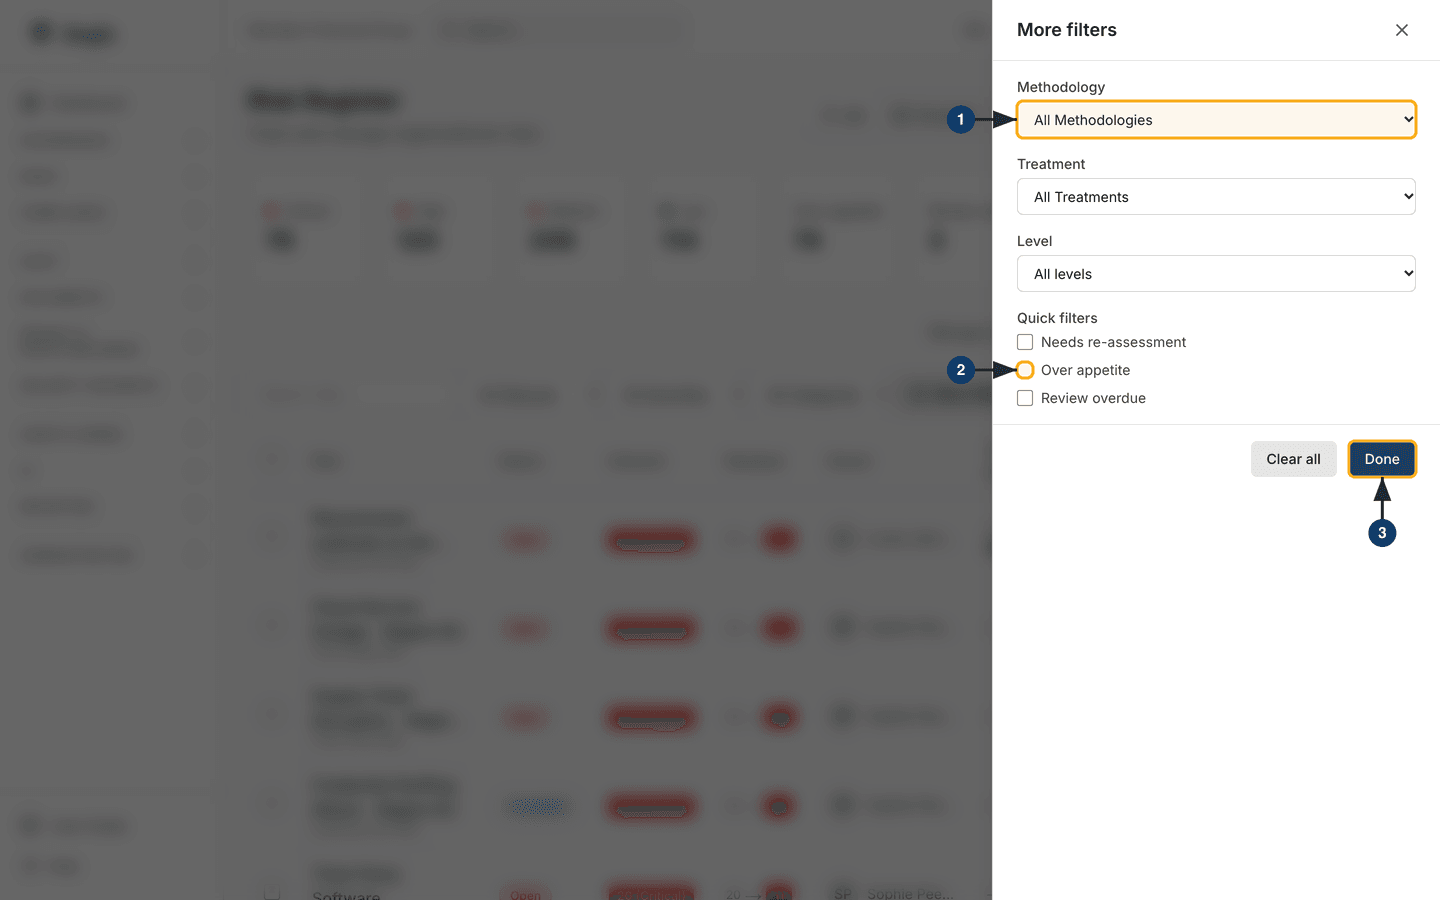
Select
More filters. A panel slides in from the right withMethodology,Treatment,LevelandOwner, and three Quick filters tick boxes:Needs re-assessment,Over appetiteandReview overdue. The owner list is shown only to roles that may list users, which by default means an Admin; the captured Manager panel therefore has noOwnerfield. - Choose values or tick boxes. The list behind the panel updates straight away and each choice is added to the address.
-
Select
Doneto close the panel, orClear allto remove every filter, the main ones included. Back on the register,More filtersshows how many of these extra filters are active —2after ticking two boxes.
The Grouped view
-
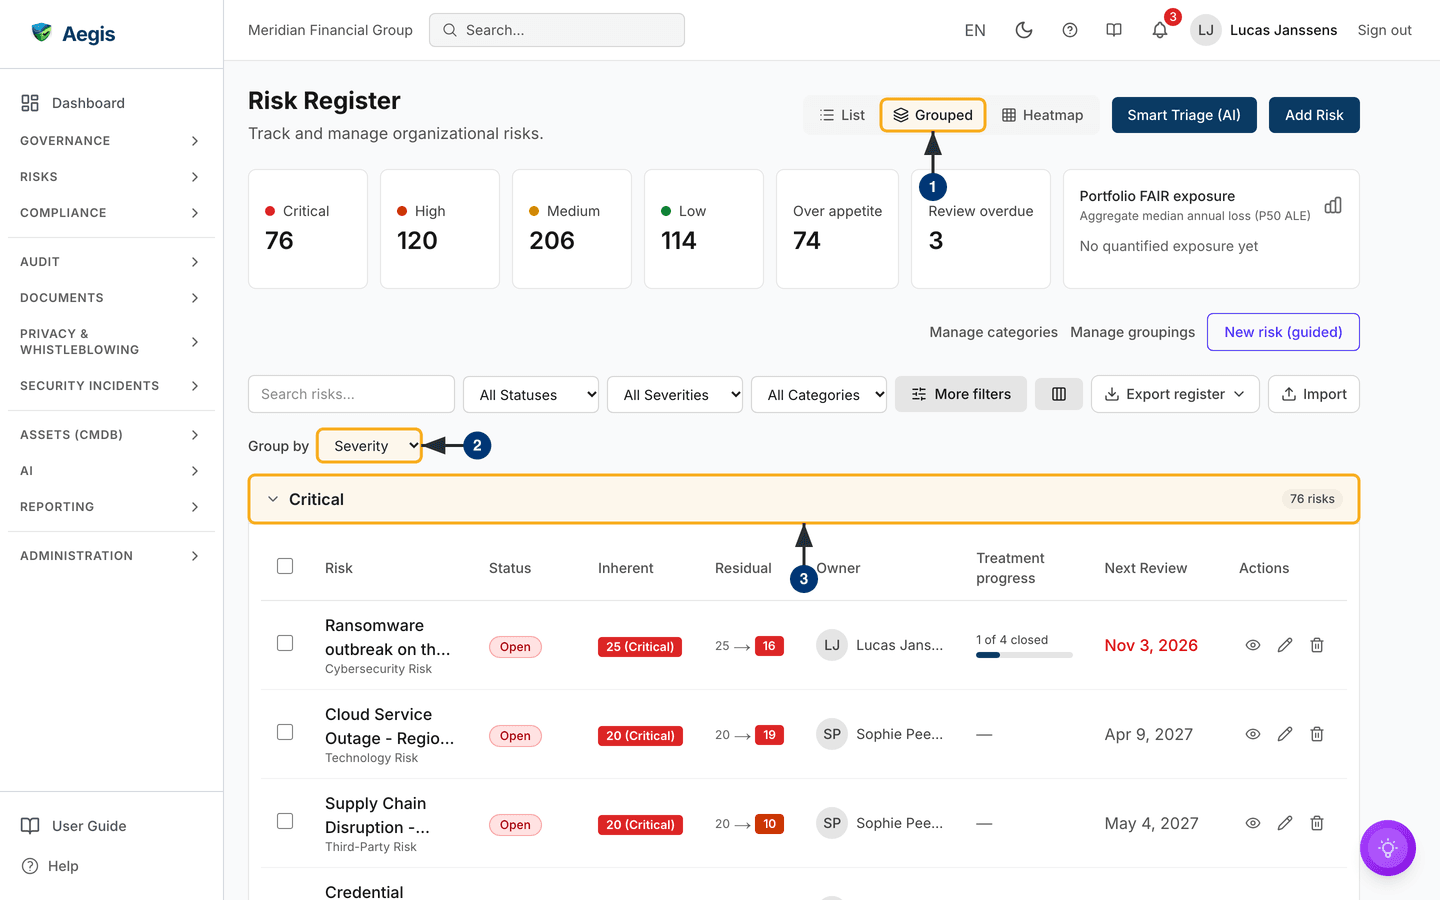
Select
Groupedin the view switch. AGroup bylist appears above the register, set toSeverityuntil you change it. -
Choose
Severity,Category,StatusorOwner. The register is split into one section per value — highest severity first — each with its name and a count, such as76 risksforCriticalon the captured screen. Your grouping is saved to your profile. - Select a section heading to fold the section away or open it again. The filters, row actions and bulk bar work inside each section as they do in the list.
The Heatmap view
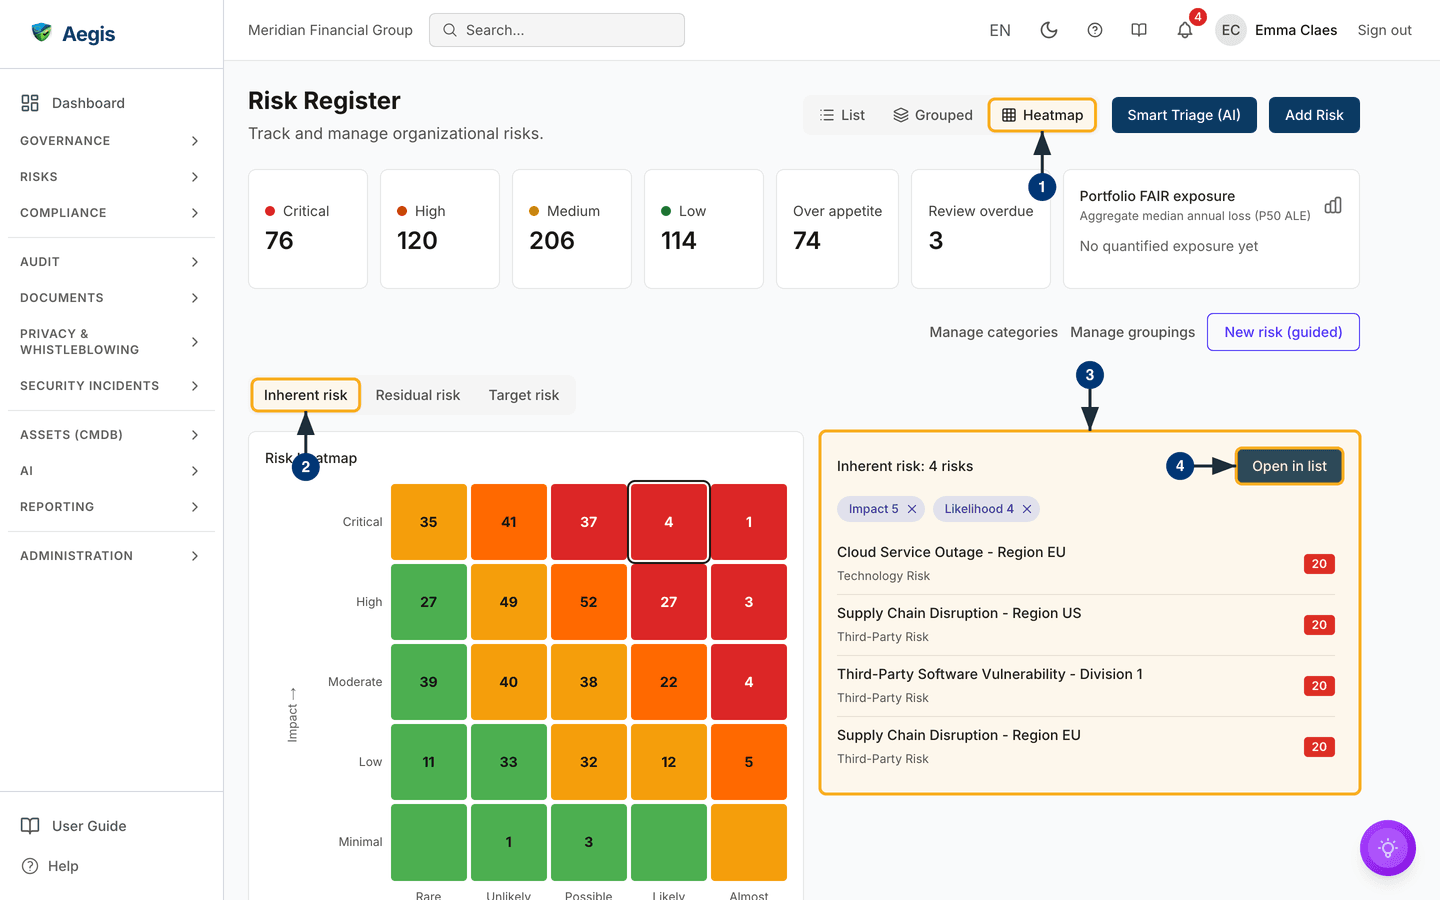
Heatmap replaces the table with the impact × likelihood grid of the
whole register. Each cell shows how many risks sit in it on the chosen score
basis, and the heatmap ignores the list filters, so a link or tile that carries
a filter opens the List view instead.
-
Select
Heatmapin the view switch. The summary tiles stay; the grid replaces the table. -
Choose the basis:
Inherent risk(before any action),Residual risk(after the actions already delivered) orTarget risk(once every planned action is done). The counts move to the cells of that basis. -
Select a cell. It is outlined, and the panel beside the grid names the basis
and the count —
Inherent risk: 4 riskson the captured screen — showsImpactandLikelihoodchips (each with a×to drop it) and lists every risk in the cell with its score, most severe first. Select a risk title to open it. -
Select
Open in list. The List view opens filtered on exactly that basis and cell, so the number of rows equals the number in the cell; remove the cell chip above the table to return to the full register.
Empty, no-result and error states
-
An empty register says no risks are registered yet and offers
Add RiskandImport; a Viewer instead reads that a risk manager can add or import them. -
When the filters match nothing, the register says so and offers
Clear filters. -
If the register cannot be loaded, a red message explains it and
Retryloads it again without leaving the page.
On a phone
Below tablet width the table becomes a list of cards. Each card shows the title
and category with the row actions beside it, the status and residual badges, and
the owner and next review date. At 390 px nothing scrolls sideways; the filters
and More filters panel are the same as on a desktop.
Adding a risk in three steps
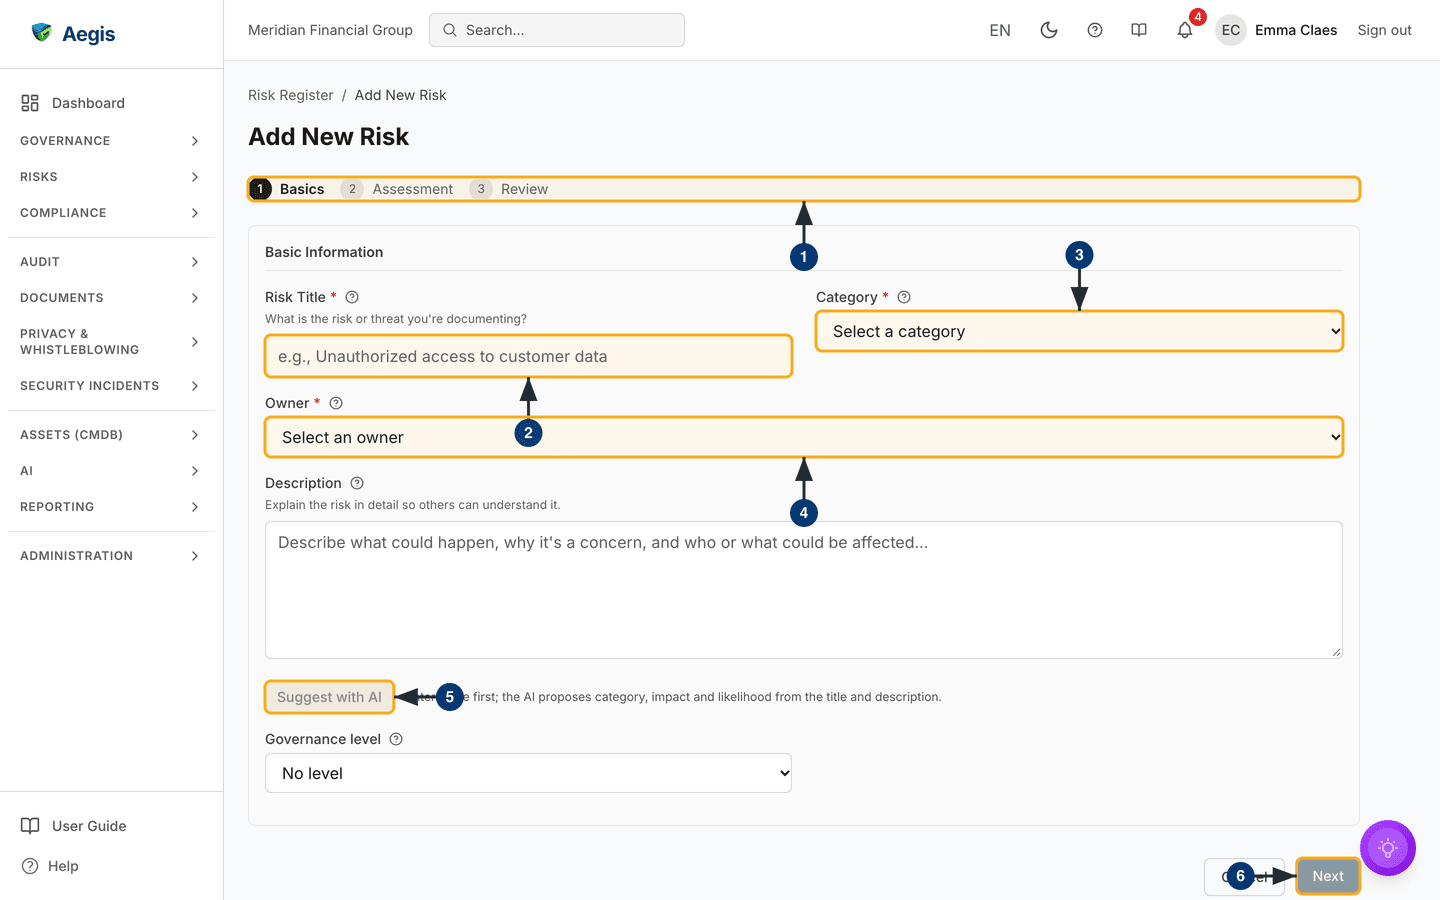
Add Risk opens Add New Risk on its own page. A
step bar at the top reads Basics, Assessment and
Review; Back keeps everything you typed.
New risk (guided) above the register still opens the longer
methodology wizard for organisations that score per impact dimension.
- The step bar shows where you are: the current step is filled in, the later ones are grey. Only the current step's fields are shown, under Basic Information on the first step.
-
Type the
Risk Title— what could go wrong, in one line. It is required; theDescriptionfurther down the form is optional. -
Choose the
Category, which is required. Its risk appetite is what the score is judged against later. -
Choose the
Owner: the person accountable for the risk. Creating a risk never hands you the right to accept it, so who you may name depends on that right. If you hold risk-acceptance authority (a Manager or Admin by default), the field starts onMeand you may leave it there. Anyone else — a Contributor, as on the captured screen — seesSelect an owner, must name someone else, and is not offered their own name. -
Optionally select
Suggest with AI(see The AI assists below). It stays inactive until there is a title, and the line beside it says so. Below it,Governance levelstarts onNo level. -
Select
Next. With a required field still empty,Nextstays inactive: selecting it frames the missing field in red and readsComplete the required fields to continue.You stay on the step.Cancelbeside it leaves without saving.
Assessment and Review
-
On Assessment, choose an impact and a likelihood on the
methodology's scale (1 to 5 on the standard grid). The score preview
multiplies them as you choose and says whether the result is within the
category's appetite. Until both are chosen,
Nextis refused withChoose an impact and a likelihood to continue.The same step holds an optionalLikelihood rationale(why you chose that likelihood) and theTreatmentdecision, which starts onNot decided; once you choose a treatment, itsJustificationis required. -
On Review, check the summary of both steps and, if you
want, set the
Next Review Date. Then selectCreate risk. The risk opens on its own page with statusOpen. The owner, when it is not you, gets a bell notification and an e-mail saying the risk was assigned to them; the same happens to the new owner whenever the owner is changed later.
Importing and exporting the register
-
Select
Import, thenDownload templateto getrisk-import-template.xlsx. Fill it in outside Aegis. OpenColumns and accepted valuesin the dialog for every column's exact header, whether it is required, the values it accepts and an example; a.csvupload must use the same headers on line 1. -
Attach the completed file —
.xlsxor.csv— and selectValidate. Aegis reports how many rows are valid and lists each problem by row number, without writing anything. -
Select
Import n valid row(s)to write them; only rows with no errors are imported. The dialog reports how many risks were created and updated, and the register refreshes behind it. -
To update risks in bulk, fill in the
Risk IDcolumn: it is the first column of an Excel or CSV export. A row with a Risk ID updates that risk instead of creating one. Only the cells you fill in change, blank cells keep the stored value, and the scores are recalculated.Validateshows how many rows will be created and how many updated; an unknown or repeated Risk ID is reported as a row error. -
For the other direction, select
Export registerand chooseExport as ExcelorExport as CSV; the export honours the filters currently applied. Exporting needs the risk export permission, which Manager and Admin hold by default; without it the button is not shown. For a hand-picked set, tick the rows and useExporton the bulk bar, which downloads a CSV of only those risks.
Working on a risk: the detail page
All work on a risk happens on its own page; there is no edit dialog. A
breadcrumb leads back to
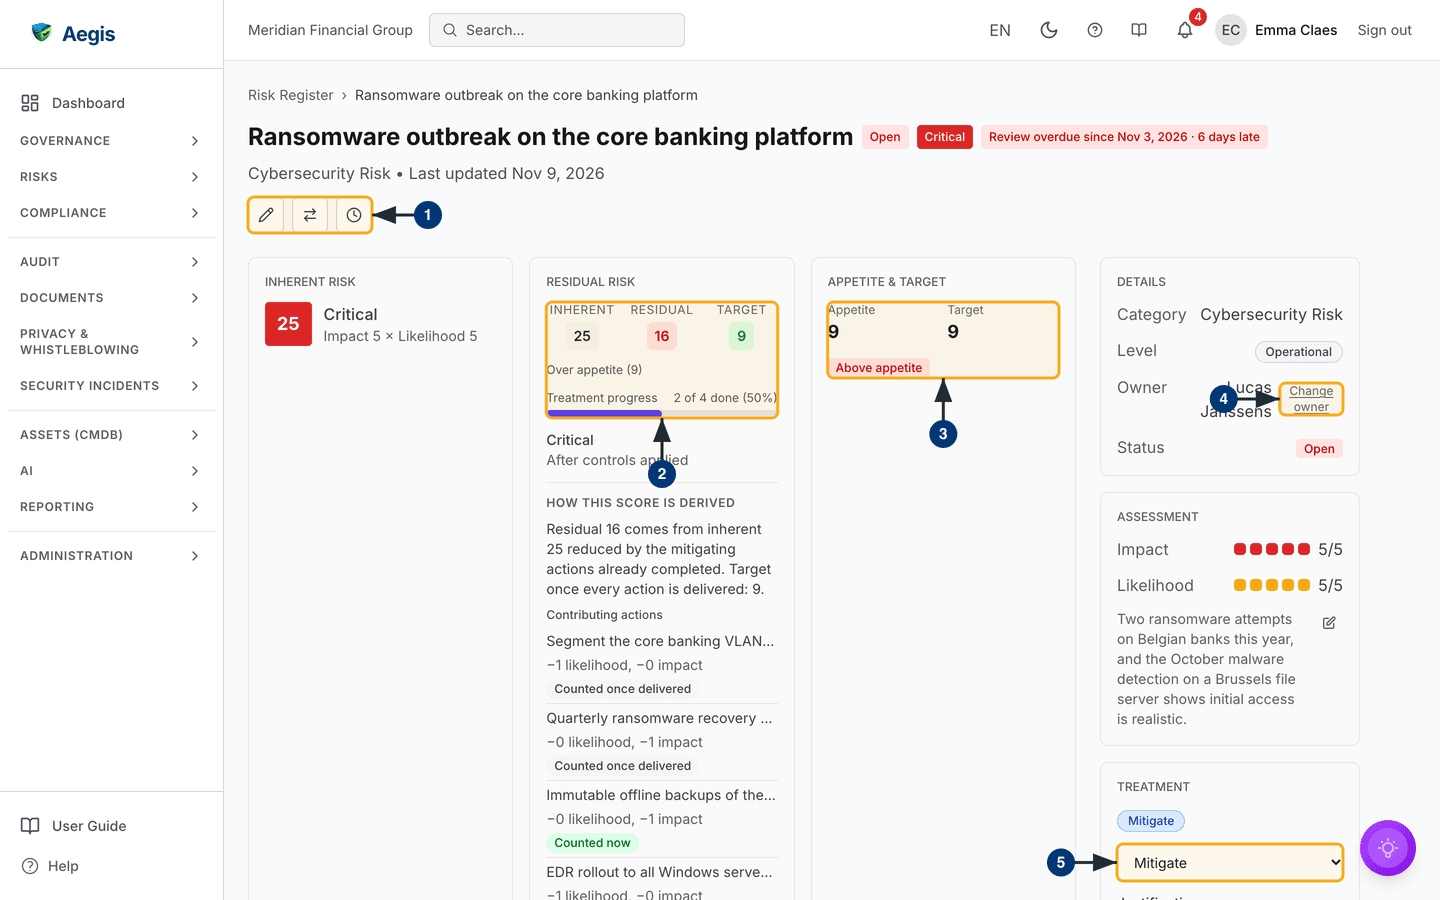
Risk Register. The title line carries the status chip, the
severity badge and the review chip, and the line beneath names the category and
when the risk was last updated. Three score cards run across the page:
Inherent Risk (the score in a coloured block, its band and the
Impact × Likelihood it comes from),
Residual Risk and Appetite & target. The
right-hand column stacks Details (category, level, owner with
Change owner, status), Assessment (impact and
likelihood as dot scales, with the likelihood rationale beneath),
Treatment and Dates (created, updated and next
review).
- The icon buttons under the title edit the risk (the pencil), change its status (the two arrows) and confirm a review (the clock). When AI is configured for your organisation, a sparkle icon after the pencil jumps to the AI enrichment; the captured screen, from an installation without AI, does not show it. A Manager also sees export, which downloads this one risk as a CSV file, and delete. Hover a button to see its name; a Viewer sees no buttons at all.
-
Residual Risk shows the inherent, residual and target
scores side by side, whether the residual is over appetite, the treatment
progress (for example
2 of 4 done (50%)) and How this score is derived. That explanation lists the contributing actions, each with the likelihood or impact points it removes and a tag:Counted nowonce its reduction is in the residual,Counted once deliveredwhile it only counts toward the target. The residual cannot be typed in: it moves when a mitigating action is delivered and attested, or when you correct the impact, likelihood or methodology. -
Appetite & target shows the category's appetite and the
score you reach once every action is done, with an
Above appetitemarker when the target is still above it. A category without an appetite says so. -
Select
Change ownerin Details to hand the risk to someone else. The new owner gets a bell notification and an e-mail, and the change appears in History asOwner changed. In Assessment, the pencil beside the likelihood rationale edits that text in place. -
In Treatment, the badge shows the current decision. To
change it, choose
Accept,Mitigate,Transfer,InsureorAvoid, write theJustification(required whenever a treatment is chosen) and selectSave & apply. When the methodology forbids a treatment for the risk's band, or needs a sign-off for it, the card says so; only the owner or a holder of sign-off authority can give that sign-off.
The tabs and the History tab
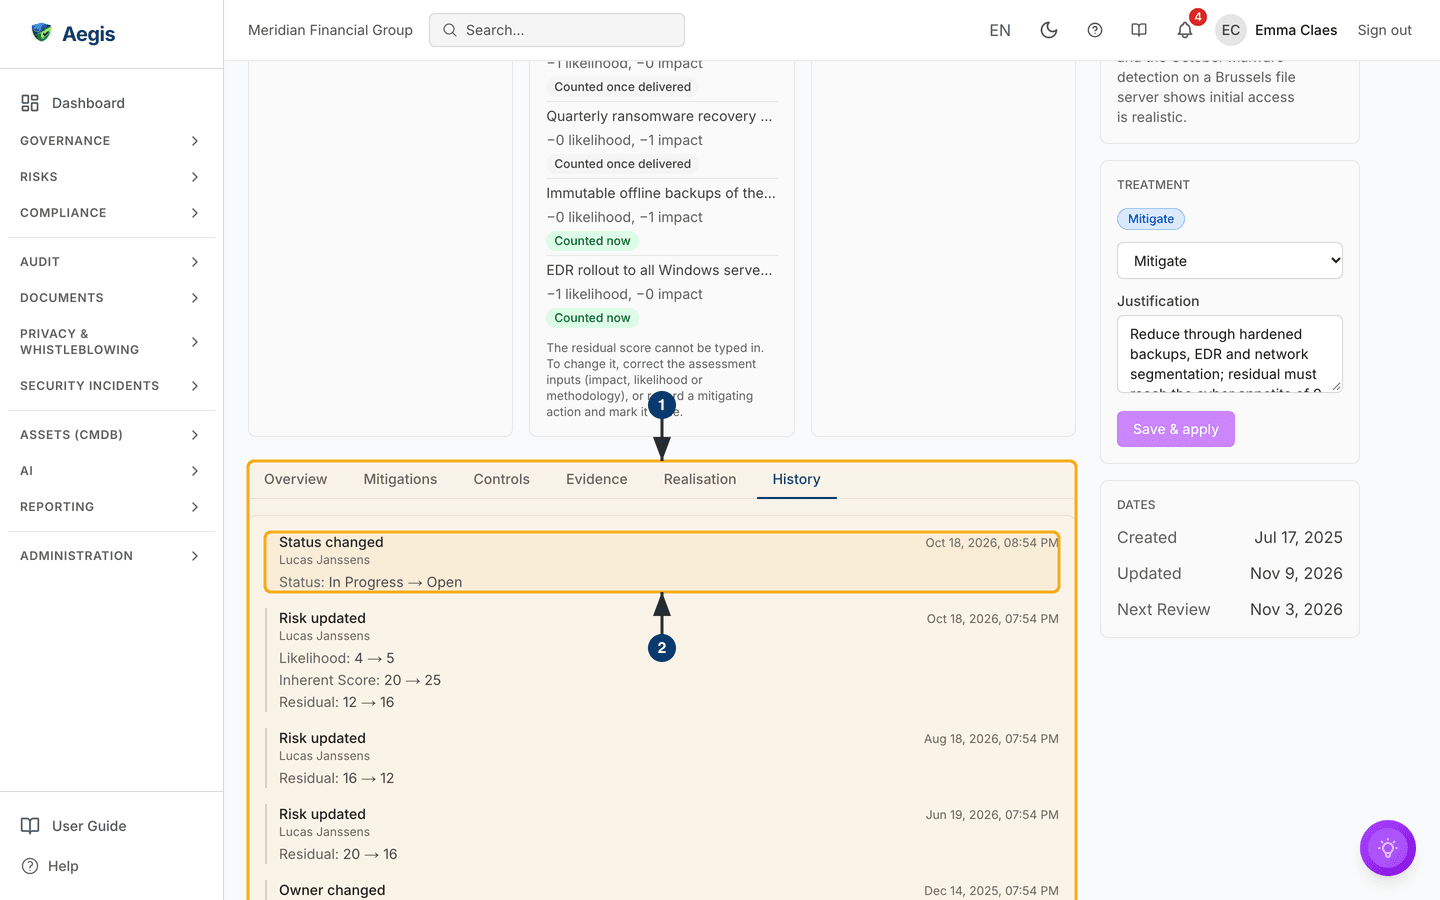
Below the score cards, the tabs — Overview,
Mitigations, Controls, Evidence,
Realisation and History — hold the working surfaces.
The three score cards stay above them on every tab, so a delivered action shows
its effect without switching back. The open tab is kept in the address as
?tab=, so a copied link opens on the same tab.
-
Select
History. Everyone who can see the risk can read its history. -
Each row is one entry of the audit log about this risk, newest first: what
happened (
Risk created,Risk updated,Status changed,Owner changed,Risk accepted, …), who did it and when, and the before and after values — on the captured screen, for example,Status: In Progress → OpenandResidual: 12 → 16. Edits of several fields at once show one line per field. Changes made by a workflow or by a Jira sync appear too, underSystemor the automation's name. An acceptance or a request for approval also shows its justification and review date.
Treatment and residual are separate records: the treatment says how you will handle the risk, residual what exposure remains. With no delivered and attested mitigating actions, residual equals the inherent score — so a residual matching the inherent number means the treatment work has not been captured yet.
Reviewing a risk on schedule
Every risk carries a Next review date. On the detail page the chip
beside the status counts down to it — due in 10 days,
due today or 8 days late — and once the date has
passed the chip turns red and reads Review overdue since the date
(6 days late on the captured screen). The register's
Next Review column shows the same date. Aegis follows the date up
for you:
-
Reminder. 14 days before the date the owner gets a bell
notification and a Risk review due e-mail with the status, the
actions done and a
Review this riskbutton. This also applies to an accepted risk. -
Escalation. When nobody has confirmed the review 7 days
after the date, every
Manager and
Admin gets an
Overdue risk review e-mail with
Open riskandAssign new owner; the second button opens the owner picker on the risk. - Each mail goes out once per review cycle, and whether it was sent, held for the digest or not sent is recorded in the audit log. Whether you receive it at once or in your daily digest follows your choices under Settings → Notifications.
- An Admin changes the two thresholds (14 and 7 days by default) under Settings, in the Risk review reminders card of the risk management settings.
To record that you reviewed the risk:
-
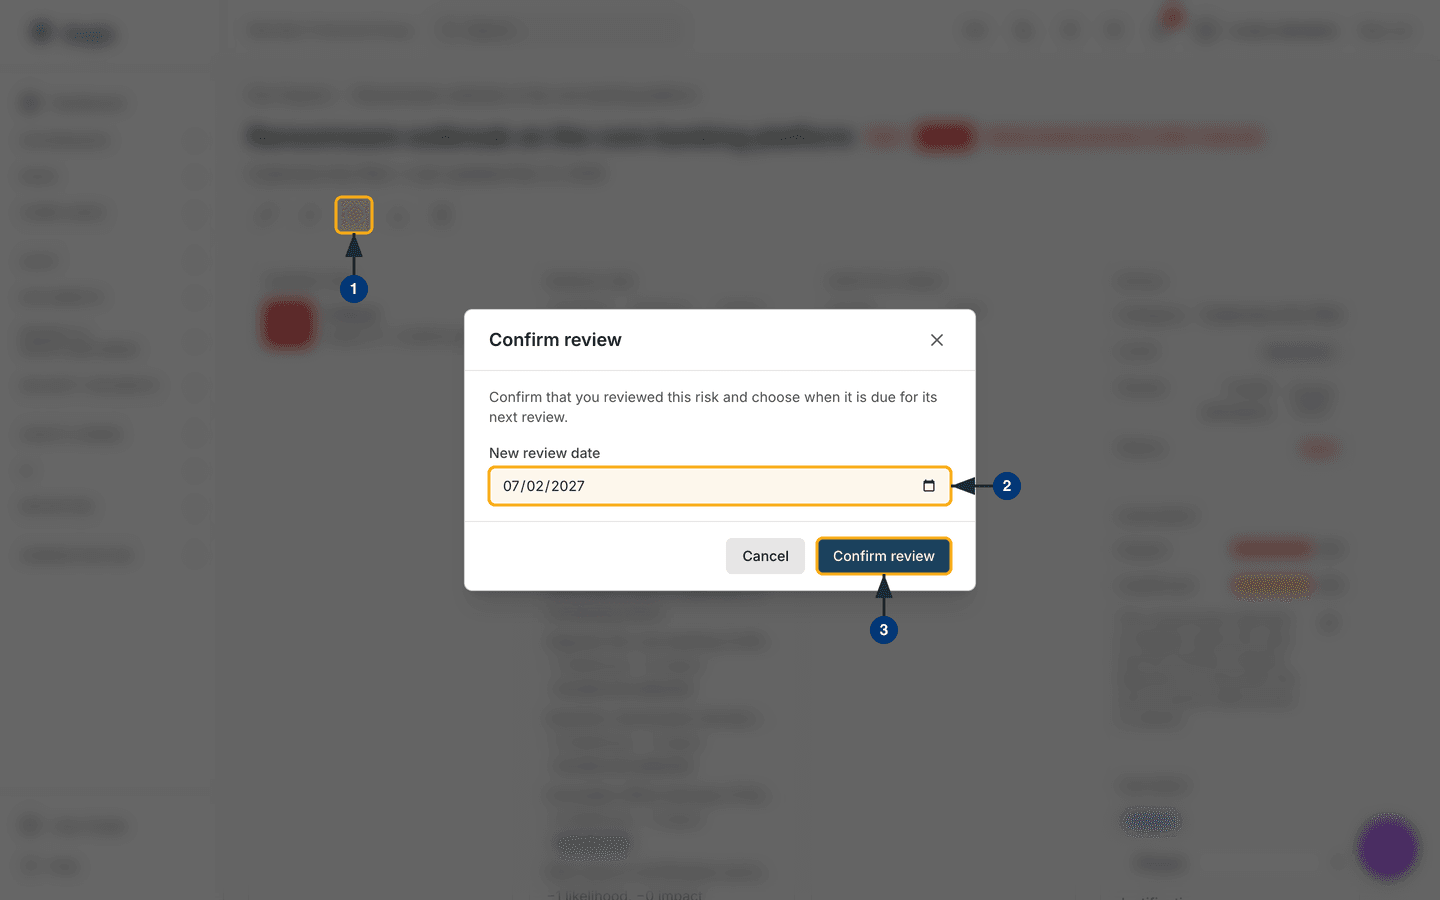
On the risk's detail page, select the clock icon,
Confirm review, in the action row. A dialog opens. -
Check the
New review dateunder the line asking you to confirm that you reviewed the risk. It is prefilled with today plus the length of the risk's last review cycle, or one year for a risk never reviewed before. The date must lie in the future; today or an earlier date is refused with a message under the field. -
Select
Confirm review(orCancelto leave the date as it was). AReview confirmedmessage appears, the chip counts down to the new date and History records the confirmation with the old and the new date. The reminder and the escalation start again for the new date.
A passed review date never changes a risk's status. An accepted risk stays
Accepted: its owner gets the reminder and the managers the
escalation, and confirming the review only moves the date.
Moving risks to another methodology
Every risk is scored under one methodology. A risk created without one, by any route, is stored under your organisation's default methodology, and risks recorded before that rule are linked to the default too. To move risks to a different methodology:
-
Tick the risks in the register and select
Change methodologyon the bulk bar. A dialog opens. -
Choose the methodology and select
Change methodology. The risks are linked to it; their scores are not changed. -
Read the notices that follow. A risk whose impact or likelihood is above the
new methodology's levels (a 5 on a 4 × 4 grid, for example) is flagged
Needs re-assessment, in the register and as a notice on its detail page. An accepted or signed-off risk moves only when you are its owner or hold risk-acceptance authority; the others stay where they were and are counted in a warning.
Re-assess a flagged risk through Edit on its detail page. The
methodologies themselves are kept under Risk Methodologies at
/risks/methodologies, where Levels per axis sets a
grid of 3 × 3, 4 × 4 or 5 × 5. Changing
the number of levels resizes both scales and rescales the score bands; existing
risks keep their scores.
Status, acceptance and exceptions
A risk moves through the statuses Open, InProgress,
Mitigated and Accepted; the status panel behind the
change-status button offers only the valid moves. Accepting is a formal act: the
risk goes on the exceptions register with
who accepted it, when, why and until when. Every status change — on the page, in
bulk, by a workflow or by a Jira sync — is written to the audit log and shows in
the risk's History.
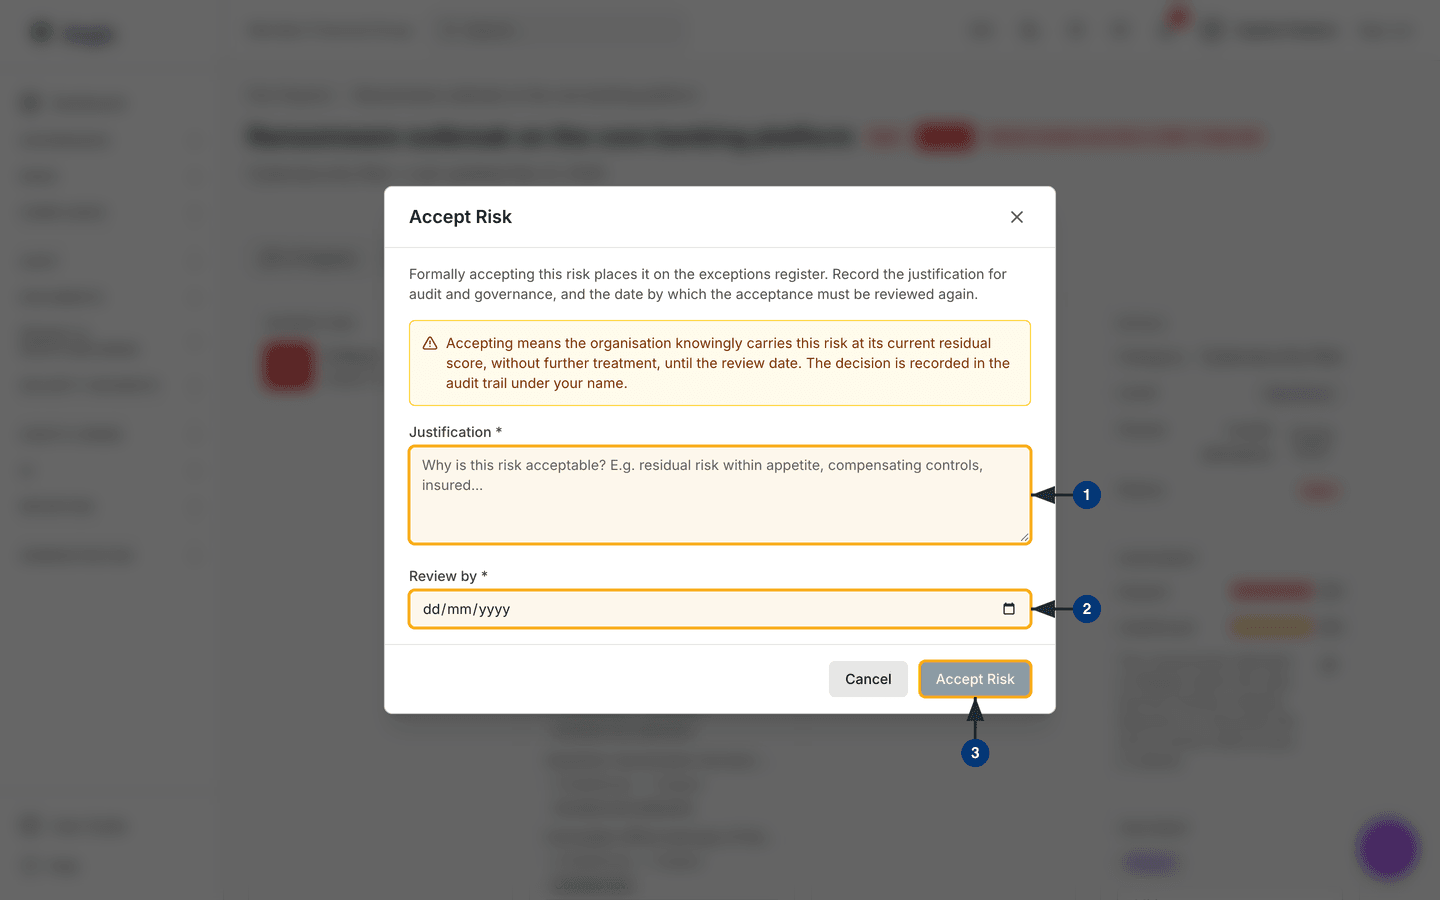
To accept a risk, select the change-status button and then
Accepted in the status panel. The
Accept Risk dialog opens with a short explanation and a yellow
warning: accepting means the organisation knowingly carries the risk at its
current residual score, without further treatment, until the review date, and
the decision is recorded in the audit trail under your name.
-
In Accept Risk, write the
Justification: why the organisation can carry this risk as it stands. It is required. -
Set
Review by: the date, today or later, by which the acceptance must be looked at again. It is required too. -
Select
Accept Risk. It stays inactive until both fields are filled. The same rule applies when you accept several risks at once from the bulk bar.
Above the risk appetite: Request approval
The owner of a risk may accept it only while its residual score is within the
appetite of its category. Above the appetite — or when the category has no
appetite set — a
Contributor sees
Request approval instead of Accepted in the status
panel. The same dialog asks for the justification and review date and sends the
request to the managers; the risk stays Open and the request
appears in its History. A
Manager or
Admin opens the risk, selects
Accepted, finds the requested justification and review date already
filled in, and confirms.
When the review date passes, an accepted risk stays Accepted: it
does not reopen by itself. It counts as review overdue on the register until
someone reviews the acceptance.
The AI assists
Seven AI features touch this module, all advisory. Smart Triage ranks the top ten of your open and in-progress risks by severity, overdue review and residual exposure, then narrates that order: Aegis computes the ranking and the model may not reorder it. Enrich with AI returns threat context, related CVEs, suggested mitigations and control recommendations. AI treatment plan proposes new mitigating actions, each with an estimated likelihood or impact reduction; creating one is a separate step you take. Review (AI) comments on an acceptance justification and its review date.
-
Suggest with AI, in
Add risk, proposes the category, impact and likelihood from the title and description you typed, with a one-sentence rationale. The fields it fills are marked as an AI proposal until you change them, and nothing is stored until you selectCreate risk. -
Suggest mitigations, on the
Mitigations tab of a risk, proposes up to three
mitigations, each linked to one of your controls. Select
Addto turn one into a mitigating action orDismissto drop it;Closeleaves everything as it was. - What changed since the last review is a short summary in the reminder e-mail, written from the risk's history and the status of its actions. It is labelled as AI-generated and only appears in a reminder that is e-mailed at once, not in a digest.
Each of the three shows the model it used and the information it worked from, as the other AI features do. Each click costs one AI credit when it returns a proposal, and the reminder summaries cost one credit per daily run, however many risks are due. None of these features change a risk's status, score or treatment on their own, and the two briefings leave a trace only if you save them as a record — a person reviews the output and decides.
Tips and limits
-
Impact and likelihood are changed through
Editon the detail page, which opens the risk's edit form at/risks/{id}/edit; the dot scales on the detail page itself are read-only. -
The Heatmap view plots every risk in the register, not only the current page
of the list, so its cell counts match what
Open in listshows. -
Levelis the governance altitude —Strategic,TacticalorOperational;Groupingsholds values such as business unit or department.Manage groupingsleads to the types behind that column; the values must exist before you can assign them. - Deleting a risk (Managers and above) asks for confirmation. It is a soft delete: the risk leaves the register, the row is kept for the audit trail, and the policies, evidence and controls it was linked to are untouched.
Where this connects
Risks are treated using Policies and proven with Evidence, linked through controls in Compliance frameworks. The sources behind a risk live in Threat actors, accepted risks in the Exceptions register, follow-up work in Action items, and supply-chain risk in Vendors. When a risk materialises, record it in Incidents — the incident response scenario follows one from register to report.