Scenario: an ordinary working week
You are not on the compliance team — Aegis touches your week three times: a policy to acknowledge, a training course to complete, and once, perhaps, a concern to report.
This chapter follows Tomas, a logistics planner. He does not write policies, score risks or prepare audits, and most weeks he never opens Aegis at all. But a compliance programme only works if everyone plays their small part, and three of those parts land on ordinary staff: confirming you have read the rules, completing security training, and speaking up when something looks wrong. Each takes minutes, and this chapter shows exactly where each one happens.
Who you are in Aegis
Most staff who sign in for these duties hold the Viewer role — enough to read every approved policy and acknowledge it — or Contributor if their job also involves logging incidents or uploading evidence. Many employees have no Aegis account at all: the training itself runs in your organisation's training platform, and reporting a concern deliberately needs no sign-in. Some organisations also send people without an account a personal read link by email, so they can read a policy and confirm it without signing in (see the tips below). If you have been asked to acknowledge a policy but cannot sign in and have no read link, ask your administrator for an account — What each role can do includes a table of which role fits which job.
What's on this screen
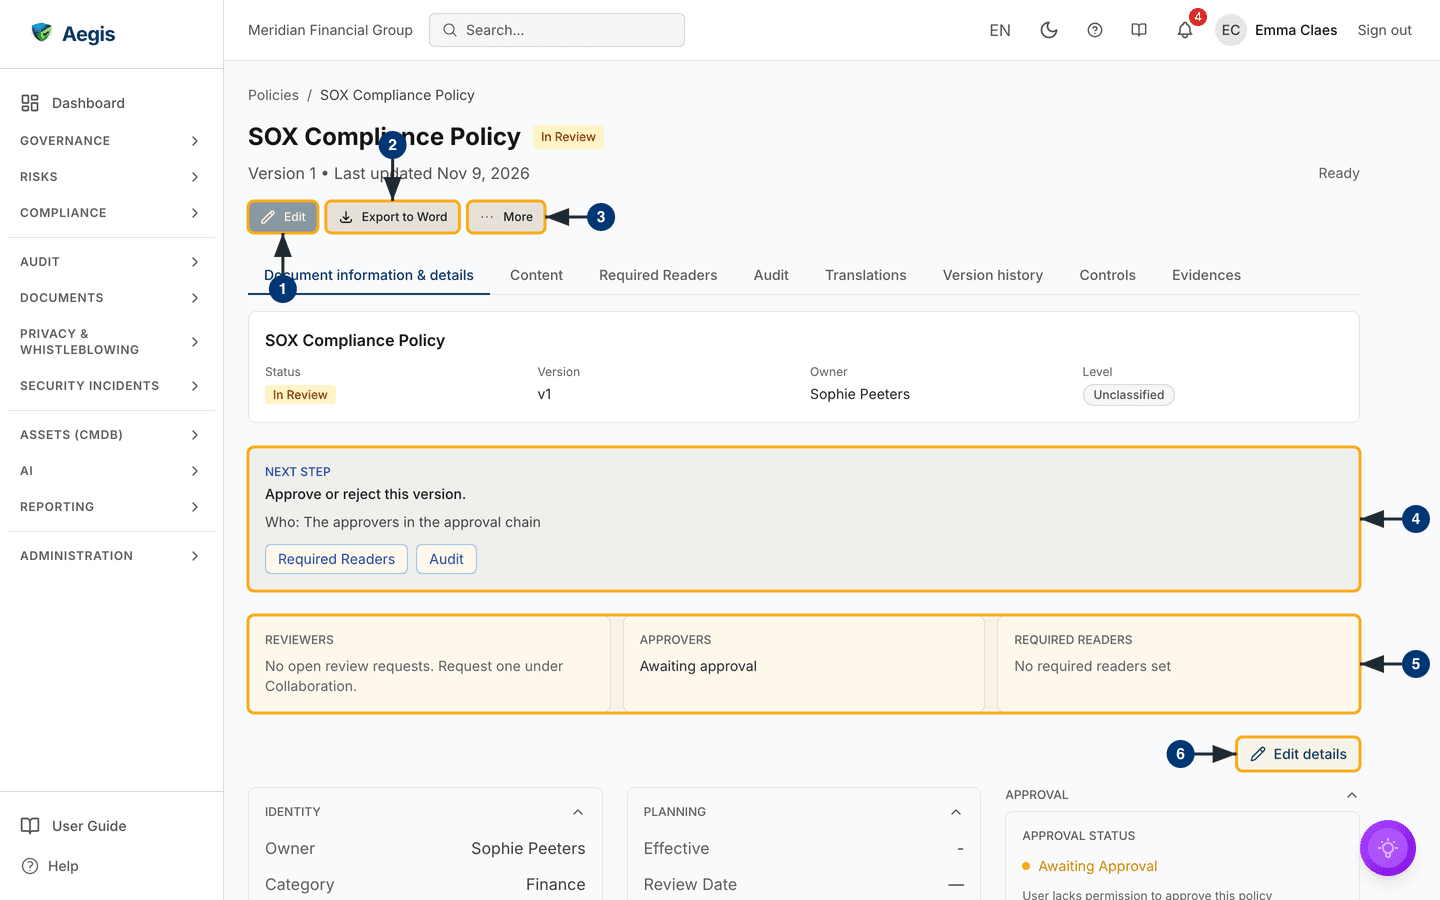
Most of Tomas's week in Aegis happens on one screen: a policy's own page. The
capture below was taken as a
Contributor on a policy that
is still In Review, so it shows a little more than a Viewer sees.
From the top: a breadcrumb back to Policies; the policy title with
its status badge; the version and the date it was last updated; a toolbar; and a
row of tabs — Document information & details,
Content, Required Readers, Audit,
Translations, Version history,
Controls and Evidences. The capture is open on the
first tab, which starts with a summary band (Status,
Version, Owner, Level) and ends with
collapsible Identity, Planning and
Approval cards. The numbered marks on the figure follow the list
below.
-
Editappears only to people who may change the policy, and only works while it is aDraft. A Viewer does not see it at all. -
Export to Wordis there for everyone. Selecting it downloads a Word copy of the policy — handy for reading offline, though the acknowledgment itself still happens in Aegis. -
Moreopens a short menu of further actions. What it holds depends on your role and the policy's status; most of it is for the people who write and approve policies. -
The
Next steppanel says what must happen to the document now and who must do it — on the captured screen, "Approve or reject this version", by the approvers in the approval chain. ItsRequired ReadersandAuditbuttons jump straight to those tabs. -
Three tiles —
Reviewers,ApproversandRequired Readers— summarise who is involved. The last one tells you whether the policy names people who must read it; on the captured screen it reads "No required readers set". -
Edit detailsopens the details for editing. LikeEdit, it is shown only to people who may change the policy.
Task 1 — Read and acknowledge a policy
A new travel policy has been approved, and Tomas is asked to confirm he has read
it. If the policy owner has named him as a required reader, Aegis tells him
itself: when he is added to the list, and again each time the policy is
re-approved, a notification arrives — in the bell at the top of the screen and,
depending on his
notification settings, by email — linking to
his own To read list. Otherwise the request reaches him from a
manager, with a link to the policy. Once a policy is Approved,
every signed-in person can read it, whatever their role.
-
Open the policy. Follow the link in the notification or
email, or open the
Compliancegroup in the left menu and choosePolicies. The policy register appears; type the policy's name intoSearch policies…and selectSearchto narrow the table. Selecting a row opens the policy on itsContenttab; the policy's title and the eye icon at the end of the row open it onDocument information & detailsinstead. -
Read the policy on its
Contenttab. The acknowledgment is a formal record that you read and accepted this version, so read it before you confirm — the audit log keeps the timestamp. -
Open the
Audittab and find theRead Bysection. It lists who has acknowledged this policy so far, each with the version they confirmed and the date and time. If the policy names required readers, aMust Readsummary shows how many of them have acknowledged, in the form "n of m acknowledged". The per-person list behind it — a green tick or an amberOutstandingbadge for each name — is shown only to people who may edit the policy. -
Select
Mark as Read. The button showsMarking...briefly, then a green line appears — "You have acknowledged this policy" — and your name joins the list with the date and time. That is the whole job; the button does not return for this version. Your IP address and the kind of device you used are stored with the confirmation as evidence.
Acknowledgments belong to the version you read. When the policy is revised
and re-approved, the round starts again: your earlier confirmation is marked
as belonging to an older version, a line explains that the policy "has been
approved again since you confirmed it", and the button returns as
Re-confirm as Read. Being asked twice about the "same" policy
is the system working as designed, not a mistake.
Task 2 — Complete your security training
The annual security-awareness course arrives by email from your organisation's
training platform — KnowBe4 is a common one. The course itself runs there, not
in Aegis: you follow the link, watch the material, answer the quiz. Aegis is
where the result lands, as a completion record the compliance team can
show an auditor. When the compliance team has assigned the training to you
through a campaign in Aegis, you also have a page of your own for it:
My Training, in the Governance group of the left menu,
open to every role including Viewer. It appears only when your organisation has
the Security Awareness module and licence; without them, follow the email from
the training platform.
-
Open
My Training. It lists only your own assignments, each with its campaign name, a status badge and its deadline (or "No deadline"). With nothing assigned it reads "You have no training assigned." -
Select
Open course, where the row offers it, and complete the course in the training platform before its due date. The course opens in a new browser tab. -
Back in Aegis, select
I completed this. AConfirm completiondialog opens with an optionalScore (optional)field. SelectConfirm: "Your completion has been recorded." appears, the row turns toCompletedwith the confirmation date, and the button disappears. Nobody can confirm on somebody else's behalf, whatever their role.
If your organisation imports results from the training platform instead, there
may be nothing to confirm on My Training. To check that a result
was recorded, a Contributor can open Security Awareness in the same
group: the Training tab lists each course, person, status and
score; type your name into Search training records... and select
Search. A row reading Completed is your proof. If the
row is missing, records may arrive on the next sync — ask whoever runs the
training if it has not appeared after a few days.
An overdue course is worth taking seriously: Aegis reminds people whose training
is about to fall due or already overdue, the compliance team sees it on their
side as an overdue record and a higher High-Risk Users count, and
unfinished training is one of the findings auditors raise most often. The full
reference for this screen is
Security Awareness.
Task 3 — Report a concern
Months later, Tomas notices invoices that do not add up. His organisation's whistleblowing channel runs on Aegis, and it is built so that using it costs him nothing: no sign-in, no name unless he chooses to give one, and legal protection from retaliation under the EU Whistleblower Directive (the European law that requires a safe internal reporting channel).
-
Open the reporting link your organisation published — on
the intranet, a staff notice, or a contract. It leads to a standalone page
headed
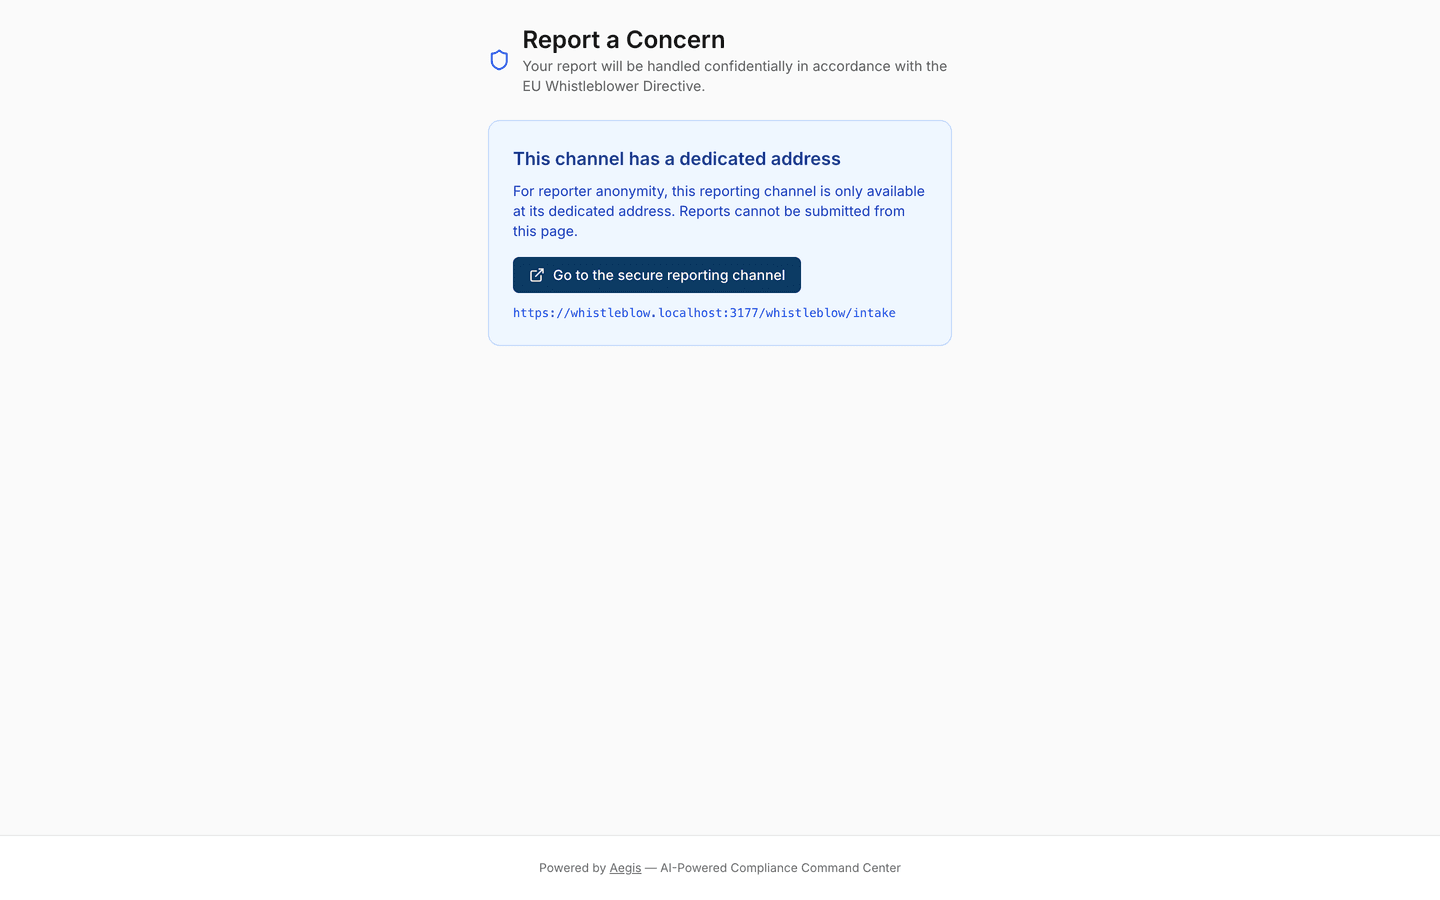
Report a Concern, on its own dedicated web address, with none of the usual Aegis navigation. If you are signed in,Report a concernin thePrivacy & Whistleblowinggroup of the left menu gets you there too: it first shows a panel headed "This channel has a dedicated address", because reports cannot be submitted from inside Aegis, and itsGo to the secure reporting channelbutton takes you to the right address. You may prefer to open it on a personal phone; that is a supported and sensible choice. -
Choose a
Category, describe what happened, and decide about your identity. The categories run from fraud and harassment to data protection and corruption, withOtherfor anything else. Describe the situation underWhat happened?— dates, places and the people involved help the handlers. TheYour identity (optional)panel may be left entirely blank to stay anonymous; if you do fill it in, it is stored encrypted. -
Select
Submit Report, then save the case number and recovery code shown on the confirmation panel.Copy to clipboardcopies both. The recovery code appears once and is never shown again — it is your only way back to the case, to follow its status and answer the handlers' questions. If you try to leave before saving them, Aegis asks "Leave this page?" first.
The step-by-step reference — including how to check your report later and what each status means — is Report a Concern. What happens on the receiving side is covered in Whistleblowing; the handlers see the case, not the reporter, unless the reporter chose otherwise.
Tips and limits
-
Acknowledging a policy in Aegis needs either a signed-in account or a
personal read link; reporting a concern needs neither. With a read link you
read the document, select
Send code, enter the six-digit code emailed to you and selectConfirm— a link alone is never enough to confirm. How those links are issued is covered in Access from outside Aegis. If you have neither, the acknowledgment is being collected another way — ask your manager. -
Procedures can carry the same
Read Byconfirmation as policies — the flow is identical, on the procedure's own page (Procedures). -
Your personal list of reading obligations is
To read, in theDocumentsgroup of the left menu. It shows the approved policies and procedures you must read, with chips forTo read,ReadandAll, each row's status and any deadline; each row links to the document. It appears only when your organisation has the Documents module switched on — without it, the notification or the link from your manager is the thing to work from (Compliance documents). - A concern about a security event you witnessed at work — a lost laptop, a phishing email you clicked — is usually an incident, not a whistleblowing case. Report it to your IT or security contact straight away; speed matters more than the channel.
Where this connects
The screens visited here have full references: Policies, Security Awareness and Report a Concern. If your duties grow into drafting documents or logging incidents, What each role can do explains the role to ask for, and the How do I…? index finds the right chapter for any other task. Terms glossed in brackets are collected in the glossary.